This is the second of a two-part article explaining two security features in Windows Server 2012 (WS2012 and later) Hyper-V networking, DHCP Guard and Router Guard.
The previous article, Hyper-V Router Guard and DHCP Guard Explained, introduces and outlines these two security features. Hyper-V administrators can use these features to prevent guest OS administrators from using their virtual machines as rogue routers or DHCP servers on the network.
This article covers how to properly enable these services.
Network Security is Not a Default Setting
One might think that a feature that prevents rouge network services should be on by default. As an admin, I know that I would prefer one that was. However, DHCP Guard and Router Guard are not enabled by default. There are three possible reasons for this that I can think of:
- Performance: Performance: According to Ben Armstrong of Microsoft, “Router guard does have a relatively minimal impact on performance”. He says the same of DHCP Guard.
- The Requirement: Regarding DHCP Guard being off by default, Ben says that “Given that most virtual machines are not running DHCP servers, it is not enabled by default as it is not needed”. He repeats that message for Router Guard.
- Self-Service Networks: Microsoft engineers products with cloud deployments as their intended solution. In a true cloud, a tenant provisions their own network. Those networks are isolated and are under the control of the tenant. Maybe the tenant wants to enable DHCP or router services, and doesn’t want to open a helpdesk ticket with the cloud administrators to do this. In that case, the current default of leaving DHCP Guard and Router Guard not-enabled makes sense.
Enabling DHCP Guard and Router Guard
There are a number of questions to ask before enabling either. How to do it, can they be deployed quickly to several virtual machines? Can you configure new default settings?
Most Hyper-V hosts are underutilized in terms of processor so “minimal” performance impacts are not a big deal when weighed against the protections offered by these features.
Hyper-V Manager and Failover Cluster Manager
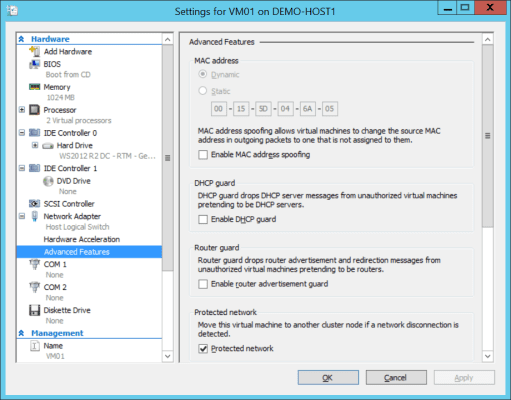
You can quickly enable or disable DHCP Guard and Router Guard by editing the settings of a virtual machine in Hyper-V Manager or Failover Cluster Manager. First, expand the network card and browse into Advanced Features. You will see check boxes for enabling DHCP Guard and Router Guard. Both boxes will be unchecked by default. Check either or both boxes to prevent this virtual NIC from offering DHCP and or router services.
Enabling Router Guard and DHCP Guard in a virtual machine
Using PowerShell
You might have read the previous article and thought, “I’d like to disable these services on all of my virtual machines, and maybe enable DHCP on two virtual machines”. You can use PowerShell to quickly make the changes and prevent a work-related injury caused by clicking through the settings of hundreds of virtual machines.
This first line will enable Router Guard and DHCP Guard on all virtual machines:
Set-VMNetworkAdapter * -DhcpGuard On -RouterGuard On
You can then disable DHCP Guard on selected virtual machines:
Set-VMNetworkAdapter VM01 -DhcpGuard Off
You can configure dozens of virtual machines on a host with a few lines of code!
What if you have a virtual machine that has multiple NICs and you want to disable the services on just one NIC? This PowerShell function that will do that:
Function EnableGuardServices ($TheVM, $NICNumber)
{
$NICs = Get-VMNetworkAdapter $TheVM
Set-VMNetworkAdapter -VMNetworkAdapter $NICs[$NICNumber] -DhcpGuard On -RouterGuard On
$DHCPStatus = $NICs[$NICNumber].DhcpGuard
$RouterStatus =$NICs[$NICNumber].RouterGuard
Write-Output "The $NICNumber NIC on $TheVM now has DHCP Guard $DHCPStatus and Router Guard $RouterStatus"
}
# Run the function
EnableGuardServices VM01 0
Enable DHCP Guard and Router Guard by Default
You might have a policy that says that network services such as DHCP and routing are disabled by default and to enable them, the tenant or user must open a helpdesk ticket. In this case it would be best to deploy virtual machines with the guard features enabled by default. There are some orchestration tools that could do that. You could run some PowerShell as part of a System Center Orchestrator runbook. You could use Service Management Automation (SMA) to run PowerShell cmdlets as a part of the workflow. You could also use the features of System Center Virtual Machine Manager (SCVMM) to enable these features by default.
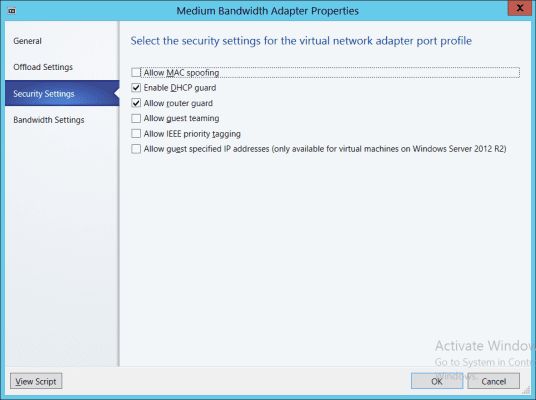
When a virtual machine template is created, a virtual NIC is typically added in the hardware specification. You can configure the virtual NIC to have a specific port profile. A port profile is normally used to define quality of service (QoS), but it can be used to configure advanced virtual NIC features, as shown below.
Enabling DHCP Guard and Router Guard using System Center Virtual Machine Manager
Any virtual machine created from a template that uses such a customized port profile will be prevented from advertising itself as a DHCP server or router by default. You can always change these settings later if required but your network will be secure from rogue guest OS administrators without much additional effort. As Ben Armstrong noted in his posts, not many virtual machines will legitimately run these roles so few customizations should be required.


