Deploying VNet-to-VNet VPNs in Azure
In a recent Petri IT Knowledgebase article, I explained what a VNet-to-VNet Virtual Private Network (VPN) connection was and why you might deploy one in Microsoft Azure. In this step-by-step guide, I’ll show you how to deploy a VNet-to-VNet VPN connection using two VNets in two different regions.
My Microsoft Azure Environment
First I will explain my environment, and then I’ll show you how to create the VNet-to-VNet VPN connection. I have deployed two VNets in my Microsoft Azure subscription:
| VNet Name | Region | IP Address |
| NorthEurope1 | North Europe (Dublin, Ireland) | 10.2.0.0/16 |
| WestEurope1 | West Europe (Amsterdam, Netherlands) | 10.3.0.0/16 |
Each virtual network has one or more virtual subnets with the /24 subnet mask. I need to make sure that my VNets do not have overlapping IP addresses to allow routing, as a VPN connection will fail if they do overlap. I can also create site-to-site VPN connections from my on-premises network(s) to my connected VNets. I also need to avoid overlapping address ranges between the “sites” in this scenario.
I am going to connect the two VNets, which are in two different regions, together using a VNet-to-VNet VPN to enable routing between the two otherwise isolated virtual networks.
Create a Temporary Local Network
A local network defines a remote network that a VNet will accept VPN connections from. We’ll be creating a local network for each VNet to enable connectivity to the other VNet. Part of the description of a local network is the publicly visible virtual IP address of the virtual network, also known as the gateway IP address. We can’t get that address until we create a gateway for each VNet, and we can’t create a gateway until we configure the remote local network in each VNet. So, which comes first in this chicken and egg riddle? The local network or the gateway?
The answer is that we’ll create a temporary local network with a made up gateway IP address. We’ll use this to enable VPN connectivity into each VNet. Once that’s done, we can create the gateway in each VNet, record the gateway IP addresses, and use that information to create the correct local networks. Phew! It sounds like a lot of work, but this will all make sense if you try it for yourself.
Click New > Network Services > Virtual Network > Add Local Network in the Microsoft Azure portal to create a new local network.
Creating a local network in Microsoft Azure (Image: Aidan Finn)
Name the local network something, such as “Temp”, and enter any random IP address as the VPN Device IP Address of this temporary network. On the second screen, enter a local IP address range of a network that you do not use.
Assign Temporary Local Network
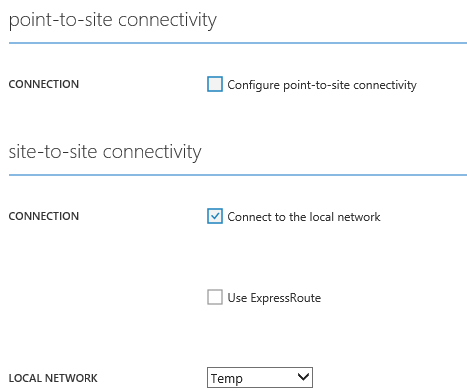
The next step is to edit both of your virtual networks, one at a time. Open the properties of each virtual network, click Configure, and check the Connect To The Local Network box under Site-To-Site Connectivity. Save the change, and make sure that you repeat this action for the second VNet.
What you’ve done here is configured the VNet to allow connections from the network and VPN device IP address specified in the local network. Yes, it is a temporary local network, and we will fix that later when we have the gateway IP addresses of each VNet.
Configuring a local network in a Microsoft Azure virtual network (Image: Aidan Finn)
Create the Gateways
Once again you will be configuring both VNets. Navigate to each VNet and click Dashboard. In the bottom of the window, there’s a button called Create Gateway and choose Dynamic Routing. Click that button and wait. Actually, go have lunch now. At this point, a new subnet is being created within your VNet. And a gateway is being created to allow your VNet to have a virtual IP address that is publicly visible for VPN connections. In my experience, clicking Create Gateway runs a task that can take 15 to 20 minutes to finish.
Once completed, browse back to Dashboard in each VNet and record the Gateway IP address. Then double-check to ensure that you have recorded the network address of the VNet, which are listed in the portal as Address Space. You will need this information to create the required local networks for the final solution.
Create the Local Networks
You are going to create two local networks. In my example, I created a local network called WestEurope1, which specified two pieces of information:
- VPN Device IP Address: The Gateway IP Address recorded from the WestEurope1 VNet.
- Address Space: The network address (Address Space) that was also recorded from the WestEurope1 VNet
The WestEurope1 VNet is used to configure the NorthEurope1 VNet. This tells the NorthEurope1 VNet that the VIP of WestEurope1 will be used for the VNet-to-VNet VPN connection, and that it will route all traffic to 10.0.3.0/16 to WestEurope1.
Next, I created a local network called NorthEurope1 using the Gateway IP Address and Address Space of NorthEurope1. This left me with three local networks: one recording the details of each VNet for the other VNet to connect and route to, and one temporary one, which we will delete later.
Local networks created in Microsoft Azure (Image: Aidan Finn)
Fix up the Local Network Connections
Now you are in a position to configure the correct and final local network connections in each VNet. I configured WestEurope1 (with the network details of the WestEurope1 VNet) as the local network for NorthEurope1. And then I configured NorthEurope1 (with the network details of NorthEurope1 VNet) as the local network for WestEurope1.
Once you save the changes, the temporary local network can be removed.
Now when you browse to Dashboard in either VNet, you’ll see a depiction of each VNet trying to connect via a VPN … and failing. This is because the two VNets cannot authenticate with each other yet.
Configure a Shared Key
Normally when we create a site-to-site VPN into a VNet, we will record the supplied unique Managed Shared Key from the VNet’s dashboard. This won’t work in this case because we need each VNet to use the same, not unique, shared key to authenticate the VPN connection.
You’ll need to come up with a nice long random key and save it in a secure location. Next, you’ll need to use Azure PowerShell.
I keep talking about PowerShell. Here’s yet another reason for you to join the rest of us in keeping our jobs.
PowerShell has a module that you can retrieve by using the Web Platform Installer. You will need to configure some kind of authentication to allow remote administration, which you can read more about on the Microsoft Azure website.
You will run two cmdlets to configure the shared key for each VNet. I ran the following cmdlets:
Set-AzureVNetGatewayKey -VNetName NorthEurope1 -LocalNetworkSiteName WestEurope1 -SharedKey $somethingRand0m
Set-AzureVNetGatewayKey -VNetName WestEurope1 -LocalNetworkSiteName NorthEurope1 -SharedKey $somethingRand0m
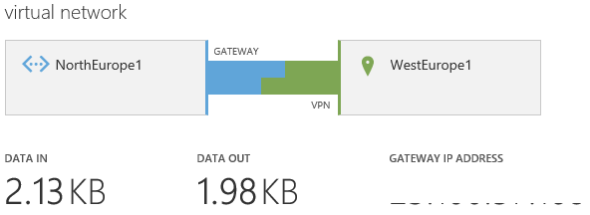
And then, you wait. Within a few minutes both of the VNets will connect via the VNet-to-VNet VPN connection. Don’t worry if there is a failure; there will have been a gap between when you configured the final local networks for connectivity and when you configured the shared key and any connection during that window will have failed.
A connected VNet-to-VNet VPN (Image: Aidan Finn)
Now I should be able to deploy virtual machines within those VNets and have free and secured communications between the two regions.


