You might wonder why you might want to do it, but it is possible to create a NIC team inside of a virtual machine. In this blog post, I will explain several different reasons to create a NIC team, along with necessary configurations.
Why a Guest OS NIC Team Might Be Required
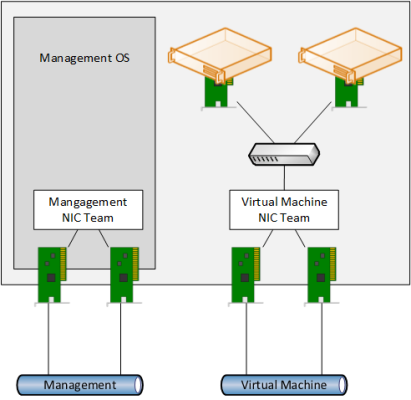
Normally you will never create NIC teams inside of virtual machines. A best practice is to implement what is illustrated in the figure below. A pair of physical NICs in the host are designated for virtual networking use. These two NICs are ideally plugged into different top-of-rack switches and are teamed in the management OS of the Hyper-V host.
The default team interface is used to connect a virtual switch. Virtual machines are connected to this virtual switch. With this design, your virtual machines get network path redundancy, where you have more than one of each physical device (NIC and top-of-rack switch) to connect the virtual machines to the network core. We don’t need multiple vNICs in the virtual machines or virtual switches in the hosts because these are virtual devices that do not suffer hardware failures.
A typical host NIC team for virtual machines. (Image: Aidan Finn)
Reasons to Create a NIC Team Inside of a Guest OS VM
What are legitimate reasons to create a NIC team inside of the guest OS of a virtual machine? There are two that I can think of.
1. To experiment with NIC teaming
The first reason is simple enough; you want to experiment or demonstrate NIC teaming, and you do not have any physical machines to work with. I typically will use a virtual machine to show new Windows or Hyper-V administrators how to use LBFOADMIN.EXE to create and configure NIC teams.
2. To get network path fault tolerance for in-guest services
The second reason is related to a hardware feature that Hyper-V supports that is incompatible with NIC teaming. Single-Root IO Virtualization (SR-IOV) is a feature that is made possible by SR-IOV capable NICs. SR-IOV directly connects the virtual function (VF) or vNIC of a virtual machine to special physical functional (PFs) on a host’s network card.
This direct connection bypasses the networking features of the host, such as the virtual switch and the host’s NIC team. The result of enabling SR-IOV is that a host’s NIC team offers no network path fault tolerance for the virtual machine. And that means if you want network path fault tolerance for your in-guest services, then you will have to implement NIC teaming within the guest OS.
Note: The best guidance for NIC teaming is Microsoft’s whitepaper, “Windows Server 2012 R2 NIC Teaming (LBFO) Deployment and Management.”
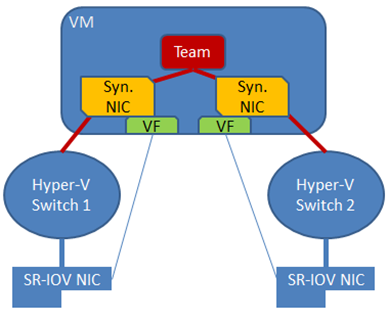
In-guest NIC teaming for SR-IOV (Image: Microsoft)
The host has two SR-IOV capable NICs. A virtual switch is created for each NIC — SR-IOV enhanced traffic will bypass the virtual switch, but the virtual switch is used to map the virtual machine’s vNICs to the correct physical NIC.
The virtual machine is given two virtual NICs, and each virtual NIC is connected to one of the virtual switches. This means that each virtual NIC has a different virtual and physical paths to the network core in the data center. The two virtual NICs are teamed, and this provides load balancing and fail over between the two virtual NICs using a single IP address.
Virtual Machine NIC Team Considerations
There are several different considerations to keep in mind when creating a NIC team inside of a virtual machine:
- Enable NIC Teaming: A Hyper-V administrator must enable NIC teaming in the settings of the virtual machine.
- Two virtual NICs: A team in a physical server may contain up to 32 NICs. A team that is created inside of a virtual machine is only supported with two virtual NICs, even though nothing will stop you from creating larger teams.
- External Virtual Switches: You must ensure that each of the two virtual NICs is connected to a different external virtual switch. Private/Internal virtual switches will leave the team in a disconnected state. Using just one virtual switch is not supported.
Enabling NIC Teaming
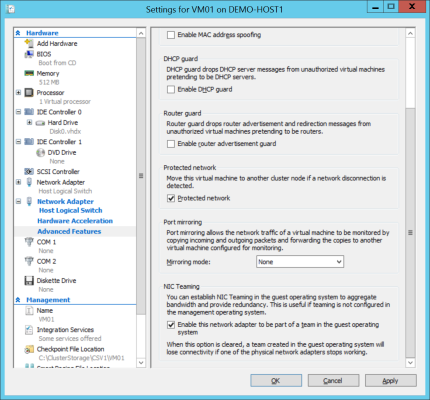
The setting for enabling NIC teaming in a guest OS is controlled by the Hyper-V administrator. Edit the settings of the virtual machine, expand the network card that will be a part of the NIC team, and browse into Advanced Features. There you will find a setting called Enable The Network Adapter To Be A Part Of A Team In The Guest Operating System. This setting is disabled by default; check the box to enable this virtual NIC to become a part of a NIC team in this virtual machine’s guest OS.
Enabling NIC teaming in a Hyper-V virtual machine’s settings (Image: Aidan Finn)
Enabling this setting can lead to a lot of clicking. PowerShell can be a lot quicker. The following example will enable NIC teaming for all NICs in a virtual machine called VM01.
Set-VMNetworkAdapter -VMName VM01 -AllowTeaming On
Once you enable NIC teaming in the virtual machine settings you will proceed with creating the NIC team as usual in the guest OS. Note that the configuration will be locked down to switch independent and the load balancing will also be locked down. This is the ideal and only possible NIC team configuration within a guest OS.


