- Blog
- SharePoint
- Post
Configuring SSL on SharePoint Sites
With the advent of SharePoint 2013 some new best practices on how to deploy SharePoint sites are being released. The new best practice is to deploy web applications with secure sockets layer (SSL). More importantly, if you plan on using SharePoint apps or any Exchange site mailbox features, you must have SSL enabled on all your sites. In this article I’ll show you how to configure SSL on your SharePoint sites.
Obtain a Certificate
Before you begin configuring IIS and SharePoint, you’ll first need to obtain a certificate (if you already don’t have one). To obtain a certificate you will need to generate a certificate-signing request (CSR) from the webserver, which you then supply to your SSL vendor of choice. Alternately, you can create a self-generated certificate. If your server is going to be public facing, I would recommend obtaining a commercial certificate that is widely trusted rather than a domain-issued certificate. Once a certificate is obtained, it will need to be imported into the webserver for use by the SharePoint sites.
If you have an existing certificate that is used for other servers, such as a wildcard certificate, that certificate can be exported into a .pfx file and imported to the SharePoint webserver. I prefer to use wildcard certificates mainly because it’s one certificate that I need to manage and renew rather than having several specific SSL certificate files. For this article I am using an existing wildcard certificate that was exported from IIS on a different webserver.
Import Certificate Into SharePoint Webserver
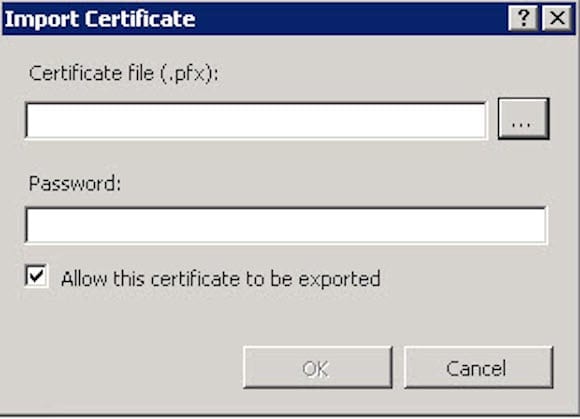
- Copy your .pfx file to a location on the SharePoint Webserver.
- Open IIS manager and go to Server certificates.
- Select Import on the actions pane.
- Locate the .pfx you just copied to the server, supply the password, and check the box to allow the certificate to be exported.
- Click OK.
Configure IIS Bindings
After you have imported the certificate you will need to bind your site to use https. To configure the IIS bindings complete the following steps:
- Open IIS manager and go to your SharePoint site
- Right-click on the site and select Edit Bindings
- Select Add binding.
- From the drop-down choose HTTPS and select the certificate that you just added to the server.
- Fill in the Host header information and click OK.

Configure SharePoint for SSL
Now that you have added your certificate to IIS and bound it to the site, you’ll need to configure SharePoint to use SSL using Alternate Access Mappings. Alternate Access Mappings is how SharePoint determines how to handle the incoming URL requests and redirects to them the appropriate URL, in this case we are using HTTPS.
- Open Central Admin on SharePoint Server. Go to Application Management, then select Alternate Access Mappings.
- Select the web app that you want to change to SSL by selecting it from the top right drop-down menu.
- Edit the default public URL and change HTTP to HTTPS to redirect the site to use SSL.

- To redirect HTTP requests to be automatically redirected to HTTPS, click on Add an Internal URL.
- Add the non-HTTP URL and make sure the zone is set to default.

- Once you save your settings test your site by accessing the site in your browser.
