Configure Exchange 2010 to Receive Emails for Other Domains
Exchange 2010 is similar to Exchange 2007 in that it will only accept email for your internal domain name. However, there are instances that may require your Exchange servers to receive emails that are in not your internal domain name. When this happens you will need to configure your Exchange servers to accept email for those other domains. To find further explanation on what an accepted domain is and the types of accepted domains, visit our previous Petri IT Knowledgebase article, Configure Exchange 2007 to Receive Email from Other Domains.
Configuring Exchange 2010
Configuring Exchange 2010 to accept email for other domains is similar to configuring in Exchange 2007 to accept other domains, in that it natively does not accept email from the external world; instead, you must tell it that it is allowed to do so.
For example, say your company decides to change its Internet domain name from mycompany.com to mycompanyemail.com. To do so, you will need to add the new domain name as an accepted domain name in Exchange.
Accepted domain names can be used in various situations such as each company division having its own Internet domain name, company mergers and acquisitions, or when your internal domain name is different than your Internet domain name.
Prior to configuring, ensure that you have the correct permissions to apply the changes. You must have the Exchange organizational administrator’s role permissions delegated to you in order to configure changes. Accepted domains are configured at the organizational level on Exchange 2010 servers with the HUB transport role. You can configure accepted domains in two ways: by using the Exchange Management Console (EMC) or through Exchange Management Shell (PowerShell prompt).
Configure Exchange 2010 with EMC (GUI)
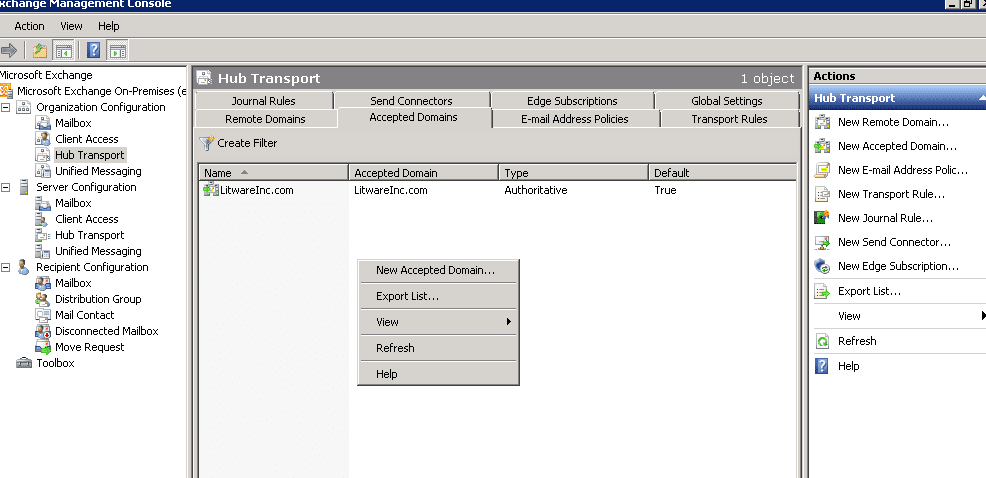
First, open the Exchange Management Console. Expand the Organizational Configuration. There are two ways to add an accepted domain using the EMC:
Edge Transport role server (only use if you are using this role): Select Edge Transport, then click on the accepted domains tab.
Hub Transport role server: Select Hub Transport, Click the Accepted domains tab. From there you can do either of the following:
- In the work pane, right-click and select New Accepted Domain.
- In the action pane, select New Accepted Domain.
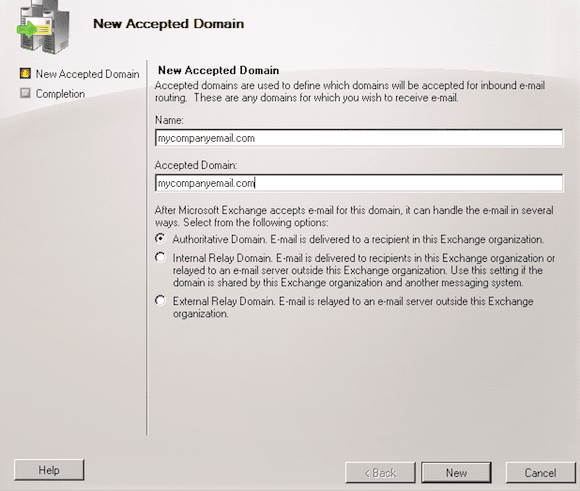
Next, the New Accepted Domain wizard will appear, as seen below.
In the Name field, type in a name to identify the new accepted domain. You can use any name you wish, but I would recommend using the same name as your new accepted domain. This will make things simple and easier to identify in the event that you have multiple domains that may be similar.
In the Accepted Domain field: Type in the accepted domain name. This is the field that identifies the SMTP domain name that will be accepted by your Exchange servers.
Select one of the following options to set the domain type. For a more detailed explanation, see Configure Exchange 2007 to Receive Email from Other Domains.
- Authoritative Domain
- Internal Relay Domain
- External Relay Domain
Select New; the wizard will begin configuring.
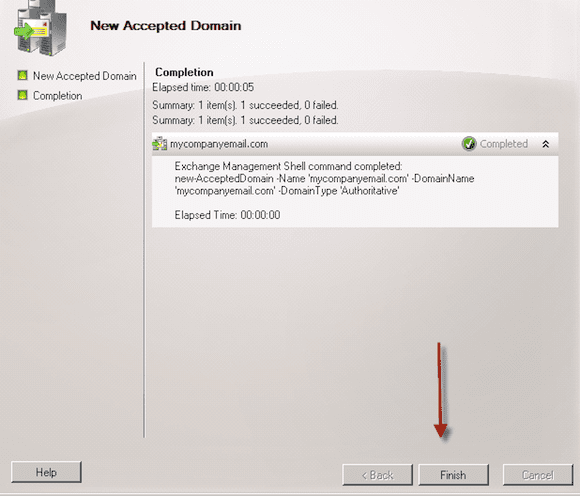
After the wizard has finished configuration, select Finish, as shown below.
Configure Exchange 2010 with Exchange Management Shell (PowerShell)
You can also configure a new accepted domain through Exchange Management Shell. To do so, follow these procedures.
First, open the Exchange Management Shell.
For the following domain types, type the respective commands:
- To create an Authoritative domain type:
New-AcceptedDomain –Name “YourEmailDomain.com” –DomainName YourEmailDomain.com –DomainType Authoritative
- To create an Internal Relay domain type:
New-AcceptedDomain –Name “YourEmailDomain.com” –DomainName YourEmailDomain.com –DomainType InternalRelay
- To create an External Relay domain type:
New-AcceptedDomain –Name “YourEmailDomain.com” –DomainName YourEmailDomain.com –DomainType ExternalRelay
Deleting an Accepted Domain
There may be times when you will need to delete an accepted domain. We can do this either by using the Exchange Management Console (EMC) or by Using Exchange Management Shell (PowerShell prompt).
Using Exchange Management Console (EMC):
Open the EMC. Expand the Organizational Configuration. There are two ways to add an accepted domain using the EMC:
- Edge Transport role server (only use this if you are using this role): Select Edge Transport, then click the accepted domains tab.
- Hub Transport role server: Select Hub Transport, Click on Accepted domains tab
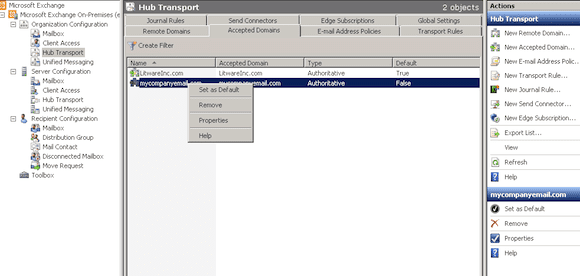
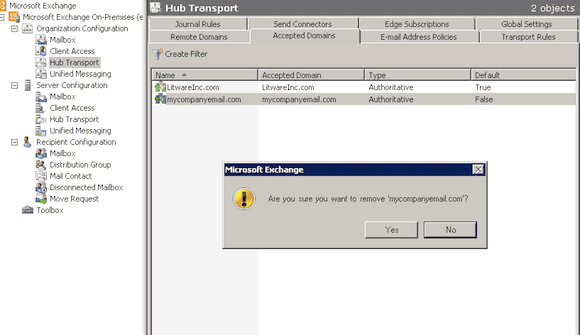
Select the Accepted domain you wish to remove. You can either right-click or and choose Remove or select Remove from the action pane.
Click Yesto remove when the prompt appears.
Using Exchange Management Shell (PowerShell prompt):
To remove an accepted domain from the Exchange Management Shell, use the following procedures: Open the Exchange Management Shell prompt, then type:
Remove-AcceptedDomain –Identity youremaildomain.com
Accepted domains allow the exchange organizational to know for which SMTP domains the Exchange servers should accept emails. They are replacements to the recipient policies that were used in Exchange 2003/2000 versions. You will need to create additional accepted domains for every domain that you wish to accept incoming emails for in addition to the default accepted domains. If you wish to relay emails for other domains you will also need to configure the accepted domains and add the appropriate external relay settings.


