Configuring Exchange 2007 as an Authenticated or Anonymous SMTP Relay
Scenario
By default Exchange 2007 is configured to only accept SMTP email for domains it is authoritative for, and will only relay email onto other domains for authenticated local users. Usually for Outlook/OWA based clients this is entirely sufficient as even when connecting from remote locations the clients appear to be local to the Exchange Server so it is happy to relay for them. This is thanks to the connection mechanism, Outlook Anywhere and OWA both route the email data through the IIS server, or a user on a VPN will appear to be on the LAN.
This does create a problem if you need to use an alternative mail client that does not support the Outlook web protocols, in which case it will want to use SMTP to send emails. You are most likely to encounter this scenario with non-Windows/Blackberry mobile devices and “cloud” based PIM sync applications like Apple’s “MobileMe”. The solution is to configure your Exchange 2007 Server to accept authenticated SMTP connections and allow them to relay emails to remote domains – note that “authenticated” is essential otherwise you will turn your server into an “open relay” which will soon be abused by spammers.
Implementation
There are some fundamental differences between the SMTP implementation in Exchange 2003 and 2007 that will leave you very confused if you dont know about them. The main thing is that the Exchange 2007 no longer uses the SMTP service you were familiar with but has replaced it with the Exchange Transport service, which uses “Receive Connectors” and security permissions to define who can do what. “Receive Connectors” are like the SMTP virtual servers of before, they can be defined by the networks allowed to access them, the authentication mechanisms, and the permission groups. By default all authenticated users have full send and receive permissions for all connectors, so you shouldn’t have any need to edit specific permissions.
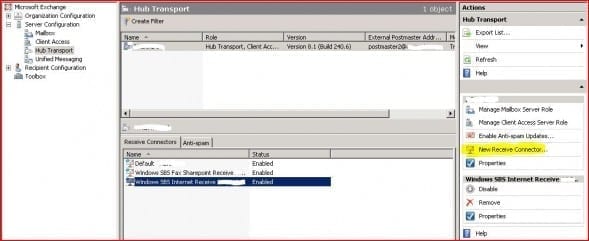
Now if you open your Exchange Management Console and navigate to the Server Configuration – Hub Transport section you should see something like this:
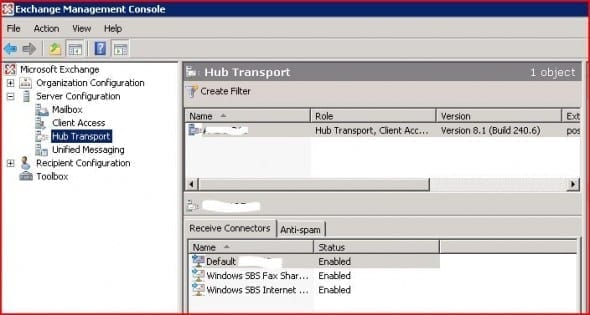
This screenshot is of an SBS2008 server, if you have a standalone Exchange 2007 you will just have two receive connectors – “Default” and “Client”, but the principals are the same. The Default connector is configured to allow local network clients to submit email to the Exchange Server, if you check the properties you will see it is restricted to the local network and allows all permission groups except anonymous. We want to change the settings for users connecting from outside our network so we need to look at the “Windows SBS Internet Receive” properties:
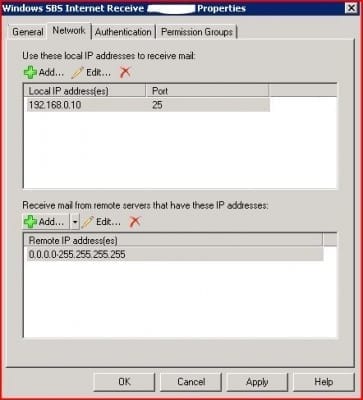
As you can see this connector is listening on the local interface and will accept connections from any remote IP address.
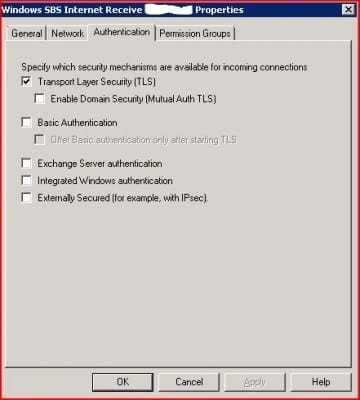
The only security mechanism available is TLS, which means this connector will only accept standard unauthenticated SMTP sessions. We want to allow our users to authenticate so we need to tick the “Basic Authentication”, but leave “Offer Basic authentication only after starting TLS” unticked unless you are sure your mail application will support it – most will not.
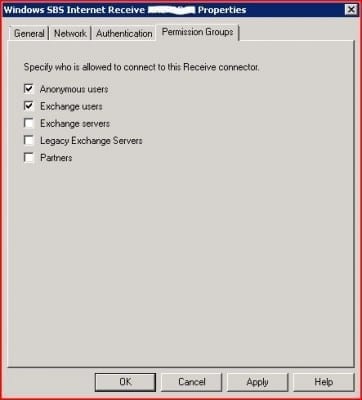
Finally we need to allow our Exchange Users permission to use this connection so tick the box. Now click “OK” to close the properties and then open the Server Manager (click Start, right-click “Computer” and select “Manage”), browse to the “Microsoft Exchange Transport” service and restart it to ensure all the settings are applied.
The easiest way to test your new settings is to use Outlook Express (or Windows Mail on Vista) on a remote computer, setup a new account with your server IP/DNS name for the SMTP server. You should be able to email anyone by using the “my server requires authentication” option with just your domain username and password, then if you test without authentication it should only accept emails to users on your domain. Make sure you test this last point because if you have made a mistake and your connector isnt accepting email then you will not receive any inbound mail until you fix it!
Anonymous Relays
Apart from providing a solution to supporting authenticated SMTP for your remote users this method should also give you a better understanding of how the receive connectors work now. Another situation where you may need to use them is to provide an anonymous relay service for internal systems, for example photocopier/scanner units that support basic email but no authentication. Note that you will only need an anonymous relay if your device needs to email outside your domain – internal emails will not be a problem.
An incorrectly configured anonymous relay can leave you open to being used as a email server by spammers, which in turn will get you blacklisted so you can’t email anyone anymore. Therefore you should approach with extreme caution and I strongly recommend you test your server with a relay check utility such as www.mxtoolbox.com .
This time you need to create yourself a new receive connector so return to your Server Hub Transport section in the Exchange Management Console:
Click “New Receive Connector” to start the wizard and on the first page enter a suitable name, then select “Custom” from the drop-down menu. Configure the connector with the same Authentication settings as before but only “Anonymous Users” allowed, then in the “Network” section just add the IP addresses of the devices you wish to allow anonymous relay rights to. Make sure you get this last part right! Now by default anonymous users do not have the rights to submit email for external domains so we need to grant them, and this has to be done through the Exchange Management Shell. Enter the following command:
Get-ReceiveConnector “connector name“ | Add-ADPermission -User “NT AUTHORITY\ANONYMOUS LOGON” -ExtendedRights “ms-Exch-SMTP-Accept-Any-Recipient”
Make sure you enter the connector name as it appears in the Management Console and run the command, it should confirm the permission has been added. As before make sure you restart the Transport Service and then test your new connector, and don’t forget the open relay test to be sure!


