


Windows 8 and 8.1 simplify the whole process of connecting to wireless networks. Tap the wireless icon in the Taskbar and out pops the Network Charm displaying a list of wireless networks in range. Tap the one you want, enter the password, and BOOM, you’re done. It doesn’t get much easier, but simplicity always comes with a cost. In this case, the “cost” is that some functions, such as managing wireless profiles, have actually become harder in these latest desktop Windows versions. In today’s post, I’ll show you how to troubleshoot and fix wireless issues in Windows 8 with the NETSH command.
Wireless Profiles in Windows 8
Many might ask “what’s the big deal?” In most cases they’d be correct – there’s often no need to manage wireless profiles manually. For IT pros though, we live outside of the “most” and “often” categories. Our bread and butter is dealing with the abnormal situations, instances in which working with wireless profiles stored on a PC is just a part of troubleshooting.
More often than not, my first step in troubleshooting a misbehaving wireless connection on a PC is to remove the wireless profile and recreate it. This is an easy point-and-click affair in Windows 7, but how is the same thing done from within Windows 8 versions? The good news is it’s still an easy process. The bad news (at least if you’re a GUI aficionado) is that it’s no longer a GUI-driven process. That’s right: removing a wireless profile in Windows 8 is all about the command line.
Remove a Wireless Profile
The first step is to start an elevated command or PowerShell prompt. I rarely use CMD.exe anymore and almost exclusively work in PowerShell for command-line tasks. Remember, PowerShell doesn’t run just cmdlets. For all intents and purposes, it can run anything CMD.exe can run. I like as many options as possible, so I’m going to get things rolling by right-clicking the Start button on my Windows 8.1 Pro Desktop and then clicking Windows PowerShell (Admin).
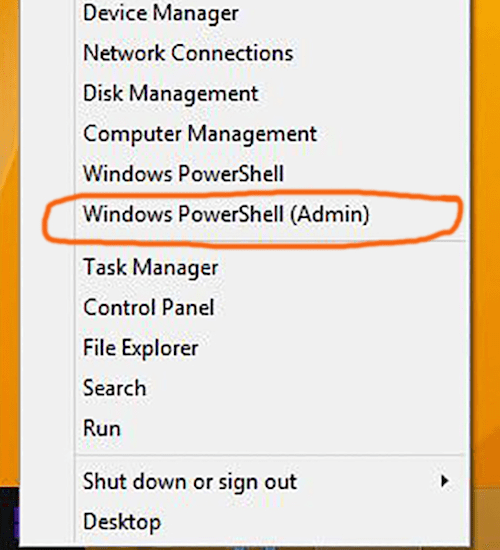
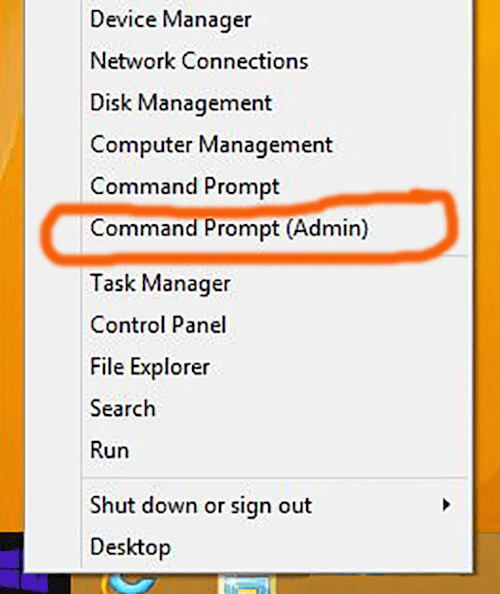
What? You don’t see Windows PowerShell (Admin), but instead see Command Prompt (Admin)?
Well, you have three choices. Use the elevated command prompt, start PowerShell another way, or change your system to display the Windows PowerShell (Admin) prompt when right-clicking the Start button. As far as I’m concerned, the latter is the most appealing so here’s how to make it happen.
Display the Windows PowerShell (Admin) Prompt
- Right-click an open area on the Taskbar and then click Properties.
- In the Taskbar and Navigation properties window that appears, click the Navigation tab.
- In the Corner navigation section, click the checkbox for Replace Command Prompt with Windows PowerShell in the menu when I right-click the lower-left corner or press Windows key+X.
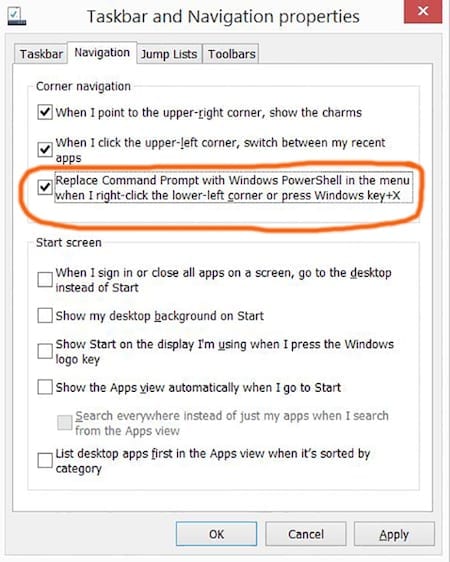
- Click OK. From now on when right-clicking the Start button, it’ll be PowerShell all the way!
- Once the elevated PowerShell prompt is running, use the NETSH command to display the wireless profiles stored on the PC. Type NETSH WLAN SHOW PROFILES and hit Enter.
 Prompt")
Don’t be surprised if the list is longer than expected. Any wireless network the PC has connected to will be stored as a profile. On top of that, the list will also contain profiles from other devices if the user has the settings sync feature of Windows 8 enabled. Consider a user with a laptop, a desktop, a tablet, and a phone, and it’s easy to see how a profile list can grow to contain dozens of entries.
Remove Profile
- In the Show Profiles output find the profile name you want removed. Removing the profile is as simple as typing the command NETSH WLAN DELETE PROFILE “profile name” and pressing Enter. That’s it, like I said easy-peasy lemon squeezy!
 Prompt delete profile")
- Being a member of the “trust, but verify” crowd, I like to verify results. Doing so simply involves displaying the Show Profiles list again by typing NETSH WLAN SHOW PROFILES, pressing Enter, and checking that the removed profile is indeed gone.
 Prompt profile remove")
- On the topic of NETSH, it can do much more than just show and delete profiles. Using it to display visible wireless networks in the area is as simple as typing NETSH WLAN SHOW NETWORKS then pressing Enter.
 Prompt show networks")
Extending that command just a bit to NETSH WLAN SHOW NETWORKS MODE=”BSSID” adds a slew of helpful information to the output including signal strength, radio type, transmission rates, and more.

Another very handy NETSH command for wireless troubleshooting is NETSH WLAN SHOW INTERFACES. The output of this command will display detailed information about configured wireless network interfaces on the system. Everything from name, description, and MAC address to interface state and whether a wireless network is connected.

I could go on and on with various NETSH WLAN commands, but I’ll round out the discussion with the big kahuna. If the goal is to learn everything the NETSH WLAN command can provide, type NETSH WLAN SHOW ALL and press Enter. Watch the screen scroll by for a few seconds and then spend a while reviewing the output which includes every possible modifier of the NETSH WLAN SHOW command.

The simplicity of connecting to wireless networks in Windows 8 and 8.1 is great for users. However, for IT pros troubleshooting problems it can be a hindrance rather than a help. Luckily, with the knowledge of a few key NETSH commands along with a little old school command line prowess, IT pros can work with wireless networks as easily and effectively as ever.