Top 10 Server 2008 Tasks With PowerShell – Part 2 (6 through 10)
In Part 1 of the Top 10 Server 2008 Tasks with PowerShell, we covered the first 5 tasks of our list. Today in part 2, we’ll cover the remaining 5 tasks that will help you perform server tasks faster and more efficiently.
- Change the local administrator password with PowerShell
- Restart or shutdown a server with PowerShell
- Restart a service with PowerShell
- Terminate a process with PowerShell
- Create a disk utilization report with PowerShell
- Get 10 most recent event log errors with PowerShell
- Reset access control on a folder with PowerShell
- Get a server’s uptime with PowerShell
- Get service pack information with PowerShell
- Delete old files with PowerShell
6. Getting 10 most recent event log errors
Every morning, you may have to go through your event logs to find the 10 most recent errors in the system event log on one or more computers. You can easily accomplish that task with PowerShell using the Get-EventLog cmdlet.
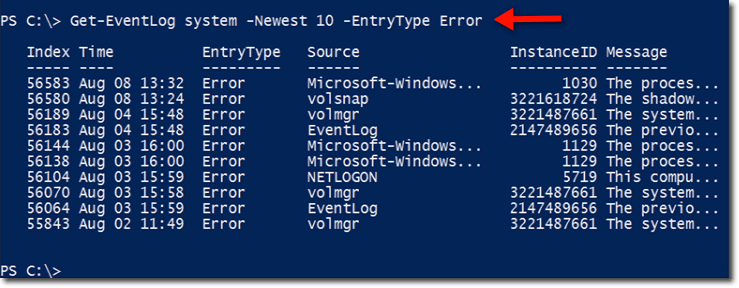
All you need to specify is the name of the log and the entry type. A typical command for this particular task would look like this:
Here, the name of the log is ‘system’ and the entry type is ‘Error’. So PowerShell is going to fetch the 10 most recent error entries from the system log. This command is issued to a local computer, so we don’t have to specify a computer name.
Notice that the messages aren’t shown in their entirety. Let’s modify the command a bit so you can see those messages.
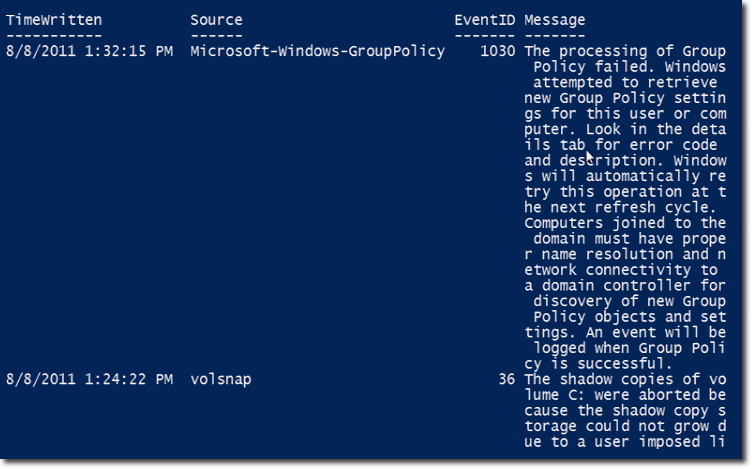
We simply piped the output of the previous command to ft, which is an alias for Format-Table, and then asked the table to display the following properties: Timewritten, Source, EventID, and Message. We also added the -wrap and -auto to make the output prettier. -wrap enables text wrapping, while -auto enables auto-sizing.
Here’s a portion of that command’s output:
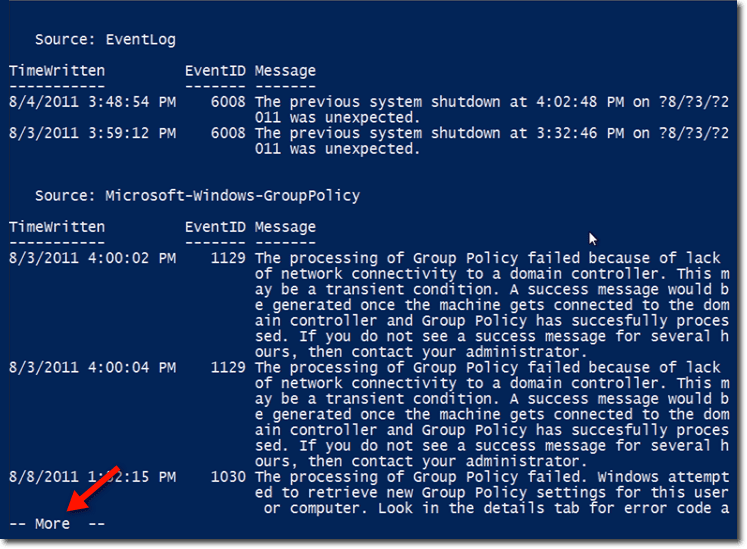
Let’s create yet another version of that command. This one sorts the properties by Source and then groups them. The final output is piped to more so that the display will pause one screen size at a time and not scroll all the way down.
Here’s a portion of the output:
Notice how the items are grouped by source. The first set of information have EventLog as their source, while the second set have Microsoft-Windows-GroupPolicy. Notice also the — More — indicator at the end, which tells the user to press a key in order to view more information.
All those Get-EventLog commands we showed you were done on a local computer. Let’s now see how we can do this remotely.
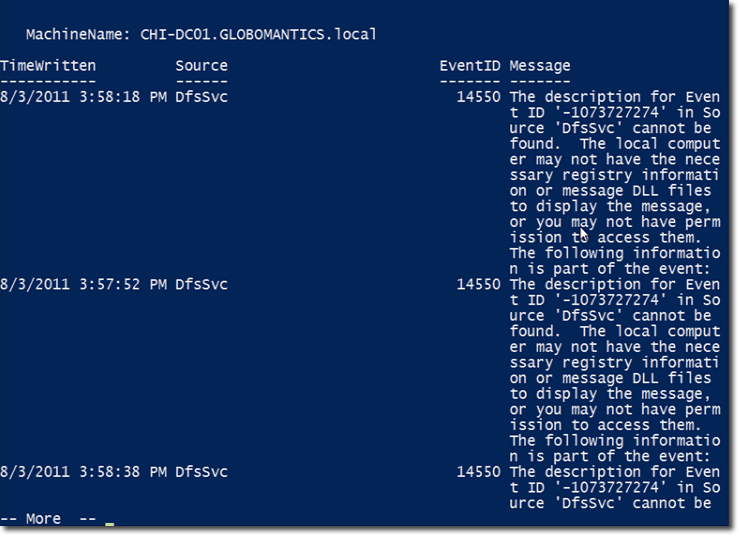
For example, let’s say I want to see the 5 most recent errors on my domain controllers in my Chicago office. The computer names are chi-dc01 and chi-dc02. Let’s assume that I would like to sort and group the output by Machine Name. I would also like to show the following properties: Timewritten, Source, EventID, and Message. Again, I will add -wrap, -auto, and more to get a more visually appealing look.
Here’s a portion of the output.
If you still recall what we did in task #5 of this article, you can pipe the output of this command to an HTML file and put the report on an Internet server. Anyway, there are lots of things you can do with this output. The important thing is that you now know how to get the needed information using the Get-EventLog cmdlet in PowerShell.
7. Resetting access control on a folder
There may be instances wherein the NTFS permissions of a folder are not set the way they need to be. If this happens, you will want to reset the access control on that folder. To accomplish that, you can use the Set-Acl (Set-ACL) cmdlet.
The easiest approach would be to use Get-Acl to retrieve the ACL from a good copy and then copy that ACL to the problematic folder. That will replace the existing ACL. Although it is also possible to create an ACL object from scratch, the first method (i.e., copying from a good copy of the ACL) is the recommended option, and that’s what we’re going to show you here.
Let’s say we have a file share called sales in a computer named CHI-FP01, and that file share has a ‘good’ copy of the ACL. To copy the ACL of sales and then store it in a variable named $acl, you execute this command:
Let’s have a look at the information inside that ACL:
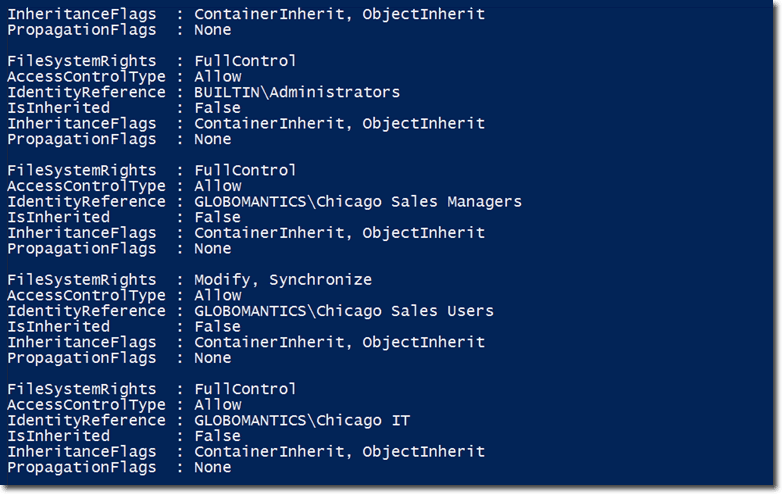
See that Access property at the right? That is actually another object. To see the contents of that object, just use this command:
Here are some of its contents:
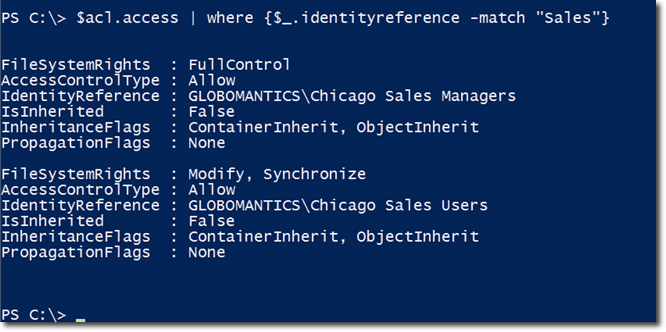
As you can see, it is actually a collection of access control entries. If you only want to see identity references whose names match with “Sales”, enter the following command:
Now, if we use the same command to view the contents of the Access property belonging to a newly created file share named chicagosales, we get nothing. Note that we are using a shorthand notation here:
One possible reason why we aren’t getting any values is maybe the share was set up but the NTFS permissions were not properly provisioned.
Obviously, the solution to this problem would be to copy the ACL from our ‘good’ file share and apply it to our ‘bad’ file share. But first, we need to take the current NTFS permissions of the chicagosales file share and save them to an XML file. That way, if something goes wrong, we can simply roll-back by re-importing that XML file and use Set-acl to set those permissions back.
Once that’s taken cared of, you can then go ahead and apply a Set-Acl command on chicagosales using $acl, which is just the ACL copied from our ‘good’ file share.
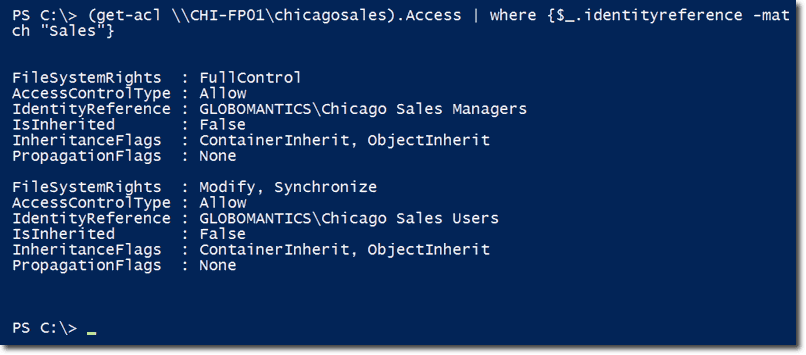
To verify whether we’ve succeeded, we can apply the same command we used earlier to display identity references whose names matched with “Sales”:
So now, the chicagosales NTFS permissions are the same as the sales permissions. That’s the easiest way to manage permissions and is one way to quickly address access control issues.
8. Getting a server’s uptime
You’re boss might want to be updated regularly regarding your server’s uptime. To get the information you need for this task, you use the WMI Win32_OperatingSystem class. This will return the value you need, and it works locally and remotely. The property you’ll want to look at is the LastBootUpTime. However, since it comes in a WMI format, you’ll want to convert it later to a more user-friendly date-time object.
Let’s start with an example using a local computer running Windows 7.
First, let’s save the results of a GetWmiObject expression to a variable named $wmi.
So now, $wmi will have some properties we can work with. The properties you will normally want to work with are the CSName (computer name) and LastBootUpTime.
As mentioned earlier, the LastBootUpTime is a WMI timestamp, which is not very useful. So we need to convert that. Let’s save the converted value to a variable named $boot.
We used the ConverToDateTime method, which is included on all the WMI objects that you get when you run GetWmiObject. The parameter you pass to that method is the LastBootUpTime property of the WMI object $wmi.
If you show the value of $boot, you’ll get something like this:
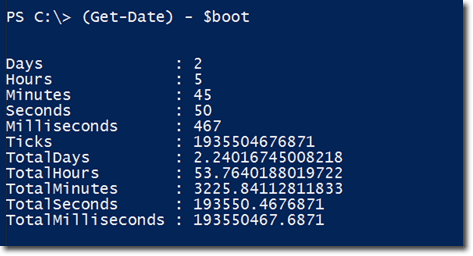
That is clearly a more useful piece of information than the original form of the LastBootUpTime. To find out how long that machine has been running you just subtract $boot from the current date/time, which can be obtained using Get-Date.
The result is a TimeSpan object. You can get a more compact result by converting that object to a string using the ToString(). Practically every object in PowerShell is equipped with a ToString() method.
The result above tells us that the machine has been running for 2 days, 5 hours, 46 minutes, and so on.
Let’s now put everything we learned here into a function called get-boot. Let me show you the function first in its entirety.
The function has a parameter that takes a computer name and defaults to the local computer name.
It also has a Process script block so computer names can be piped to it. Basically, if something is piped-in to it, the variable $computername will be set to the piped-in value. Otherwise, what will be used is whatever was passed as the parameter for computername.
Included in the Process script block is the GetWmiObject expression specifying the remote computer name.
There are also a couple of hashtables. The CSName property is not so user-friendly, so it is replaced with a new property called Computername. There’s also a property called LastBoot which contains the value of LastBootUpTime converted using the ConvertToDateTime() method. And then there’s one more property called Uptime, which is a TimeSpan object that shows how long the machine has been running.
If we run this locally (i.e., we don’t have to specify a computer name), the function defaults to the local computer name. Here’s the output:
Just like what we did in item #2 of this article (“Restarting or shutting down a server”), you can save the names of your servers in a text file, process only those that can be pinged, and then pipe those names to the get-boot function.
That last screenshot shows you a list of remote computers and their corresponding last boot up time as well as their total uptime.
9. Getting service pack information
There are a couple of reasons why you would want to obtain service pack information of your servers. One reason is that you may be in the process of rolling out an upgrade and you need to find the computers that require a particular service pack. Another reason is that you may be doing an inventory or audit of your computers and part of the data that you would like to get is the level of service pack they are at.
Again, you can accomplish this using WMI and the Win32_Operating System class. There are several properties you may want to look at. This would include: the ServicePackMajorVersion, which is just an integer indicating the version pack such as 1, 2, or zero; the ServicePackMinorVersion, which is rarely seen but is there; and the CSDVersion, which will give you a string representation such as “Service Pack 1”.
If you have been reading this article from the beginning up to this point, you should know by now that you can use WMI to get a lot of information from your computers in Windows PowerShell. So again, we’ll employ Get-WmiObject and the Win32_operatingsystem class. The properties you’ll most likely be interested with are the CSName (computer name), Caption (the operating system), CSDversion, and the ServicePackMajorVersion.
Here’s a typical expression using all that.
As shown from the screenshot, this Windows 7 box is not running any service pack, so the ServicePackMajorVersion is zero, while the CSDVersion is blank.
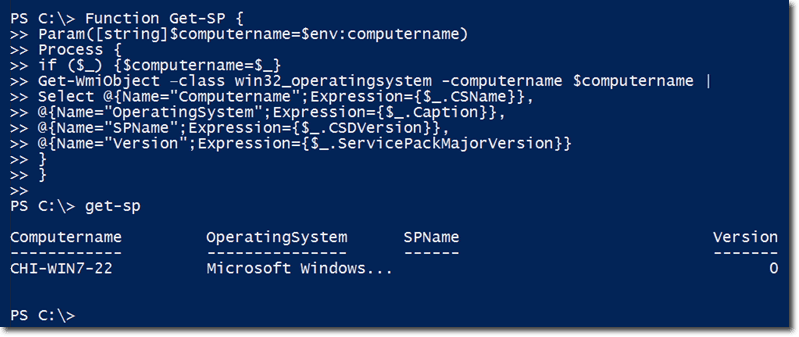
Let’s now deploy our time-honored practice here of creating a function. Let’s create a function named Get-SP. As usual, we’ll take a parameter of the computer name, which will default to the local computer.
Again, we use a Process script block. So if a computer name is piped-in, the variable $computername will be set to that piped-in object. The main part of this function is the Get-Wmiobject/Win32_operatingsystem class expression.
Just like before, we deploy a couple of hashtables. We take the CSName property and assign that to a property called ComputerName, which is much easier for a user to understand. In the same manner, instead of using the Caption property, we use Operating System. And instead of using CSDVersion, we use SPName. Lastly, instead of using ServicePackMajorVersion, which is quite a mouthful, we simply use Version.
Of course, you can assign any property name you deem most suitable in your case.
Here’s the complete function along with a sample output when we run it locally:
So now, we’re ready to grab our list of computers from our text file, only deal with those we can ping, and pipe-in each of those computer names to our newly-created get-sp function. Here’s the result:
You can see that CHI-DC02 is missing Service Pack 1, which has been released for Server 2008 R2. So I should, at some point, put in my project plan to update the Service Pack on that computer.
10. Deleting old files
The last common task we’re featuring here is the task of deleting old files. This is something you may need to do in cleaning up a file server or a user’s desktop. You may need to find files in those computers that are older than some date and delete them. To accomplish this, we’ll be using the Get-ChildItem cmdlet. It has an alias called dir, which is a term you’re more familiar with.
The best way to implement this task is to compare the LastWriteTime property on a file or folder object to some date-time threshold. If the LastWriteTime is beyond that date-time cutoff, then that’s a file you would want to delete. Just so you know, there’s also a LastAccessTime property but I rarely use that.
While LastWriteTime indicates when the file was last modified, LastAccessTime could be populated or changed by system utilities such as antivirus software or a defrag utility. Thus, LastAccessTime is not a good representation of the time when the file was last accessed by an actual user.
Once you find the files you’re looking for, you can pipe them to Remove-Item. Because Remove-Item supports -WhatIf and -Confirm, you can first run the command with those parameters, save the result to a text file, show it to your boss for approval, and then go ahead with the final deletion process.
Although it is possible to use a one-line pipeline expression in PowerShell to find particular files for deletion, I find this task best done using a script. That way, you can add some logging capabilities and support for whatif because if you’re deleting files, you really need to make sure you’re deleting the files you really intend to delete.
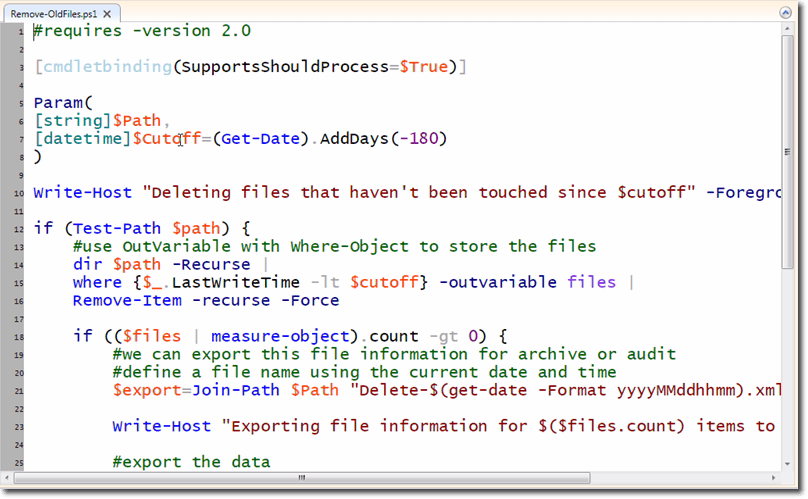
Here’s an example script file I wrote that does this job quite well. It’s available on the disk, so you can view the complete script from there. Look for the file called Remove-OldFiles.ps1. Here’s a portion of that script:
It’s actually an advanced script, which uses cmdlet binding that’s set to SupportShouldProcess=$True. That means, if you specify -whatif when you run the script, -whatif will be picked up by Remove-Item, which supports -whatif.
Notice the parameter named $Cutoff. That is the cutoff date. The default value is 180 days from the current date but you can specify another value and it will be treated as a date-time object.
The meat of the command is this:
It will do a recursive directory listing of the specified path. More specifically, it will seek out all the files where the LastWriteTime is less than $cutoff. Then it will save the files that meet that criteria to a variable called files using the common parameter -outvariable. Finally, any file that the where object picks up will be piped to Remove-Item, which will recursively go through and delete the files if it can.
Assuming files that meet the conditions for deletion are found, an xml file will then be created and stored in the current directory. The file will be given the file name Delete-yyyyMMddhhmm.xml, wherein ‘yyyyMMddhhmm’ is the current timestamp expressed in year-month-day-hour-minute. This will give you an audit trail for the files that are deleted.
Here’s the code snippet responsible for that:
So those are the main parts of the script. Let’s see it in action. First, let’s get a cutoff date that’s 270 days from the current date.
Next, we run the script. Now, let’s say I want to clean up the public directory of my file server in Chicago. The server’s name is chi-fp01 and I want to delete all files older than the specified cutoff date.
Here’s the command, along with the result notifications.
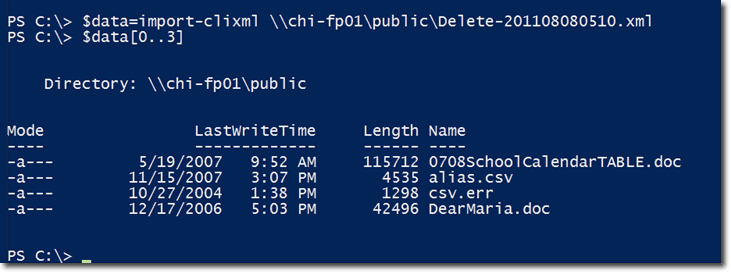
Notice that you can see the path of the xml file that was exported, so you can check it out later if you want. For the meantime, let’s just see the first four files that were deleted. To do that, let’s just import the contents of the xml file to a variable named $data and then view the first four items in $data.
If you look at the dates of those files, you’ll see how old they really were.
Conclusion
So there you have it! Windows Server 2008 provides a GUI that works great for several server tasks but as I hope these two articles have demonstrated, PowerShell can often be a quicker and more efficient approach to many Server 2008 tasks. I hope you learned a lot and I look forward to having you here again soon.


