


Storage Spaces Performance Tuning
I’ve written a number of articles during my time at the Petri IT Knowledgebase on Storage Spaces, but I have not talked about some of the advanced settings that have a direct impact on the performance of storage for Hyper-V virtual machines. In this article, I’ll share some tips on how to tweak Storage Spaces to get the best performance you can for storing your Hyper-V virtual machines.
The Curse of the Default
Windows Server is a general server product that can do lots of specific tasks. As a result of this, Microsoft has to configure default settings that they perceive are best for most, but not all, scenarios. Many consultants and administrators make the mistake of using the GUI’s wizards and clicking Next, Next, Next until they have what they think is a finished solution. What they are doing is accepting the default under-the-covers values, and this affects performance. But those folks who’ve dug a little deeper and take time to ask questions about default settings have found that there are some changes that should be made.
Multi path IO (MPIO) Policy
If you are using a Cluster-in-a-Box (CiB) or a just-a-bunch-of-disks (JBOD) tray for Storage Spaces, then you have a SAS connection between your server and your disks. Multipath IO (MPIO) is used to unify and provide failover if you have multiple connections to the storage system. What you might not know is that Windows Server’s implementation of MPIO has a number of policies that configure how traffic is transmitted across those connections. In my testing I found that having the wrong policy could have a huge negative impact on storage performance.
The best MPIO policy to use is Least Blocks (LB), as this policy sends data through the connection with the least number of blocks currently being processed. If you want to do this, then you are going to have to use some PowerShell.
You can retrieve the current MPIO policy by running Get-MSDSMGlobalDefaultLoadBalancePolicy. To configure Least Blocks as the MPIO policy, you will run:
Set-MSDSMGlobalLoadBalancePolicy -Policy LB
If only things were that easy! According to Microsoft Support, you will also need to edit the registry, probably followed by the usual reboot requirement. Open the registry editor and navigate to HKEY_LOCAL_MACHINE\SYSTEM\CurrentControlSet\Services\msdsm\Parameters. You will have to create two registry values:
- DsmUseCacheForLeastBlocks: A binary value type with a value of 1.
- DsmCacheSizeForLeastBlocks: A QWORD (64 bit) value type with a hexadecimal value of 100000 (representing 1 MB).
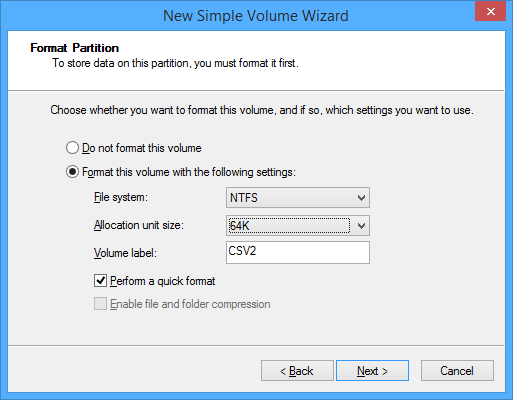
Allocation Unit Size
When formatting a volume, most people never give the Allocation Unit Size option a second thought. Allocation Unit Size is set to default, and most users simply click Next to get the format finished. What is that default allocation unit size? According to the most up-to-date documentation that I could find, the default allocation unit size depends on the size of the volume being formatted. If you have a 2 to 6 TB volume, then the allocation unit size will be 4 KB, but if it’s larger than 128 TB (well beyond the 64 TB supported max size of VSS), then you’ll have a 64 KB cluster. So what is best?
There is a reason Microsoft hasn’t provided a best-practice value because the allocation unit size really does depend on the workload that you will run in your virtual machines. However, when you are formatting a volume that will be used to store Hyper-V virtual machines, the best allocation unit size to use is 64K.
Storage Spaces Interleave
When you write data to a virtual disk (LUN), Storage Spaces will spread the data around the physical disks in the disk pool based on:
- Fault tolerance: Parity or mirroring
- Column count: The number of disks written to or read from in parallel
- Interleave size: the amount of data written to a disk at once
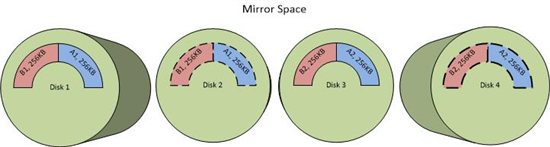
In the below diagram, there is a two-way mirrored volume with a column count of two. The virtual disk was created with the default interleave size, which is 256 KB. When data is written to the virtual disk, the data is broken up into interleaves (also called slabs) and spread across the disks, as you can see below. A chunk of data called A is split into two x 256 KB chunks of data (interleaves) called A1 and A2. Because this a two-way mirror, every interleave must be written to two different physical disks. A1 is written to Disk 1 and Disk 2, and A2 is written to Disk 3 and Disk 4.
What is the best size for the interleave if you intend to store Hyper-V virtual machines on the virtual disk? By default the interleave will be 256 KB, but this is not the best size for optimal performance. One of the most demanding workloads we normally have in virtual machines is a database, such as SQL Server. Microsoft recommends creating virtual disks with a 64 KB interleave size for workloads such as SQL Server. You can do this when creating a new virtual disk by running the New-VirtualDisk cmdlet with the –Interleave parameter.
Additional Notes
Here are some other tips to be aware off:
- Disk choice: Be aware that not all disks are made equal when you are selecting physical disks. Make sure you check the specifications and the disk manufacturer’s reputation. You can’t assume that a disk is high quality just because the company has a well-known brand.
- Firmware and drivers: Update every firmware and driver that you can, which includes updating the firmware of the disks. Some companies, like SanDisk as some of us have found, have shipped brand new disks with very old firmware. Sadly, that same company did not publicly share the firmware for their server class SSDs and this caused the performance of the entire JBOD and the attached servers to completely tank.
- Test disks: One disk with a fault can run RAID arrays or Storage Spaces disk pool’s performance. Run the Storage Spaces Physical Disk Validation Script to test each disk and identify any outliers that could drag down the rest of the pool.
- Test Storage Spaces: Once you are running, you can test Storage Spaces using a free script called DskSpd. This is a tool that Microsoft uses internally to test hardware. The wrong thing to do is to test Storage Spaces or a Scale-Out File Server by copying files, as it’s a long and complicated reason, but if you do test by copying files then expect to be disappointed because that operation works very differently than reads and writes by virtual hard disks.
- Don’t use parity disks: Most of the time that I hear of someone complaining about performance it is because they have deploy parity virtual disks. Parity virtual disks are only for archive workloads. If you are deploying virtual machines on Storage Spaces then use two-way or three-way mirrored virtual disks.
- Physical isolation: Those deploying petabyte sized installations can pick up a handy tip from Microsoft CPS. Microsoft can isolate physically demanding workloads by placing them onto virtual disks that are in different disk pools. Each pool is a domain of performance — a virtual disk is placed on every disk in a pool, and a virtual disk does not impact the performance of virtual disks in other pools.
- Get beyond the GUI: Things like interleave size are not revealed in the GUI when you are deploying Storage Spaces. Get under the covers if you want to make the most of your new storage investment.