


In this easy Ask the Admin, I’ll show you how to set up a L2TP with IPsec Virtual Private Network connection in Windows Phone.
Virtual Private Networks (VPNs) were once the preserve of corporate networks, but they’ve become increasingly popular amongst consumers. Businesses use VPNs to provide employees with secure remote access to servers, and consumers for a variety of different reasons.
Accessing geo-blocked content is one the most common uses. When you connect a device to a remote server using a VPN, it’s assigned an IP address from a pool of available addresses in the region where the remote server is located, essentially making it look like a device in Germany for example is physically located in the US. Before using a VPN to access geo-blocked content, remember that it may land you in trouble if it’s against the terms and conditions of the content provider, or if it’s illegal to circumvent measures used to restrict access to content in the jurisdiction where the content provider is located.
Security is another primary use for VPNs. Imagine a situation where you’re connected to public WIFI, and you are concerned about browsing the Internet or using a service that has encryption. VPNs encrypt traffic between your device and the remote VPN server, providing protection on the local network that you’re connected to.
VPN in Windows Phone
VPN support in Windows Phone was originally supposed to be added as part of an enterprise feature pack that never materialized. And for reasons only known to Microsoft, support didn’t arrive until Windows Phone 8.1, and then only in the form of the Internet Key Exchange (IKEv2) Protocol and SSL via propriety vendor plugins.
Windows Phone 8.1 Update 1 saw IPsec support added, and finally Windows Phone 8.1 Update 2 brings a couple of configuration option tweaks and a modified layout on the settings screen with an Advanced options button.
Setting Up a VPN Connection
If you use one of the commercially available VPN services, then chances are that in Windows Phone you will need to use an IPsec VPN. Follow the instructions below to add a new VPN connection in Windows Phone 8.1 Update 2. This guide can also be used for Windows Phone 8.1 Update 1, although the layout of the screens and menus is slightly different.
- Swipe down from the top of the display, and click ALL SETTINGS in the right top corner of the Action Center.
- Under network+wireless, click VPN.
- On the VPN SETTINGS page, click the ADD icon at the bottom screen.
- On the ADD PROFILE screen, type in the domain name or IP address of the VPN server, as provided by the service provider.
- Select L2TP with IPSec from the Type drop-down menu.
- Under Connect using, select username+password+pre-shared key from the menu.
Alternatively, you can select pre-shared key or pre-shared key+certificate, but most commercial VPN service providers require a username and password.
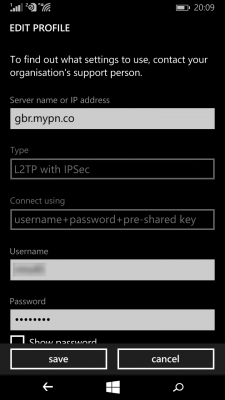
- Enter the username and password given to you by the VPN provider in the appropriate boxes.
- You must enter a key in the Pre-shared key in the box. Again, you will need to refer to the VPN provider to find out what the key is.
- Unless you want the VPN to dial up automatically, set Connect automatically to Off.
- Finally, give the new VPN connection profile a name in the Profile name box, and then press save.
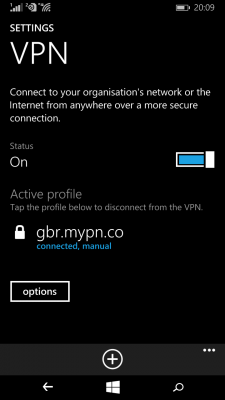
You’ll now be returned to the VPN settings screen, where the VPN status should have changed to On, and an attempt will be made to establish a connection to the remote server. You can disconnect the VPN at any time by changing the Status slider to Off.