


Migrate or Restore a Windows Server 2012 R2 Certification Authority to a New Server
A full system state backup of Windows Server includes a Certification Authority (CA) database and a private key, if the Active Directory Certificate Services role is installed. At least, that’s the theory – so make sure you always test backups thoroughly. See Microsoft’s post “System state backup does not include CA private keys in Windows Server 2008 or in Windows Server 2008 R2” for more information on potential problems.
Sometimes it can be useful to back up and restore the CA components separately, for instance when you want to migrate to a new version of Windows Server, or just a different piece of hardware. In this article, I’ll show you how to backup the Certification Authority components so that they can be restored to the same or a different server.
This article assumes that you are restoring an Enterprise Root CA on Windows Server 2012 R2 to a server with the same computer name and hard drive structure.
Backup a Windows Server Certification Authority
As the title of this article suggests, there are three main components that you will need to back up if you want to migrate or restore a CA.
- The CA’s database
- Private key
- CA Registry settings
Certification Authority (CA) Database, Log, and Private Key
To back up the CA database and private key, log on to Windows Server 2012 R2 with a domain administrator account, or other user that has CA administrator and local admin permissions.
- Open Server Manager using the icon on the desktop taskbar or from the Start screen.
- Select Certification Authority from the Tools menu in Server Manager.
- In the CA console, right-click your CA in the left pane, select All Tasks from the menu and then select Back up CA.
- In the Certification Authority Backup Wizard, click Next on the welcome screen.
- On the Items to Back Up screen, check Private key and CA certificate and Certificate database and certificate database log.
- Click Browse below Back up to this location, select an empty folder to store the backup files, and click Next to continue.

- On the Select a Password screen, enter and confirm a password to protect the private key and CA certificate. Click Next to continue.
- Click Finish on the completion screen.
- Now right-click the PowerShell icon on the desktop taskbar and select Run as Administrator from the context menu.
- Type net stop certsvc and press Enter to make sure the CA cannot issue certificates.
CA Registry Settings
Most of the configuration settings for the CA are stored in the system registry. To back up these settings, follow the instructions below:
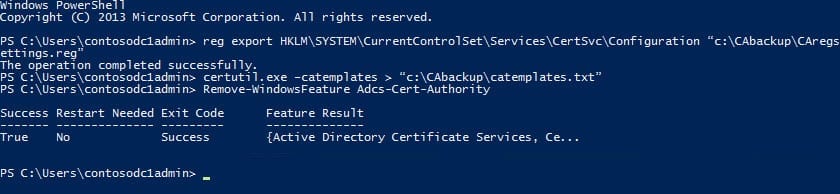
- In the PowerShell command prompt we opened in the previous instructions, type reg export HKLM\SYSTEM\CurrentControlSet\Services\CertSvc\Configuration “c:\CAbackup\CAregsettings.reg”
- Press ENTER.
Be sure to modify “c:\CAbackup\CAregsettings.reg” to the correct path for your backup folder.
Certificate Templates
If you have an Enterprise CA, i.e. one that is integrated with Active Directory, it has a list of default templates and additional custom templates that may have been configured after installation. The templates are stored in Active Directory, but if you want to restore custom templates on a new server, you will need to export the list so the new CA knows to reference the templates in AD.
- Again in the PowerShell command prompt, type certutil.exe –catemplates > “c:\CAbackup\catemplates.txt”
- Press Enter, replacing “c:\CAbackup\catemplates.txt” with the correct path and file name for your backup folder.
CAPolicy.inf File
If your CA was configured using a CAPolicy.inf file, make sure that you copy this file from the %SystemRoot% directory to the same location on the new server.
Remove the Active Directory Certificate Services Role and Server from the Domain
Microsoft recommends that you remove the Active Directory Certificate Services (AD CS) role from the server before migrating or restoring the CA on a different server. This is because when you remove the AD CS role, the CA’s configuration data is also removed from AD. It’s worth noting that the CA database, private key, and certificate are not removed when the AD CS role is uninstalled. To remove the AD CS role, run the following PowerShell command:
- Log on to the CA as a domain administrator.
- Now right-click the PowerShell icon on the desktop taskbar and select Run as Administrator from the context menu.
- Type Remove-WindowsFeature Adcs-Cert-Authority and press Enter.
Remove the Server from the Domain, Delete the AD Computer Account
If you intend to restore or migrate the CA, you must reinstate the CA on a server with the same computer name as where it was originally installed. Because Active Directory (AD) computer names must be unique, you should remove the original server from the domain and make sure the AD computer account is deleted.
- Type Remove-Computer contosoadcs1; Restart-Computer in the PowerShell console and press Enter, replacing contosoadcs1 with the computer name of your CA.
- On a domain controller logged in as a domain administrator, open a PowerShell console, type Remove-ADComputer -Identity “contosoadcs1” and press Enter, again replacing contosoadcs1 with the name of your CA.
Now you are ready to restore the CA to a new server.
Prepare the Target Server
Before installing the AD CS role, we need to name the machine and join it to the AD domain. You will also need to copy the backup files we created in the previous steps, to the server where you plan to install the new CA.
- Log on to Windows Server 2012 R2 as a local administrator.
- Right-click the PowerShell icon on the desktop taskbar and select Run as Administrator from the menu.
- In the PowerShell console, type Rename-Computer contosoadcs1 and press Enter, replacing contosoadcs1 with the name of your server.
- Type restart-computer and press Enter to restart the server.
- Now reopen the PowerShell console and type Add-Computer -DomainName ad.contoso.com and press Enter, replacing ad.contoso.com with your AD domain name. Enter a domain administrator username and password when prompted.
- You will be prompted to restart the server to apply the changes. Type restart-computer and press Enter to restart the server.
In the screenshot below, the rename-computer command fails because I have already manually renamed the computer.

Install and Configure the AD CS Role
Now that the computer has been renamed and joined to the domain, we can install the AD CS role.
- Log on to Windows Server 2012 R2 with a domain administrator account.
- Right-click the PowerShell icon on the desktop taskbar and select Run as Administrator from the context menu.
- In the PowerShell console, type Add-WindowsFeature ADCS-Cert-Authority –IncludeManagementTools and press Enter.
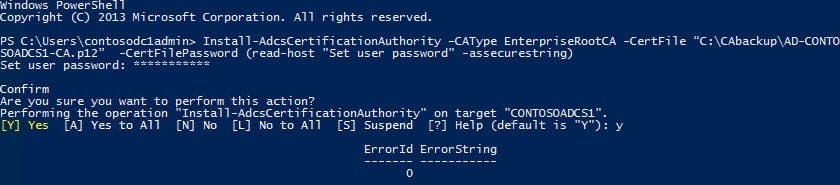
- Once the AD CS role has installed, type Install-AdcsCertificationAuthority –CAType EnterpriseRootCA -CertFile “C:\CAbackup\AD-CONTOSOADCS1-CA.p12” -CertFilePassword (read-host “Set user password” -assecurestring) and press Enter. Type the password for the file when prompted, then confirm that you want to configure the CA.
This command will install an Enterprise Root CA with all the default settings and use the certificate backed up from the source CA.
- Change “C:\CAbackup\AD-CONTOSOADCS1-CA.p12” to the path and file name of your backed up certificate, and replace “*********” with the password for the .p12 file. For more information on deploying a CA, see “Deploying a Windows Server 2012 R2 Certificate Authority” on Petri IT Knowledgebase.
Restore the CA Database and Registry Settings
To restore the CA database and private key, log on to Windows Server 2012 R2 with a domain administrator account or other user who has full access to the CA and local server.
- Open Server Manager using the icon on the desktop taskbar or from the Start screen.
- Select Certification Authority from the Tools menu in Server Manager.
- In the CA console, right-click your new CA in the left pane, select All Tasks from the menu and then Restore CA. If you are prompted to stop the AD CS service, click OK continue.
- In the Certification Authority Restore Wizard, click Next on the welcome screen.
- On the Items to Restore screen, check Private key and CA certificate and Certificate database and certificate database log.
- Click Browse below Restore from this location, select the folder where the backup files are located, click OK in the Browse for Folder window and then Next to continue in the wizard.

- On the Provide a Password screen, enter and confirm the password used to protect the private key and CA certificate. Click Next to continue.
- Click Finish on the completion screen.
- You should now be prompted to restart the AD CS service. Click Yes to confirm the operation.
Restore the CA Registry Settings
Let’s restore the CA registry settings. Before doing a restore, we’ll backup the default settings in case of a problem.
- Right-click the PowerShell icon on the desktop taskbar and select Run as Administrator from the context menu.
- In the PowerShell command prompt we opened in the previous instructions, type reg export HKLM\SYSTEM\CurrentControlSet\Services\CertSvc\Configuration “c:\CAbackup\defaultregsettings.reg” and press Enter. Be sure to modify “c:\CAbackup\defaultregsettings.reg” to the correct path for your backup folder.
- Now restore the registry settings from the source CA. In the PowerShell prompt, type net stop certsvc and press Enter to stop the AD CS service.
- Now type reg import “c:\CAbackup\CAregsettings.reg” and press Enter, replacing “c:\CAbackup\CAregsettings.reg” with the path and file name to your backed up registry settings from the source CA.
Note that the registry import procedure outlined above assumes that the source and new target CA have the same computer name and file paths; i.e. the server disk configuration, will be identical.
Restore the CA Templates
You can restore CA templates using the certutil tool as shown below:
- Right-click the PowerShell icon on the desktop taskbar and select Run as Administrator from the context menu.
- In the command prompt, type certutil -setcatemplates +DirectoryEmailReplication and press Enter. This command will add the DirectoryEmailReplication template in AD to the list of CA templates, if it doesn’t already exist. You can get a list of the templates by opening the catemplates.txt file saved as part of the backup procedure for the source CA.
Finish the restore process by making sure that you restart the AD CS service, by typing net start certsvc and pressing Enter at an elevated command prompt.