Using SharePoint 2013 Managed Navigation to Link to a Search Results Page
In a previous article, I described how useful it can be to use a result source for search to help users find relevant information. The specific use case was to have a page that shows all of the SharePoint 2013 project sites that a user has access to. In today’s article, I’ll take the next step and show you how to attach this page to your navigation menu with SharePoint 2013 managed navigation.
By using search results pages and managed navigation, you can create some no-code solutions that display lots of information, make the information easy to find, and keeps your URLs looking tidy and straight-forward.
Managed Navigation Requirements
Getting the managed navigation going will require a little bit of setup. You’ll be relying on some site collection features and some service applications, plus you’ll need a page to link up. And you’ll need to have all of the necessary permissions to perform these actions. I’ll go into each of these in a little more detail below.
Managed metadata service
You’ll need a managed metadata service running in your farm. There are good chances that this is already running in your farm if you’re already exploring working with your sites. However, if it’s not then one can be created in Central Administration in the Manage Service Applications section.
Site collection and permissions
The navigation that we’ll be configuring will be done at the root of a site collection and will be inherited through other sites in the site collection. You’ll need full control of the site collection to setup the term set navigation on the site collection.
Publishing Feature enabled
Another requirement is the publishing feature, which needs to be enabled to have the managed navigation menu item appear in the Site Settings menu.
To enable the Publishing Feature, you’ll need to be at the Site Settings page. Choose Site Collection Features, and from there find and activate Site Publishing.
An existing page to connect to your navigation link
You’ll need some page to link up in your navigation. If you need to create a page, I show you how in the previous article, “How to Configure Result Source for Search in SharePoint 2013.”
However, if you already have a different page that you’re working with, then you’re all set.
Using Managed Navigation to Link to a Search Results Page
We have a few tasks to do. First, we’ll set one of the navigation menus to use managed navigation. Second, I’ll show you how to configure the term set so that it can be used for navigation.
Third, I’ll show you how to add your page to the navigation menu and configure the navigation item to not display the name of the page at all, leaving you a nice clean URL structure.
Configure the global navigation to use managed navigation
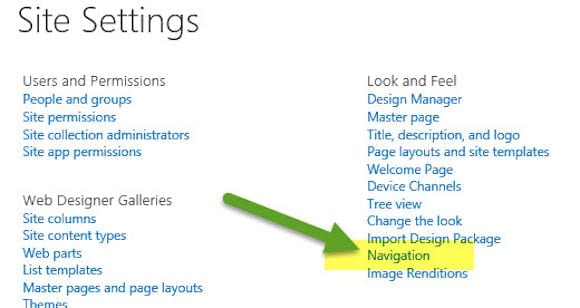
- Open Site Settings.
- Click Navigation in the Look and Feel settings section.
Note: If this option is not there, you’ll need to enable the Site Collection publishing feature. It will allow you to modify the navigation settings.
- In the navigation settings window, choose one of your navigation menus and select Managed Navigation.
- Scroll down the navigation settings window to the Term Set selection section. Click Create Term Set, then scroll down and click OK to save your settings.
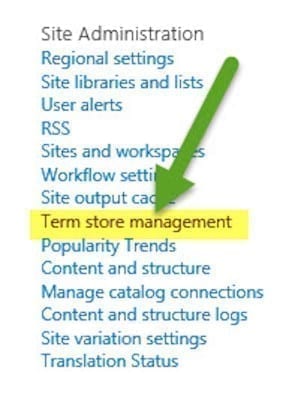
- Back at the Site Settings page, click Term Store Management in the Site Administration settings group.
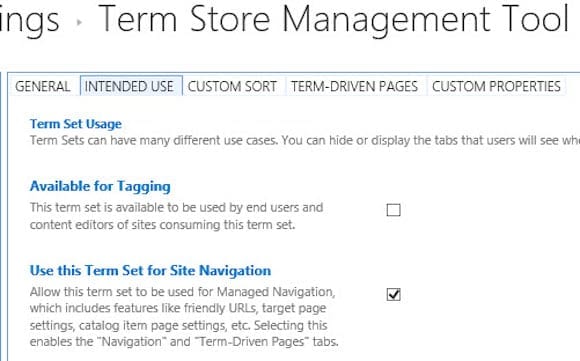
- In the Term Store Management Tool, expand your site collection term set group and select the term set that was created in the previous step. Select the Intended Use tab and verify that Use this Term Set for Site Navigation is enabled. If it isn’t, enable it by putting a check in the box and then press Save.
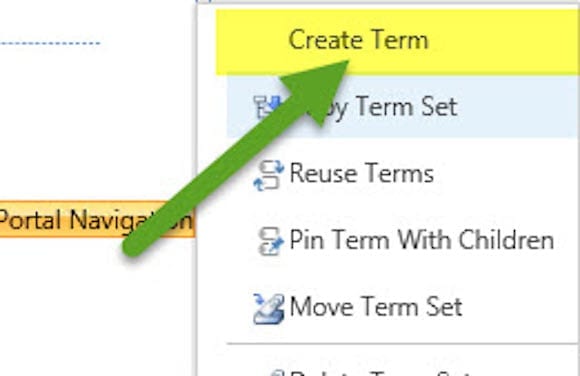
- On your site collection term set (selected on the left pane), right-click the term set and choose Create Term. Name your term in the navigation menu.
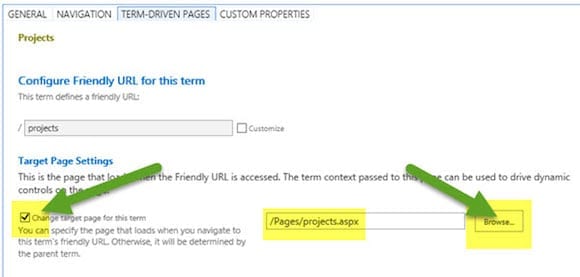
- Click your added term, then select the Term Driven Pages tab of the Term Settings. Put a check in the checkbox to Change target page for this term.
- Click Browse and find the page that you want assigned to the navigation term. Click Save.
Managed Metadata Navigation
Through the configuration of both a term set and a term-driven page, you can have the page you created be displayed directly as part of your sites global navigation.
You also have a clean URL, so that when you click on the Projects navigation heading, your URL doesn’t change to a long path that includes “Pages” and “Projects.aspx.” This makes it very easy to market the new page to your team – simply click on http://staff/projects to find all of their projects.


