There are times when you need to quickly create a virtual hard disk, either VHD or VHDX, from a Windows ISO file that you have downloaded from Microsoft. Maybe you want to rapidly deploy a boot-from-VHD installation of the latest preview of Windows so you can safely dual boot your PC.
You might want to create a virtual hard disk that can be used by System Center Virtual Machine Manager (SCVMM) bare-metal provisioning of new Hyper-V hosts. Or maybe you want to find the quickest way to deploy your first Windows guest OS in a Hyper-V virtual machine. In this post, I will show you how to use a PowerShell tool called Convert-WindowsImage.ps1 to create a VHD with a working Windows 7 or Server 2008 R2 and later installation from an image that is stored in a Windows ISO file.
What Does Convert-WindowsImage.ps1 Do?
Microsoft changed how they package Windows with the release of Longhorn, which was Windows Vista and Windows Server 2008. The old days of compressed files and cab files being thrown onto a CD were over. Instead, Microsoft decided that they would have two supported file-based container types for the IT pro:
- Virtual hard disk: The VHD and VHDX formats provide a mountable file-based image for virtualization. A bootable operating system and data can be stored on a file system that is contained within a virtual hard disk. This is the type of container that we use with Hyper-V virtual machines.
- Windows Imaging File Format: The WIM container is a type of file that is used to package up a Windows image in a single distributable file. A WIM file can contain one or more de-duplicated and compressed Windows images. Typically WIM files are used to capture working Windows installations with the intention of deploying them to one or more computers with a similar boot hardware architecture.
The ISO that you download from Microsoft contains a WIM file called INSTALL.WIM in the source folder. We can use the images that are contained within that WIM file to deploy a virtual hard disk (either VHD or VHDX) with a fully functional Windows installation using the free download, Convert-WindowsImage.ps1.
Using Convert-WindowsImage.ps1
Download this free tool from the TechNet Gallery. Note that, like other such solutions, this tool is not supported by Microsoft, but it is doing work that is legitimate. It’s a very handy utility that I have used dozens of times to rapidly provision new images.
You can use this tool in two ways. With some effort, you can learn the command line options that are documented on the download page. This might be useful if you are scripting a larger solution. However, I have only ever used the GUI option which, although offers fewer features, provides me with the “just give me what I need” solution that I require from time to time. You can launch the GUI using the following at a PowerShell prompt:
.Convert-WindowsImage.ps1 –ShowUI
Note that this tool is a PowerShell script so it will require the enablement of PowerShell script execution, which is normally disabled by default.
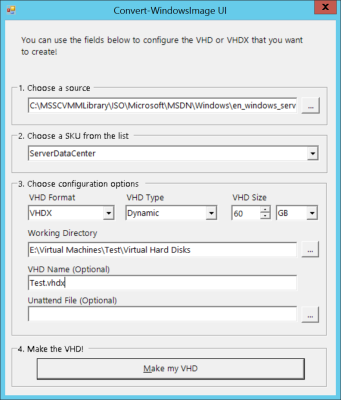
Creating a virtual hard disk from an ISO file. (Image: Aidan Finn)
There are a number of things to configure in the UI:
- Select an ISO file that you have downloaded from Microsoft
- Give the script a few seconds to find and scan the INSTALL.WIM file. The Choose A SKU From The List drop-down list box will be populated with images contained within that file. Select your desired type of installation.
- Now you configure the virtual hard disk. For Hyper-V, you should normally choose VHDX, but you would select VHD if Azure mobility is a concern. Select a type (Dynamic or Fixed) and enter the size of the new virtual hard disk.
- The working directory the location where the new virtual hard disk will be created.
- Enter the name of the new virtual hard disk
- Optionally, you can select an autounattend.xml file that you have created for the operating system using Windows System Image Manager (WSIM). This can be used to customize the installation.
When done, click Make My VHD and wait. You can monitor the progress of the job in the PowerShell window. This is also a good place to diagnose any failures. It will take a while, but a shiny new installation of Windows will be created in the working directory with a brand new installation of Windows. Note that the operating system is in a generalized state — it will specialize when the virtual hard disk is booted. In other words, that’s when a computer name, SID, and all the other uniqueness is created. What you have is a generic installation that can be used over and over.
Using the Virtual Hard Disk
You can take this virtual hard disk and simply place it in a library for reuse. I prefer to attach the virtual hard disk to a blank virtual machine and boot it up. This allows me to patch the operating system and add other specializations, such as adding Sysinternals BGINFO. I will then run Sysprep to generalize the installation and store the virtual hard disk in a library for repeated reuse. You can see how to do this in another post on manual installations.


