


How to Use Restic for Backup
Restic is a Go-based backup utility. Built on the design principles of an efficient, easy-to-use, secure, and verifiable backup system, Restic meets and exceeds those goals. Designed to be able to locate the backups anywhere, including assumed un-trusted locations, Restic employs strong cryptographic mechanisms to secure your data wherever it may be stored. In this article, we explore using Restic to backup data to an S3 compatible storage location, DigitalOcean Spaces.
Installing the Restic Binary
Although you can use a number of different official package managers to install Restic, such as apt install restic, they will often install an out-of-date version. If the minimum version installed is greater than or equal to 0.9.4 then you can use the restic self-update command to quickly upgrade to the latest version. If you not, you will need to use the more traditional method. For this example, we are going to download the latest version and install the binary.
- In the shell, download the latest version found on this page, and using the
linux_amd64version. Extract the file and install
wget <https://github.com/restic/restic/releases/download/v0.11.0/restic_0.11.0_linux_amd64.bz2> bzip2 -d restic_0.11.0_linux_amd64.bz2 mv restic_0.11.0_linux_amd64.bz2 /usr/bin/restic chmod a+x /usr/bin/restic - Run the
self updatecommand to verify that we have the latest version.
restic self-update
Creating a Restic Repository
Restic needs a place to actually store the backups, to do this we need to initialize a repository. You can create a local repository to backup the data too, but in this example we are going to use an S3 compatible location, DigitalOcean Spaces, to send our backup files to. First, we need to tell Restic what the S3 access key and secret access key is. Additionally, you need to define a repository password to encrypt the data in your backup locations. By exporting the following environmental variables, Restic can operate without user intervention.
.restic_env – This name is arbitrary, but can be used through the command, source .restic_env.
export AWS_ACCESS_KEY_ID="digitalocean_spaces_access_key"
export AWS_SECRET_ACCESS_KEY="digitalocean_spaces_secret_access_key"
You may notice that there is a space before each of these commands. That is to keep them from Bash history, if you happen to be using that shell.
Next, we need to initialize our Repository. We can do so via the following command. In this example we have opted to place the data in the restic bucket, appended to the given URL. Additionally, we use the init command to initialize the repository, which will prompt you for a password to encrypt the data.
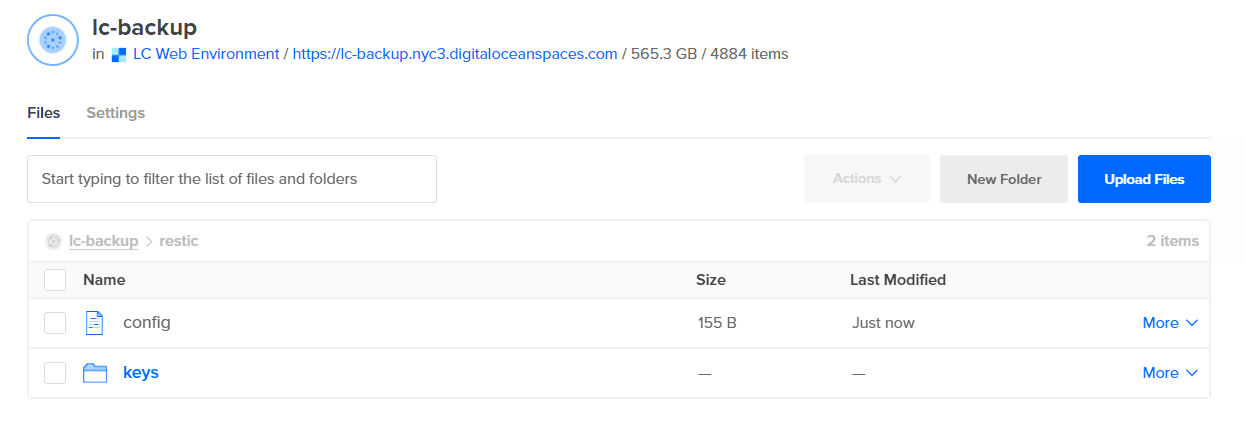
restic --repo s3:nyc3.digitaloceanspaces.com/lc-backup/restic init
If the bucket does not exist, it will be created in the location specified.

As you can also see, a new restic directory was created with the appropriate configuration data included.
To automate access to this repository, we need to add two more exports to the .restic_env file as shown below. Run the command source .restic_env again to re-export the variables.
export RESTIC_REPOSITORY="s3:nyc3.digitaloceanspaces.com/lc-backup/restic"
export RESTIC_PASSWORD='restic_password'
After sourcing the repository again, run a check command to make sure that that repository is free from errors and that you can access the repository without a password prompt.
restic check

Now that you have configured Restic, read on to learn how to backup and restore files!
Backup Files Using Restic
Backing up files in Restic is as simple as specifying the backup command and telling the utility which directory to use. In this example, there is a directory with five 100mb random files. This will create a snapshot of the data. This snapshot can be used for comparison later.
restic backup files

These files were randomly generated using the command:
dd if=/dev/urandom of=file2.txt bs=1048576 count=100
One of the very cool features of Restic is the deduplication and ability to only backup what has changed. To demonstrate this, we will copy two of the files that have been backed up to a new sub-directory and re-run a backup. You will notice that this completed in just under a second, but found the two changed files and directory.

To double-check, let’s compare snapshots to see what files are available. This is done by taking both snapshot ID’s and running the diff command.
restic diff 445f3643 e8f5720e
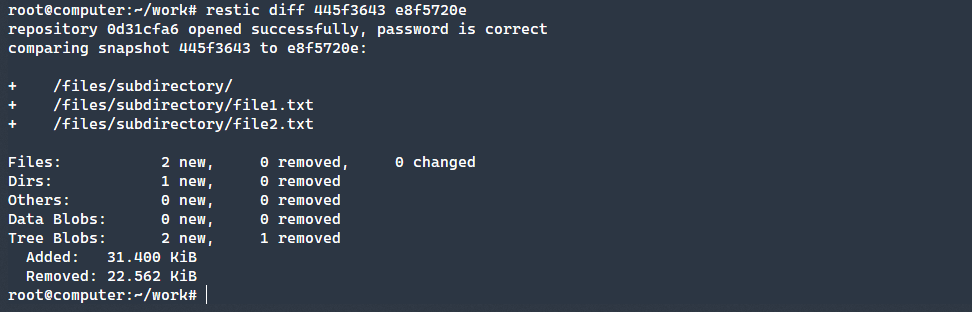
As you can see, our two files and directory are there. What if you did not know the snapshot ID? You can use the snapshots command to get the latest snapshots.
restic snapshots

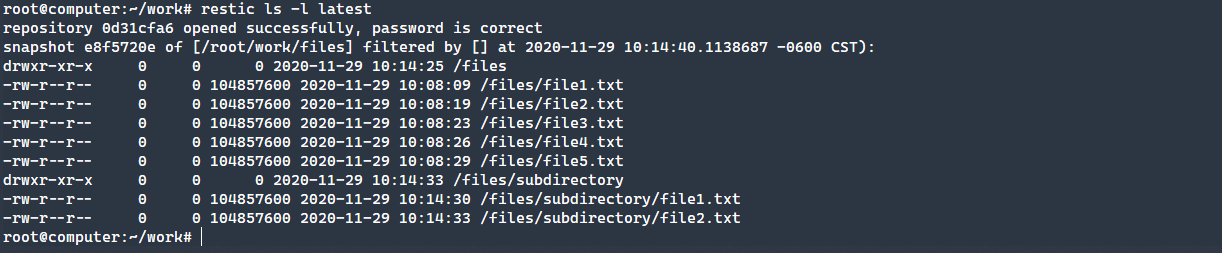
To list all the files that have been backed up by the latest snapshot, you can use the ls -l latest command, as seen below.
restic ls -l latest
Read on to learn how to restore files using Restic!
Restoring Files via Restic
The unthinkable has happened and you’ve lost files! Thankfully, you have been using Restic to keep up-to-date backups. Using the restore command, we tell Restic to use the latest backup and the target directory of files. This will create a new folder that has the restored files that you can work with.
restic restore latest --target files-restore

What if you only need a single file? You can use the --include parameter to specify just the file you need.
restic restore latest --target files-restore --include /files/file1.txt

Successfully backing up and restoring files is made easy with Restic as you can see from the above examples!
Conclusion
Restic is a powerful backup utility, all contained in a single Go binary. Not only is the tool portable and easy to use, strong cryptography and deduplication make Restic ideal for server backups to nearly any location. Get started using Restic today!