


How to Use PowerShell to Change and Update the Registry
- Blog
- PowerShell
- Post
The Windows registry is complicated and can be difficult to work with. Using PowerShell, we can leverage many different ways to interact and work with the registry and make managing a system much easier. The way that PowerShell sees the registry is through the registry PSDrive provider. This means that you can actually browse and interact with the registry as you might a typical filesystem. There are crucial differences with interacting with Registry keys and entries that you need to be aware of when working with the registry in PowerShell. Read on to learn how!
Listing Registry Keys
There are a few providers that are exposed via PowerShell. We can list all of the root’s available to the Registry PSProvider to see the entry points.
Get-PSDrive -PSProvider 'Registry' | Select-Object -Property Name, Root

There are only two that are available, the current user hive and the local machine hive. Those that are familiar with regedit.exe may notice that there are more available there than shown here.
HKEY_CLASSES_ROOT– This is a merged view for theSoftware\\Classessubkey in both the current user and local machine hives. Therefore you can modify these values by accessing the appropriate location in the already exposed locations.HKEY_USERS– This is a shortcut to the loaded hives of theHKEY_CURRENT_USERfor loaded users. A hive for a user is not available unless it is currently in use. Therefore several different SID’s are available here but not for users that are not logged in. In that situation, you have to manually load the hive.HKEY_CURRENT_CONFIG– This is a shortcut to theHKEY_LOCAL_MACHINE\\SYSTEM\\CurrentControlSet\\Hardware Profiles\\Current\\key and is just there mostly for convenience.
With all that in mind, how do we go about listing out a registry key? Using our current user for an example, we can simply list using the Get-ChildItem command.
Get-ChildItem -Path 'HKCU:\Printers'
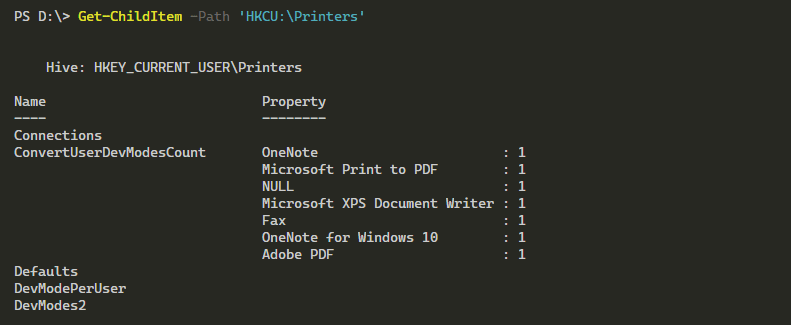
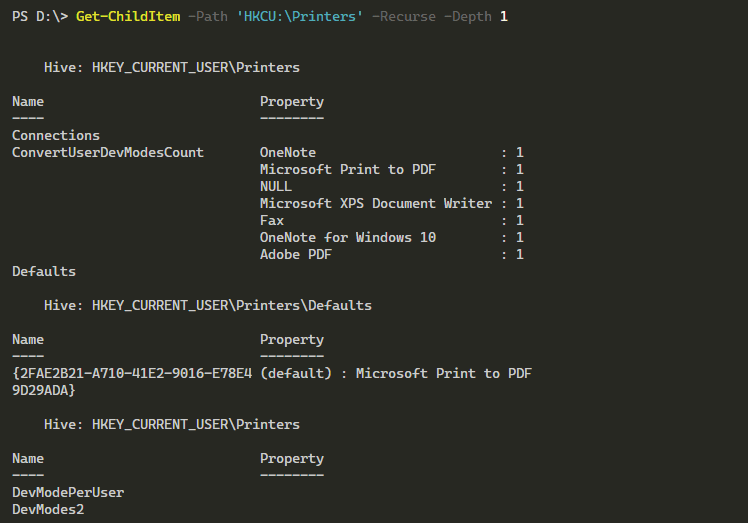
You can see that we are accessing this via the PSDrive shortcut of HKCU. Something you may quickly notice is that there is a Property that doesn’t typically exist when using Get-ChildItem in the file context. This is because every key in the registry is seen as a container, and those with only subkeys, such as the Connections key will not show any properties, otherwise they are listed out. You can see this in practice by recursing the registry key and see subkeys and their properties.
Get-ChildItem -Path 'HKCU:\Printers' -Recurse -Depth 1
Now that we know how to list registry keys and their properties, how do we actually create a registry key? Read on to learn how to do this!
Creating a New Registry Key
Sometimes we want to create a new key that can then be used to store information that is persistent across reboots, or if an application needs a specific registry to exist. This is easy to do using the New-Item and New-ItemProperty. Using New-Item we will create a new key and then create individual registry entries, using the New-ItemProperty command.
New-Item -Path 'HKCU:\MyKey'

Now that we have a container key, let’s add a registry entries using the New-ItemProperty command.
New-ItemProperty -Path 'HKCU:\MyKey' -Name 'Property1' -Value 'Value1'

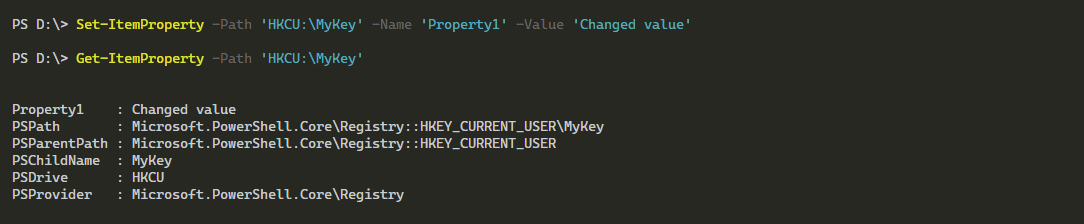
Wait a second, if we run Get-ChildItem -Path 'HKCU:\\MyKey nothing will be returned! This is because without subkeys the key acts as a container with just properties. When you specifically address a key this way, you are getting the subkeys. To make sure that we created our key and the available values, use Get-ItemProperty.
Get-ItemProperty -Path 'HKCU:\MyKey'

One last note, there are a few different registry value types such as MultiString, Binary, DWord, QWord, String, or ExpandString. These can be used in New-ItemProperty and the PropertyType to create the equivalent types in Registry. Shown below are examples of each of these in practice.
New-ItemProperty -Path 'HKCU:\\MyKey' -PropertyType 'String' -Name 'String' -Value 'This is a string!'
New-ItemProperty -Path 'HKCU:\\MyKey' -PropertyType 'ExpandString' -Name 'ExpandedString' -Value '"Expanded String" "%windir%"'
New-ItemProperty -Path 'HKCU:\\MyKey' -PropertyType 'MultiString' -Name 'MultiString' -Value @('Value1','Value2','Value3')
New-ItemProperty -Path 'HKCU:\\MyKey' -PropertyType 'DWord' -Name 'DWord' -Value 1
New-ItemProperty -Path 'HKCU:\\MyKey' -PropertyType 'QWord' -Name 'QWord' -Value 1
New-ItemProperty -Path 'HKCU:\\MyKey' -PropertyType 'Binary' -Name 'Binary' -Value ([byte[]](0x30,0x31,0xFF))

You might notice the value of
%windir%is expanded toC:\\WIDOWSwhen the property is accessed. That is the expanded string in action!
Read on to learn how to modify registry entries!
Modifying a Registry Key and Entry
Now that we have created our registry key, how do we go about modifying that key? Using the Set-Item and Set-ItemProperty commands, we can modify our keys and entries as needed. First, let’s modify the Property1 value.
Set-ItemProperty -Path 'HKCU:\MyKey' -Name 'Property1' -Value 'Changed value'
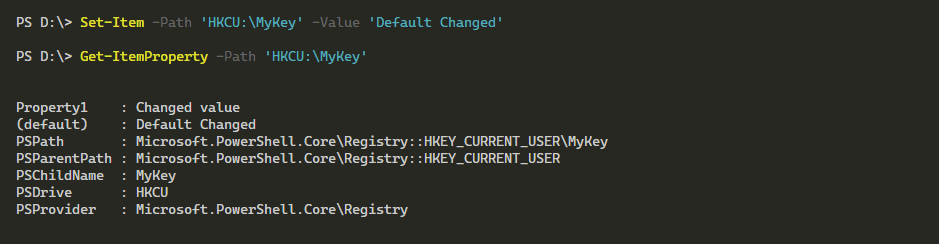
As shown above, we have changed the value of Property1. It is as easy as that! Of course, there are a few good things to know when working with values. There is a special key that is the (default) key of a given registry key. To modify this, the easiest way is using Set-Item as shown below.
Set-Item -Path 'HKCU:\MyKey' -Value 'Default Changed'
Read on to learn how to remove a registry key, when you need to clean up all those extra keys!
Removing a Registry Key
Finally, we need to remove the keys that we have created. You can either remove a single registry entry or an entire key. To do this we can use either the Remove-ItemProperty or the Remove-Item commands. First, let us remove a single property, using Remove-ItemProperty as seen below.
Remove-ItemProperty -Path 'HKCU:\MyKey' -Name 'ExpandedString'
Of course, we may just decide to remove the entire key and all subkeys. To do that we can use Remove-Item as shown below.
Remove-Item -Path 'HKCU:\\MyKey' -Recurse
Conclusion
Working with Registry in PowerShell is easy to do once the oddities of the provider are understood. Vastly simpler than older Windows command-line tools and easily integrated into scripts and functions, PowerShell is ideal for manipulating, creating, and removing Registry keys and entries!