


How to Enable TPM for Windows 11 and Solve Compatibility Issues
Microsoft has officially announced Windows 11 and with it comes a new UI, a new servicing model, and a strict new requirement for the minimum specs that are required to run the OS. In this post, I will help you understand the steps you can take today to make sure your computer is ready for the OS when it ships later this year.
At the foundation of Windows 11, there are two major changes that are impacting users and Microsoft has a Windows 11 tool that can help you understand any blockers on your specific device – you can download the tool here.
Microsoft provides the following hardware guidance for Windows 11:
- Processor: 1 gigahertz (GHz) or faster with 2 or more cores on a compatible 64-bit processor or System on a Chip (SoC)
- RAM: 4 gigabyte (GB)
- Storage: 64 GB or larger storage device
- System firmware: Trusted Platform Module (TPM) version 2.0
- Graphics card: Compatible with DirectX 12 or later with WDDM 2.0 driver
- S mode is only supported on Home edition of Windows 11. If you are running a different edition of Windows in S mode, you will need to first switch out of S mode prior to upgrading.
Configuring TPM
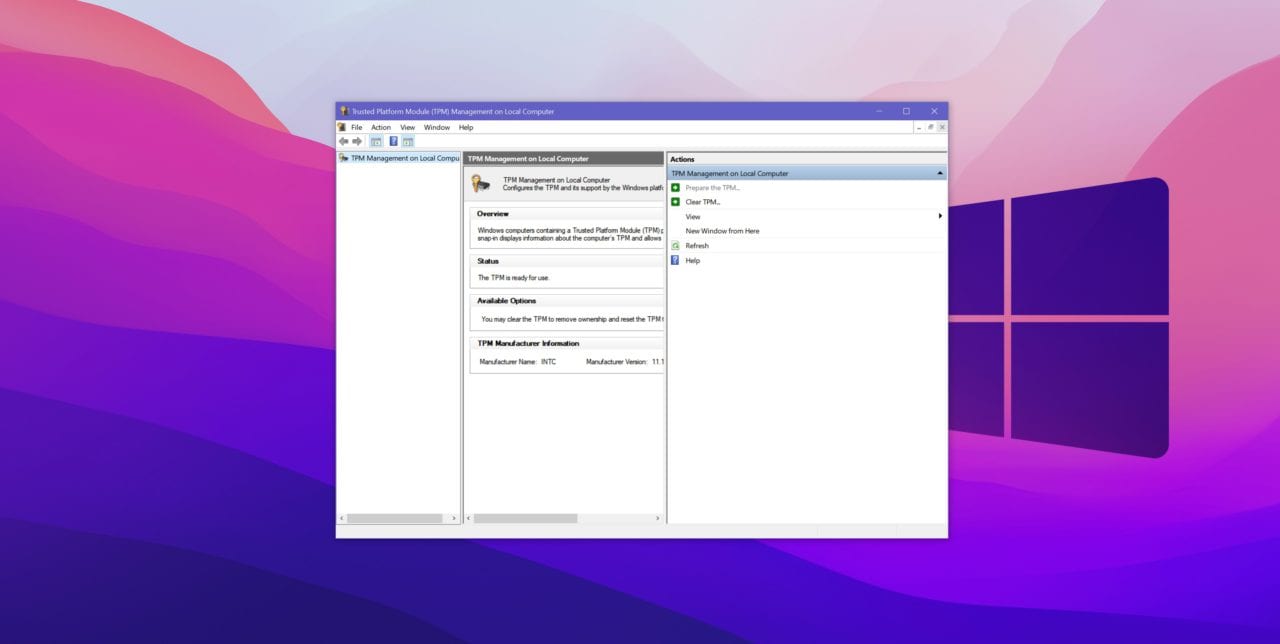
Starting with the TPM scenario. The reality here is that for most users, this will not be a problem (as long as you have a newer CPU). But where many people are running into problems is that their TPM is not enabled or needs to be configured.
The first step you should follow is:
- Hit your Windows key on your keyboard
- Type Run
- Type tpm.msc
This will open up the TPM tool on Windows and will let you know if your device has the module installed and operational. If your machine tells you it is not installed, continue below, if you do have it installed, jump down to the supported CPU section.
If your device was built by an OEM (original equipment manufacturer) or you built it yourself in the past couple of years, it likely has a TPM chip but it is not enabled. The good news is that you can enable it but the bad news is that that instruction will be specific to your hardware.
Meaning, you should try to find the instruction manual for your motherboard but if you don’t know where that is, there are still a few steps you can take to enable to feature:
- Restart your desktop/laptop
- Look for the on-screen command to enter your bios (usually F2/Del/F12)
- Look for a security tab (or it may be under Advanced CPU configuration)
- Look for a listing of TPM, Intel Platform Trust Tech (IPTT), AMD CPU fTPM, or PCH-FW
- Toggle the setting to Enabled
- Save (F10 or similar keystroke)
- Exit the BIOS and your machine will reboot.
If your machine does not have any of these options, this does not mean you have to buy new hardware (yet). If you built your own PC, there is a good chance your motherboard supports TPM modules but the manufacture did not include one – you can buy one online and attach it to your motherboard.
But before you do that, you will need to investigate if your motherboard has the correct header to attach the TPM module (look in your instruction manual to see if this is an option). Also, keep in mind that you may need to purchase a specific TPM module for your board.
Processor Compatibility
The bigger change that is going to leave a lot of people behind on Windows 10 is processor compatibility. The TPM configuration noted above, while annoying, is an easy fix as all newer processors have this functionality baked in since roughly 2016. But Microsoft has made a decision, that they have yet to fully explain why it is recommended to need an 8th generation Intel chip or newer to run the OS.
Befuddling, Microsoft is currently selling the Surface Studio 2 with a starting price at $3500 and it does not support Windows 11. The device has a 7th generation Intel chip which means it is not officially supported or recommended that you run Windows 11.
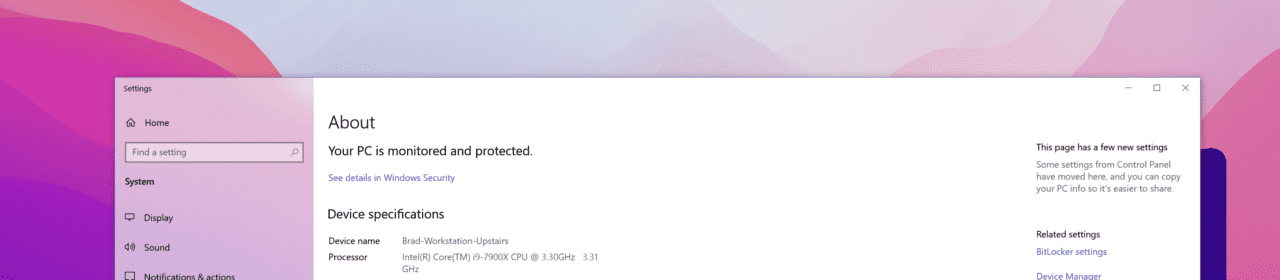
To determine what CPU your device has installed
- Hit the Windows Key
- Type “About My PC”
- Hit Enter
Windows will open a settings page that will list your system specs and in that list, you will see your CPU. Unfortunately, it doesn’t say the generation which means you will need to search for the specific generation. As a broad Intel guide, for i5 chip, unsupported models would be an i5-7200 and below, and for i7, it would be an i7-7700 and below – this is a broad guide and you should search your own CPU to find the exact generation.
You can find the official list of Intel chips supported in Windows 11, here.
On the AMD side, Microsoft says that you will need a Ryzen 3400G or better. As with the Intel chips, you will need to do your own research to determine if your chip is supported but if it’s less than a couple of years old, you should be able to run Windows 11 but if it’s older than 4 years, you may be looking at new hardware.
You can find the official list of AMD chips supported in Windows 11, here.
Additional Information
Microsoft’s ‘line in the sand’ for CPUs isn’t clear cut as older Intel chips, dating back to Intel 6th gen, have support for TPM 2.0 which meets the security requirement and the core requirement. More annoyingly, chips like the Intel 7700K are more than capable of running Windows 11 and running it well but are left out of Windows 11 for reasons the company has not shared.
This is the first significant update to Windows spec requirements in many years and it’s causing confusion with consumers. Only time will tell if Microsoft relaxes requirements on supported chips or if they are going to stand firm with the initial compatibility list.