How to Create an Azure RemoteApp Template
Microsoft’s RDS-in-the-cloud service, Azure RemoteApp, allows you to upload your own set of applications to be presented to your users. This is accomplished using a custom template. I will explain what an Azure RemoteApp custom template is and how to create one in this article.
Adding Custom Applications
Some of the lighter articles on RemoteApp only discuss the possibility of running Office 365 Pro Plus as a published application in Azure. In reality, you can run any application in Azure as long as:
- It runs on Windows Server 2012 R2 (WS2012 R2).
- It is compatible with Remote Desktop Services (RDS).
- There are no hardware dependencies.
- Licensing doesn’t get in the way – every vendor is different, so check this out before proceeding.
We can upload these applications as a part of a custom template; this a virtual hard disk containing a generalized copy of a WS2012 R2 RDS session host with your custom applications. Azure provides a script and command to upload this VHD file to Azure. You then create a RemoteApp app collection in Azure specifying that your new custom template should be used. RemoteApp will create virtual session hosts, managed by Azure, for your users to log into. Any user that is assigned to the app collection will be able to access any application that is in the VHD and that you choose to publish in the app collection.
Furthermore, if you choose to create a hybrid collection, the resulting session host virtual machines will become members of the domain that you specify. This allows you to manage those session hosts and the users’ sessions via Group Policy and login and logoff scripts.
Creating a Custom Template
The tradition method of creating a custom template is to do this on a Hyper-V host that resides in your site. The downside is that you will be uploading a large VHD to Azure, which could challenge your upload bandwidth capabilities — a basic machine with Office 2013 took me about an hour to upload on a 100 Mbps connection. There are some third-party posts on how to create a machine in Azure, but I have yet to verify this process.
The steps you will follow to create the custom template on Hyper-V are as follows:
- Create a virtual machine
- Install WS2012 R2
- Add roles and features
- Install software
- Disable EFS
- Generalize the OS
- Upload the VHD
Create a Virtual Machine
Create a virtual machine with the following specification:
- Generation 1: Generation 2 virtual machines are not supported in Azure.
- VHD format no bigger than 127 GB: Azure boot disks must be no bigger than 127 GB and they must not be the BHDX format. You can use either dynamically expanding or fixed virtual hard disks. The dynamically expanding disk has the advantage of being quicker to upload.
Install Windows Server 2012 R2
Deploy a copy of WS2012 R2 into the virtual machine. Make sure that you do not opt to use the GPT partition style for the C: drive — only the default master boot record (MBR) is supported. The virtual hard disk should contain a single volume, which is the C: drive.
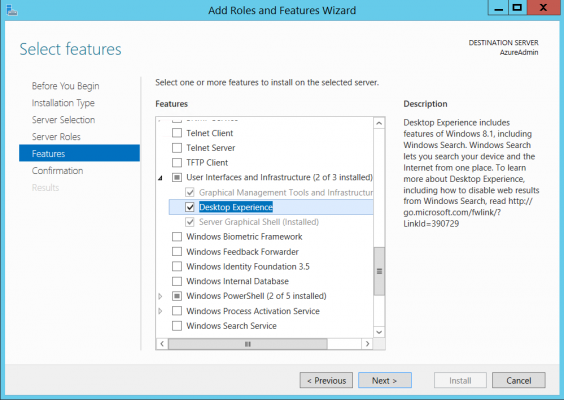
Add Roles and Features
There are two elements that you need to add via Server Manager or PowerShell:
- Remote Desktop Session Host: This role service is a part of Remote Desktop Services. Do not install any other RDS service.
- Desktop Experience: You can find this feature under User Interfaces and Infrastructure.
This is a good time to patch the guest OS of your virtual machine. It’s also a good idea to apply bug and security fixes after updating the OS.
Install Software
Get your custom applications ready and follow any guidance the vendor has provided for installing their application onto an RDS session host.
You will need to check for patches and hotfixes again.
Disable EFS
Azure does not support EFS running in the guest OS. You can disable the service using one of two methods. The first is to open an elevated command prompt and run:
fsutil behavior set disableencryption 1
The second is to open REGEDIT, browse to HKLM\System\CurrentControlSet\Control\FileSystem and set NtfsDisableEncryption to 1.
Reboot the virtual machine to apply the change.
Generalize the OS
Run Sysprep using the following command:
C:\Windows\System32\sysprep\sysprep.exe /generalize /oobe /shutdown
Do not, under any circumstance, use the /mode:vm parameter. Once the virtual machine shuts down, place the VHD somewhere safe where you will be able to upload it later.
Upload the VHD
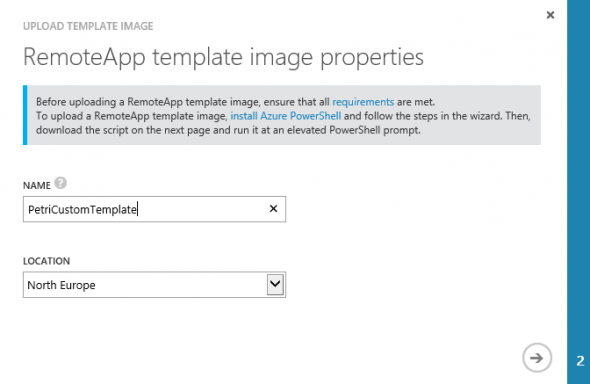
Open the Azure management portal in your browser, and navigate to Template Images in RemoteApp. The dialog allows you to create a metadata placeholder for your VHD/custom template. Name the custom template and specify the region of choice.
Do not rush on the next screen. Two things will happen that you need to act on:
- Upload script: You are promoted to save a script called Upload-AzureRemoteAppTemplateImage.ps1. Save it in a folder of choice on your PC/host, such as C:\Temp.
- Upload command: Copy the PowerShell script command and save it to a .PS1 file, such as upload.PS1, that is located in the same folder as the previously saved upload script.
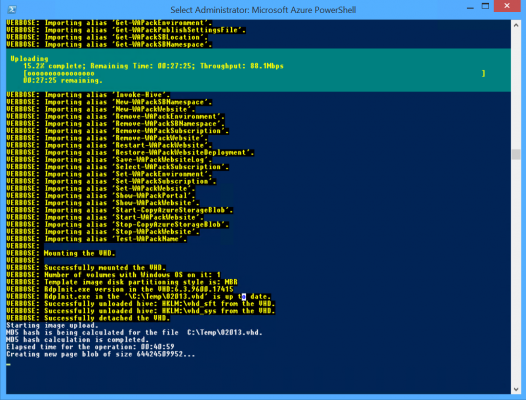
Run the upload command — maybe by running upload.PS1. The upload script will start by preparing the environment. After a few moments, you will be asked to select a file to upload. Browse to your VHD and select it. And then … wait … and … wait … and … wait.
The script will spend some time scanning the VHD to ensure that it complies with the above requirements and then upload it and this second phase takes quite a bit of time, depending on your bandwidth. You do not need to perform the upload from any specific location. Maybe you could put it on your laptop and find a hotel with a nice fibre or leased-line connection and sit back drinking tea or coffee while the upload races along!