


How Does Azure Backup via Disk Work?
In this post, I’ll give you an overview of the process that Azure Backup currently uses to seed the first full backup using a secure couriered disk transfer process.
The Backup Process
Before we talk about out-of-band disk transfers, we need to understand how Azure Backup copies data to Azure. The following process is used to copy data to a backup vault in the cloud:
- A full backup copies everything to Azure, compress and encrypting the data before it leaves the customer site.
- Incremental backups run according to your schedule to send the changes, at a block level, since the last backup to the cloud. The blocks are encrypted and compressed before leaving the customer site.
The result is what is commonly referred to as a synthetic full backup, although I’m sure that the Azure Backup team probably has a different name for their engine! The backup vault understands how to reassemble the blocks to recover files from any point in the retention policy.
The Full Backup Challenge
Typically, a full backup is very large, and incremental backups are a trickle feed of changes. A company might have enough bandwidth to deal with even an exceptionally large incremental backup. But a lot of companies will struggle with the first full backup, as they don’t want that first job to take days or even weeks.
Ideally, an online backup solution will have a means where:
- You can opt to do the first full backup online or via a disk transfer.
- Incremental backups start once the first full backup has been transferred to the online backup vault.
Azure Backup Disk Transfer
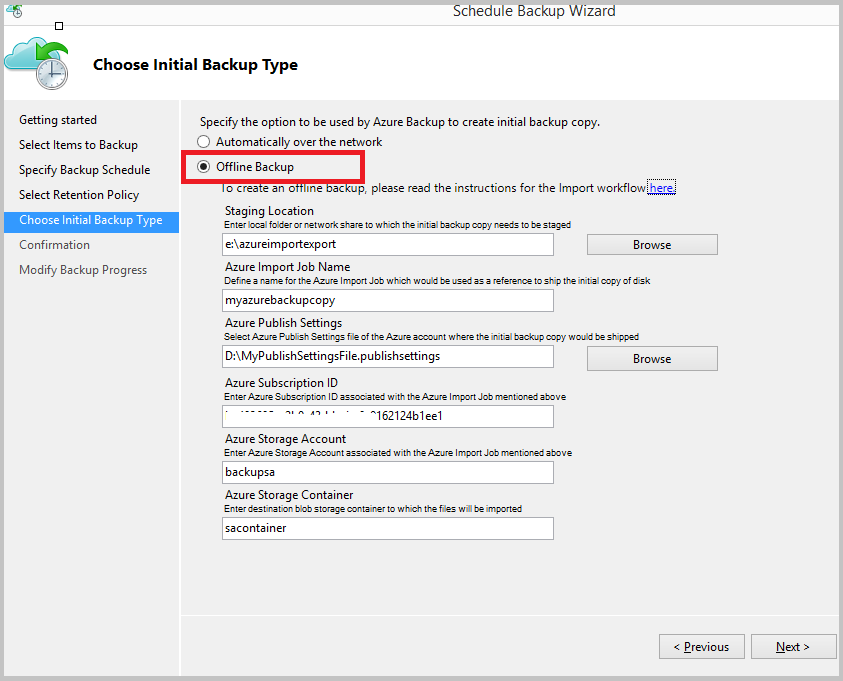
Azure Backup, including the MARS agent, Azure Backup Server, and System Center Data Protection Manager, offers a method for seeding the first backup via a secure disk transfer. When you create a backup schedule, you are asked if you want to do the first backup online or via offline backup.
How Does the Process Work?
The screen above gives you some hints of how the process is started. There are several different system requirements. In Azure, you will need:
- You need a container in an Azure classic storage account in the Azure region that you want to back up to.
- You will need an Azure classic backup vault.
- The Azure Publish Settings XML file for the customer’s Azure subscription.
- The subscription ID for the customer’s Azure subscription.
On the customer site, you will need:
- You will require some free storage space on the customer site that is big enough to temporarily hold the first backup — this can be a local folder or a shared folder on the LAN.
- A machine that will be used to prepare the data for transport on physical disks.
- BitLocker is enabled on this machine.
- Naked (no caddies) SATA II/III disks, up to 8 TB according to latest documentation by Azure Backup, that will be used to transport the data by courier.
- A way to connect the SATA disks to your machine — I recommend a simple USB/SATA connector cable because I’ve experienced driver issues with a USB disk dock/duplicator.
- A copy of the Azure import/export drive preparation tool.
And then you start the process …
Step 1 – Deploy Prerequisites
Verify that you have deployed all of the system requirements. Pay special attention to the hardware requirements and keep your physical disk connectivity simple.
Step 2 – Schedule Backup
You deploy your Azure Backup solution and schedule a backup. Pay special attention to the job import name, storage account and storage container names when configuring the offline backup; you will require these later and the values must stay consistent for the process to be successful.
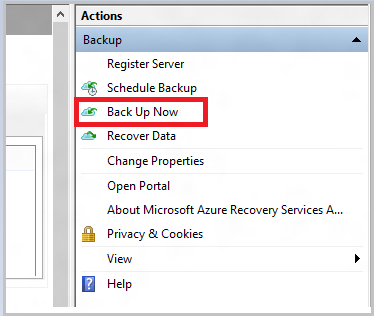
Once the job is created, you must manually start the first full backup.
Azure Backup will back up all of your selected data to the staging location — either a directory or file share that you provisioned and selected in the previous step.
Step 3 – Drive Preparation Tool
You will run WAImportExper.EXE with the PrepImport flag to:
- Prepare your disk(s)
- Transfer the backup data from the staging location to the disk(s)
This tool also creates a journal file for each disk, with the following information:
- The customer’s Azure subscription ID
- The storage account key for the storage account
- The name of the container that you created in Azure — more on this soon.
Step 4 – Create an Import Job
You sign into the old Azure management portal and browse to the new storage account. Here you will create an import job:
- Upload the journal file(s) created by the drive preparation tool.
- Enter the name of the import job, matching exactly what you entered when scheduling the backup job (Azure Import Job Name).
- Select the Azure region that contains your backup vault and storage account — this will give you the destination address for your disk package.
- Select a return carrier and enter your courier account details.
Step 5 – Ship the Disk
Call your courier and ship the disk. There is some conflicting information about this step. It is stated by Microsoft that you must use FedEx to ship the disk to an Azure region. However, there is an anomaly. The North Europe region is in Dublin, Republic of Ireland. FedEx will not collect a package within the Republic of Ireland if the destination is in the Republic of Ireland. I contacted Azure Support, and they confirmed that:
- You can ship the disk(s) to Azure with a carrier of your choice.
- You must use FedEx to collect the disk(s) from Azure.
Note that the drive preparation tool has encrypted the disk using BitLocker so you have secured the data transfer and protected the business against regulatory or data protection risks.
Step 6 – Data Import
You can monitor the disk transfer process using the management portal. The disk will have a “shipping” status after you created the import job and supplied your shipping information. After arriving in the Azure data center, if the package is accepted (if you followed the process correctly) there can be a lag before the next step; this is when the status changes to “transferring” and data is imported by Microsoft staff from the disk(s) to the container in your storage account.
Step 7 – Backup Vault Transfer
Once your data is in the storage account container, Azure Backup will, without your input, transfer the data to the backup vault; this completes the offline backup process.
Step 8 – Incremental Backups
Normal incremental backups will commence after the first full backup (the disk import) has completed. Azure Backup will automatically commence with sub-file difference backups that are encrypted and compressed before leaving the customer site.
This is the backup traffic that you should size bandwidth requirements for, because the biggest backup (the initial full backup) is complete, and Azure Backup will only use differences from now on.
What Do You Think?
The Azure Backup team is very interested in what you think of this process? Do you need to use a seeding process for the first backup? Have you looked at or used the step by step instructions? Were you scared off by the process? Did the import work for you? What improvements, if any, would you like to see? Please post below to share your thoughts.