


Microsoft Launches Group Expiration Policy into Preview

[Update, March 14, 2018] The Groups expiration policy is now generally available.
Automatically Expiring Office 365 Groups
On August 9, Microsoft put the Groups Expiration Policy into preview. Or, as the blog says, “automated expiration.” The new policy helps tenants keep the spread of Groups under control by timing them out after a set period, after which the expired groups are first soft-deleted and then permanently removed. The expiration policy applies to Office 365 Groups no matter what application creates or uses the groups –Teams, Outlook Groups, Yammer Groups, Stream, or anything else. Automated management processes are always welcome, but in this case, you need Azure Active Directory Premium licenses.
Gently Degrading Groups
Office 365 Groups have been available to tenants since November 2014. It is possible to restrict the ability to create new groups to a select set of users, but even in the most tightly-managed tenant, it is likely that groups eventually reach their best-by date and become disused.
Groups are not unusual in this respect. Experience shows that the same falloff in usage over time happens for shared mailboxes, distribution lists, public folders and other objects shared by teams of people.
Azure Active Directory Premium Needed
Office 365 creates a group expiration policy in a disabled state for every tenant. A different Azure AD policy controls the general settings for Office 365 Groups, including group creation. The expiration policy is an Azure Active Directory premium feature, so to enable the policy, your account needs an Azure Active Directory Premium license. If you access the Azure Portal without this license, you will not see the UI controls for the policy. However, you can manipulate the policy settings with PowerShell.
With a suitably licensed account. go to the Azure Active Directory portal and navigate to the Expiration option under Group Settings to reveal the policy settings (Figure 1). You can now enable the policy, define its settings, and then click Save to make the policy effective.
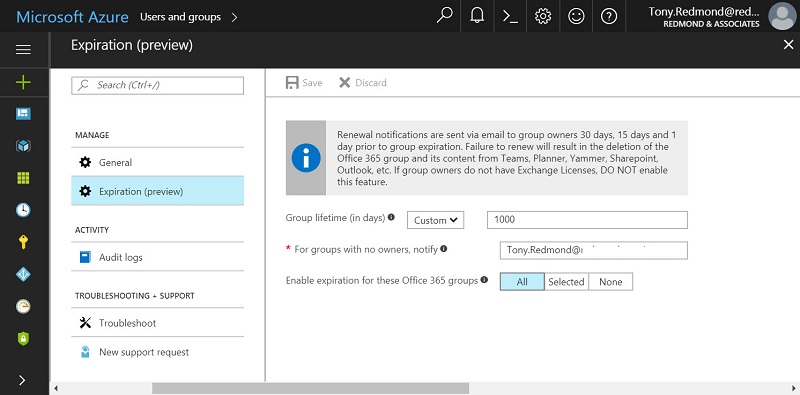
The settings are:
- The group lifetime: The default is 365 days, but you can select a higher value. I use 1,000 days for my tenant as I think this is enough to handle the lifecycle of most groups.
- The default notification address. This handles the situation where a group has no owner. You can specify one address (usually an administrator) to receive these notifications, or the address of a distribution group or Office 365 group, or addresses for multiple recipients (separated by semi-colons).
- The groups that come under the scope of the policy. Initially, the value is None, meaning that the policy is disabled. Selecting All means that every Office 365 Group in the tenant is within scope. The Selected button allows you to apply the policy to one or more groups. You pick the target groups for the policy from a list of all groups in the tenant. This is easy for a small tenant but can become very tiresome for larger tenants that support thousands of groups.
If you change the expiration policy from All to Selected, the policy ceases to apply to the groups outside the selected set and halts the expiration process for any of those groups.
Expiration Periods and Intervals
No one wants Office 365 to remove data without warning. When an expiration policy is active, Office 365 checks the last renewed date for every group and begins to send warning notifications to group owners to tell them when their groups need renewal. Office 365 sends three warning notifications before it removes a group:
- 30 days before the group expires.
- 15 days before the group expires.
- One day before the group expires.
For example, if the expiration interval is 365 days (one year), Office 365 uses the timeline in Table 1. (You cannot change these intervals as they are hardcoded).
| Days | Action |
| 1 | Group created (or renewed). |
| 335 | First expiry notification sent to group owners. |
| 350 | Second expiry notification sent to group owners |
| 364 | Final warning sent to group owners |
| 365 | Expiry period reached. Office 365 soft-deletes the group. |
| 395 | 30-day soft-delete retention period expires. Office 365 removes the group permanently. |
Table 1: Timeline for Group Expiry
Within minutes of enabling the policy, owners of expired groups begin to receive notifications. Notifications for expiring groups that do not have an owner go to the recipient nominated in the policy. After enabling group expiration, it is possible that some groups will expire immediately because their creation date is older than permitted by the expiry period. For instance, if you set an expiry period of one year, any group older than a year expires.
Normally, Office 365 soft-deletes expired groups. However, special processing occurs if groups expire when a tenant enables the expiration policy. Office 365 sends a special form of notification in this instance and treats these notifications as second reminders, so even though their groups have technically expired, owners have 15 days to renew these expired groups.
Expiry Notifications
Group owners receive expiry notifications (Figure 2) through email irrespective of how they create groups. For instance, you can create groups through Teams, Planner, Stream, SharePoint, Power BI, or Yammer without going anywhere near an email client. Obviously, this means that group owners need to check their mailbox regularly for expiry notifications. If not, they might overlook a notification and Office 365 will remove the group unexpectedly.
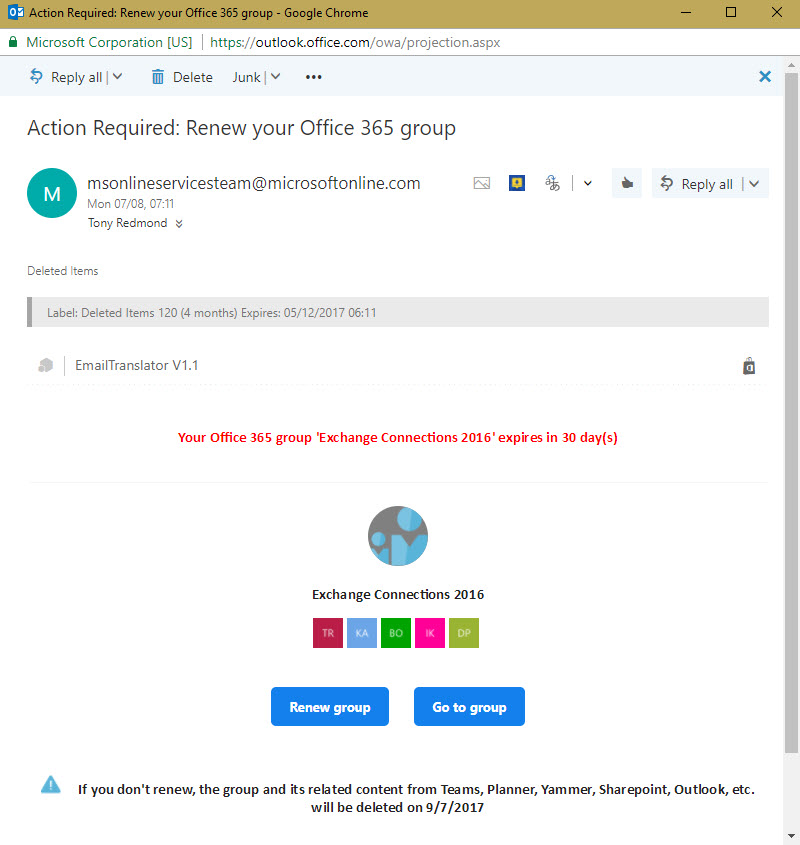
When they receive notifications, group owners decide whether to renew the group or let it expire. To renew a group, an owner can click the Renew group button in the notification message. This brings them to the Azure portal to renew the group. Three things can happen:
- If the group still exists and has not expired, Office 365 renews the group and signals success.
- If the group is soft-deleted, Office 365 restores it and sets a new expiration date.
- If the group is hard-deleted (permanently removed from the tenant), the owner sees an error message. The group can no longer be recovered.
If owners choose not to renew a group, Office 365 will eventually expire and soft-delete the group. At this point, Office 365 removes all the group resources – the group mailbox, Yammer group, Stream group, team, plans, and team site. If you decide to let a group go through to final deletion, you should make sure to recover and preserve any valuable information that exists in these resources. This is not an automatic process and it will take time and effort to ensure the retrieval of any valuable information.
Restoring Removed Groups
When Office 365 soft-deletes a group, its owners get a confirmation that it has removed the group. This notification includes a Restore group button that the owner can click to restore the group and bring it back from the dead. However, like any other soft-deleted group, Office 365 permanently removes the group after 30 days, so you have limited time to restore a group. Alternatively, you can use PowerShell to recover a group.
The renewedDateTime property of a group holds the last renewal time for a group (or the time of creation). Office 365 adds the expiry period to this date to know when a group expires. After you renew or restore a group. Office 365 updates its renewedDateTime property with the current date and time (you can see this information with the Graph Explorer but not with the Get-UnifiedGroup cmdlet) as a new starting point for the expiry countdown.
PowerShell Support
Version 2.0.0.137 (preview) of the Azure Active Directory PowerShell module has the cmdlets to deal with the group expiration policy. Two sets of cmdlets are available. The first manipulates the settings of the expiration policy. These are the *-AzureADMSGroupLifecyclePolicy cmdlets. The second set, the *-AzureADMSLifecyclePolicyGroup cmdlets, is used when you want the expiration policy to process selected groups rather than every group in the tenant.
For instance, to retrieve the settings for the current expiration policy, you run this command:
[PS] C:> Get-AzureADMSGroupLifecyclePolicy | Format-List

Id                          : 23036082-ac71-49ed-a8fd-24db5ad38379

GroupLifetimeInDays         : 1000

ManagedGroupTypes           : All

AlternateNotificationEmails : [email protected]
It is often easier and faster to manipulate the policy through the Azure AD portal, especially if you apply the policy to all groups. PowerShell and scripting become more important when you need to manage individual settings for hundreds or thousands of groups.
Automation is Good
Automated management of tenant assets is helpful, if you understand what is happening. In this case, Office 365 is good at detecting old and potentially-defunct groups and removing them in a two-phase process. Of course, an old group can be the most critical group in your tenant, so do not go on automatic pilot.
You can leave Office 365 to do its clean-up and hope that group owners do the right thing to recover potentially useful data before deletion occurs, but I suspect that some group owners will need coaching to understand their responsibilities.
Follow Tony on Twitter @12Knocksinna.
Want to know more about how to manage Office 365? Find what you need to know in “Office 365 for IT Pros”, the most comprehensive eBook covering all aspects of Office 365. Available in PDF and EPUB formats (suitable for iBooks) or for Amazon Kindle.