


Free Tools for Importing Email to Office 365
In this Ask the Admin, I’ll look at the different options for importing organizational email into Office 365, including large user archives.
There are several different options for migrating email to Office 365, including third-party solutions from the likes of CodeTwo and Mimecast, but in this article I want to outline the free tools available from Microsoft. Whether you have just a handful of mailboxes to migrate, or hundreds of users with terabytes of locally archived mail, there’s a solution for you.
Outlook.com Connected Accounts
Both Office 365 and standard Microsoft accounts can be configured to use Connected Accounts via Outlook.com. This works using Post Office Protocol (POP), so the account you want to connect to Outlook.com must have POP enabled. To add a Connected Account, all you need to do is supply the email address and password for the account you want to connect. Once a connection has been established, you’ll see emails from the connected account appear in your Outlook.com inbox. Up to five Connected Accounts can be added.
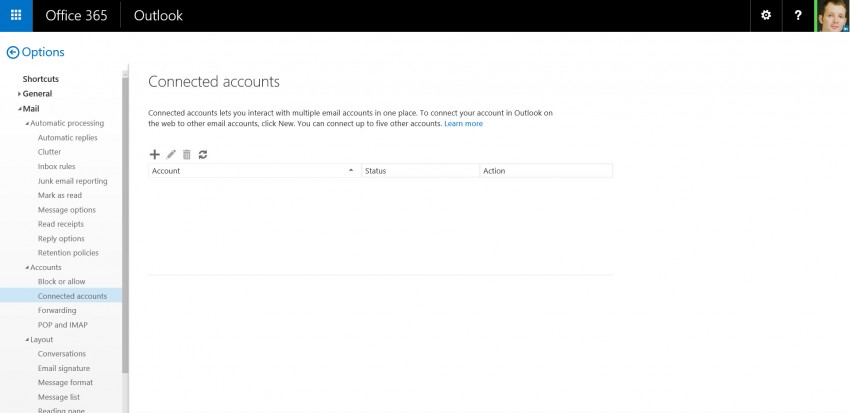
To set up a new Connected Account, log in to Outlook.com using your Microsoft account or Office 365 user account, and follow the instructions below:
- In Outlook.com, click on the settings icon in the top-right corner and select Options from the menu.
- On the Mail options screen, click Connected accounts on the left under Mail > Accounts.
- On the Connect accounts screen, click the add icon.
- In the New account connection panel, type the email address and password for the account you want to connect to Outlook.com, and then click OK.
This should be enough to add a Connected Account. If you receive a message that a secured connection could not be established, click OK to try an unsecured connection. If that’s still unsuccessful, repeat the above procedure, but this time click Skip to configure your account settings on the Unsecured connection screen:
- On the Choose your connection screen, select POP connection settings, and click OK.
- Enter a display name for the POP account, your username and password for the account you want to connect to, and the remote server connection details, and then click OK.
Outlook 2013
If you’d like a bit more control over which emails and folders are migrated to Office 365, one option is to install Outlook on the desktop, add any additional accounts you’d like to migrate mail from, and then use the Outlook interface to move mail manually.
Adding additional accounts in Outlook is a fairly similar process to adding Connected Accounts in Outlook.com, but instead of mail being integrated into one inbox, Outlook maintains separate inboxes and folder hierarchies for each account. To add accounts in Outlook 2013, click File in the top-left corner, and then Add Account on the Account Information screen. Then type your name, email address and password for the account in the Add Account dialog, and click Next to complete the process.

There’s also the option to use the Import/Export feature of Outlook 2013, which exports account data to a .PST file and allows you to import the data to the chosen account. To start the wizard, open Outlook and follow these instructions:
- Click File in the top left of Outlook.
- Then click Open & Export from the list of options on the left.
- Finally, click Import/Export on the Open screen to start the wizard.
Exchange Online Batch Migrations
The two options listed above work quite well if you’re dealing with a relatively small number of users, but once you need to migrate more than just a handful of mailboxes, you’ll want to look at alternative options. Exchange Online, the backbone of Office 365 email, can be configured with migration endpoints, which allow multiple email accounts to be imported from different messaging systems. If you have on premise Exchange servers, an Outlook Anywhere migration endpoint can be configured in Office 365 to connect to on premise Exchange for cutover staged migrations, and an Exchange Remote endpoint for hybrid migrations. Migration endpoints can be created manually, or automatically using the batch migration wizard in the Exchange Online admin center.
There are four types of batch migration:
- Remote move migration (supported by Exchange Server 2010 and later versions)
- Staged migration (supported by Exchange Server 2003 and Exchange Server 2007 only)
- Cutover migration (supported by Exchange Server 2003 and later versions)
- IMAP migration (supported by Exchange and other email systems)

You will need to select Remote move migration if you plan to move more than 2000 Exchange 2010 or 2013 mailboxes. Identities are managed using your on-premise Active Directory (AD), where this migration type is used for hybrid-cloud scenarios. Staged migrations are for Exchange 2003 and 2007 only, identities are managed in your on-premise AD and is suitable for moving mailboxes over a long period of time. Cutover migrations are for Exchange 2003 and later versions and move a maximum of 2000 mailboxes in a single batch job and also migrate identities to Office 365. Finally, IMAP migrations are supported by Exchange and most other email systems.
Migrating PST archives to Exchange Online
The tools and services described below differ from the above options in that they’re intended for migrating large email archives, rather than live user mailboxes.
Microsoft Exchange PST Capture
The primary purpose of this tool is to scan your on premise network for Outlook .PST files, and import the data to either Exchange Online or on premise Exchange mailboxes, with the ultimate goal of eliminating .PST files. Everything needed to import .PST files to Exchange Online is included in the tool, but you should remember that the processes of uploading .PST files to Exchange Online can be a slow and costly process. You can also learn more information on the Exchange PST Capture tool by visiting TechNet.
Office 365 Import Service
To address the cost and time involved in migrating .PST files to Exchange Online using the Exchange PST Capture tool, Microsoft announced the Office 365 Import Service, which still allows for network uploads of .PST files for smaller datasets, but you can also save data to hard disks and ship them directly to Microsoft.
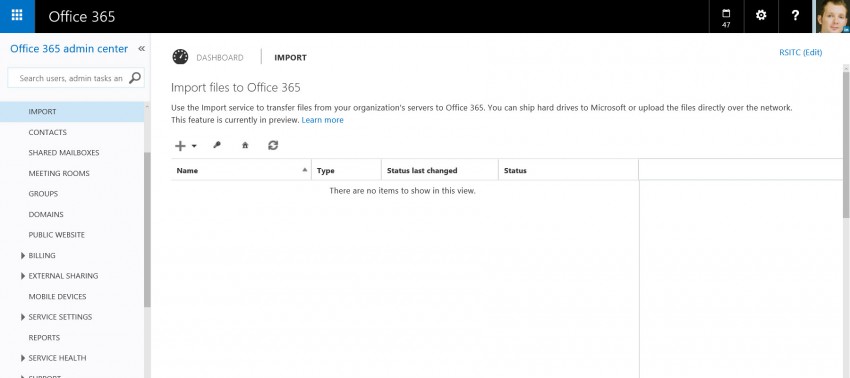
The Office 365 Import Service is accessible in the admin portal through the Import option in the menu on the left. PST files need to be uploaded to Azure using the Azure AzCopy tool, where they’re temporarily staged before being moved to Office 365. Additionally, a mapping file needs to be created and uploaded so that Office 365 is able to match the uploaded .PST files to the correct user mailboxes. For more information on the Office 365 Import Service, how to upload .PST files and create mapping files, or how to ship hard drives directly to Microsoft, see the Office 365 Import Service page on TechNet.