


VMware Workstation is, in my eyes, the best personal virtualization product around. Although other products exist, such as the free client Hyper-V on Windows 8/8.1 and Oracle Virtual Box, VMware Workstation has so many features that makes it much more usable compared to other offerings. I’ve used it for many years, and now VMware Workstation is on version 10. On my laptop I have several virtual machines (VMs) that I constantly use for various purposes, mostly running Windows Server 2012 R2 and Windows 7/8.1, but I also have some CentOS and RedHat VMs.
A couple of days ago I rebooted my laptop due to a Microsoft Windows Update, and when it started I launched VMware Workstation. I powered on one of my VMs, as I usually do. But this time I was presented with the following error:
Not enough physical memory is available to power on this virtual machine with its configured settings.
To fix this problem, power off other virtual machines, decrease the memory size of this virtual machine to 220 MB, increase the amount of physical memory for all virtual machines to 2256 MB, or adjust the additional memory settings to allow more virtual machine memory to be swapped.
It is possible that native applications and/or services have locked down memory which could be preventing the virtual machine from launching. Shutting down unnecessary applications or services may free enough memory to launch this virtual machine.
If you were able to power on this virtual machine on this host computer in the past, try rebooting the host computer. Rebooting may allow you to use slightly more host memory to run virtual machines.
And here’s a screenshot of the error I received:

The actual number of megabytes that the prompt tells you to configure may change, and sometimes it even changes between reboots of the host machine.
What? That cannot be right. My laptop has 16 GB of RAM and there were no apps that took more than 4 GB overall, which left more than 12 GB free. The VM I tried to boot was a Windows Server 2012 R2 machine with 4 GB of RAM.
I tried again, same error. I tried a different VM, same error. All my VMs couldn’t boot.
Since the same VMs worked just fine since my last reboot of the host laptop, I rebooted it, hoping it will make the error go away. It didn’t.
I looked around on the Internet. Reading some forum posts that I found, this error appears for a random reason and has been around in older versions of VMware Workstation, where it’s been found to go back to VMware Workstation 6.
4 Fixes for “Not enough physical memory” Errors
There were four approaches that I found to solve this error. For me, the third one worked, but I’ll list all of them just in case.
Fix #1 – Run as Administrator
1. Make sure VMware Workstation is not running.
2. If you have an icon for VMware Workstation on your desktop, right-click it and read on. If you don’t have an icon on the desktop, find it in Start and right-click it.
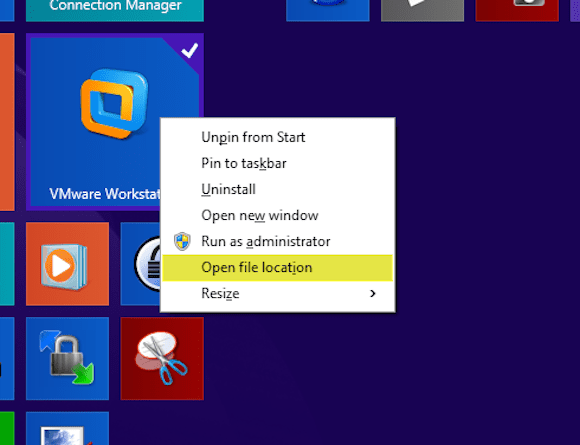
3. Select “Open file location.”
4. Right-click the VMware Workstation icon and select Properties. Go to the Compatibility tab and select “Run this program as administrator.”
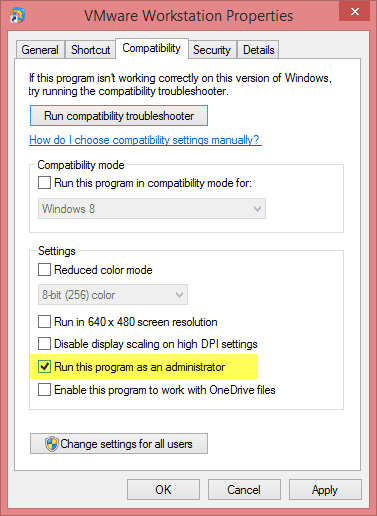
5. Click OK.
6. Try to run VMware Workstation and boot your VM. If it works, fine. If not, read on.
Fix #2 – Uninstall Windows Update Fix KB2995388
1. If you have the Windows Update fix KB2995388 installed on your machine, then you may want to remove it. It should solve the VMware error, but it will prevent you from getting the other fixes in this rollup update, so I wouldn’t rush to go down this path.
2. October 2014 update rollup for Windows RT 8.1, Windows 8.1, and Windows Server 2012 R2.
Fix #3 – Modify the config.ini file (Host Parameters)
1. Open the config.ini file located by default at C:\ProgramData\VMware\VMware Workstation.
2. Add the following line to the end of the file:
vmmon.disableHostParameters = “TRUE”
3. Save the file. You may need to edit it as an administrator in case you get an error during the save.
4. Reboot your host computer.
5. Try to run VMware Workstation and boot your VM.
Fix # 4 – Modify the config.ini file (VmMemPct)
1. Open the config.ini file located by default at C:\ProgramData\VMware\VMware Workstation.
2. Add the following lines to the end of the file:
prefvmx.minVmMemPct = "25"
3. Use “100” to run a few VMs with best performance, or use lower values such as “25” if you want to run many VMs at the same time.
Note: These settings can also be done through the VMware Workstation UI under > Edit > Preferences.

Fit all = 100
 Allow some = 50
 Allow most = 25
Some more tuning options:
- The VMware Continuum tuning guide provides instructions to set up the host for expected usage.
- Save the file. Note that you may need to edit it as administrator in case you get an error while saving.
- Reboot your host computer.
- Try to run VMware Workstation and boot your VM.
For me, the third fix worked. Hope this helps.