Exchange 2010 High Availability: Non-Mailbox Server Roles
Overview
Let’s say you have two CAS-HUB servers and you want to configure them both for High Availability. In this video post, you’re going to learn how to do just that. This lesson is taken directly from my Exchange Server 2010 High Availability Training.
In this demo, we’re working with two CAS-HUB servers named LAEX2K10CASHUB1 and LAEX2K10CASHUB2. We’ll start by enabling Network Load Balancing on both servers, enabling IP forwarding on the network adapters for both the 1st and 2nd CAS-HUB servers and finally establishing on the database itself that you need to use that CAS array.
Enable Network Load Balancing
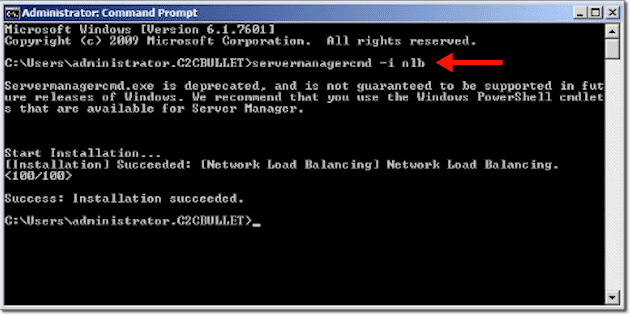
The first thing we need to do is enable Network Load Balancing on both servers. In our case, we’ll start with LAEX2K10CASHUB1. To do that, we simply type:
servermanagercmd -i nlb
You may get a message saying that servermanagercmd.exe is deprecated, but trust me, it works. Alternatively, you can enable NLB through the Server Manager or through PowerShell. There’s all sorts of ways you can enable Network Load Balancing. This just seemed to be the easiest way.
Once you’re done with the first server, perform the exact same task on the other server.
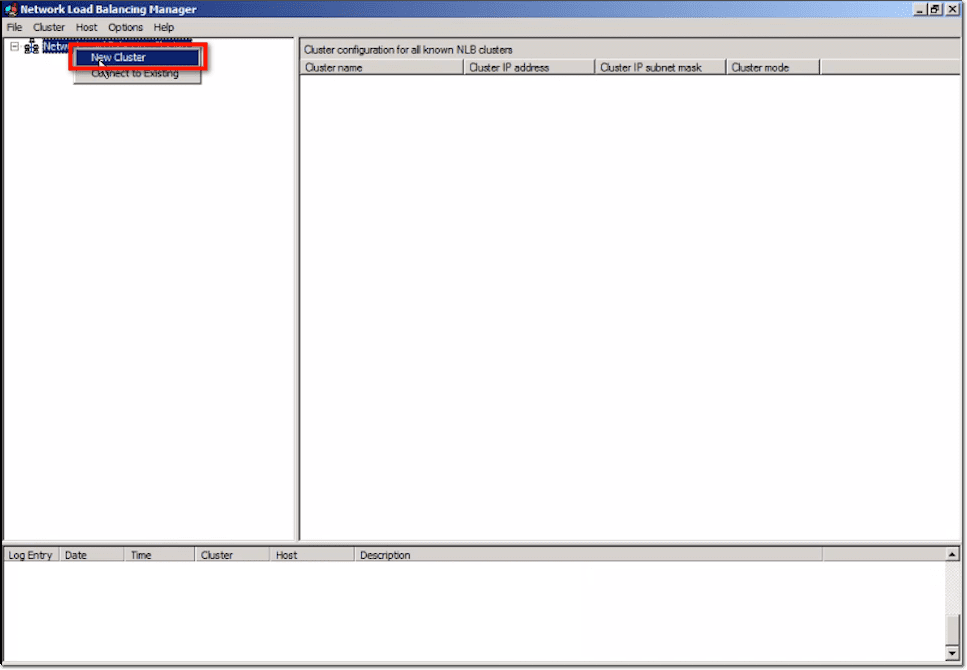
The next part will be carried out on the Network Load Balancing Manager. To start, we right-click on the Network Load Balancing Clusters and select New Cluster.
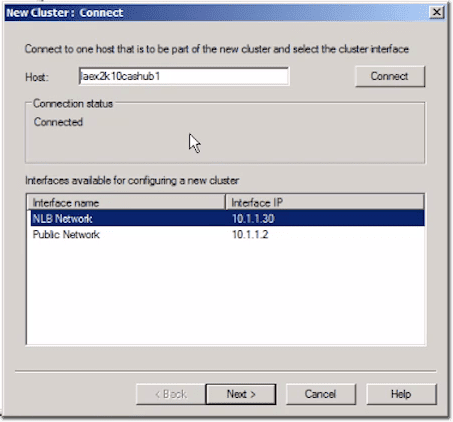
Put in the name of the host. In our case, that would be laex2k10cashub1. Here, we’re being shown the two different interfaces on this system. We have NLB Network and Public Network. They’re both using similar network address schemes. On a production network, you might put these on two separate networks if you choose. That would separate the traffic between them.
Click Next.
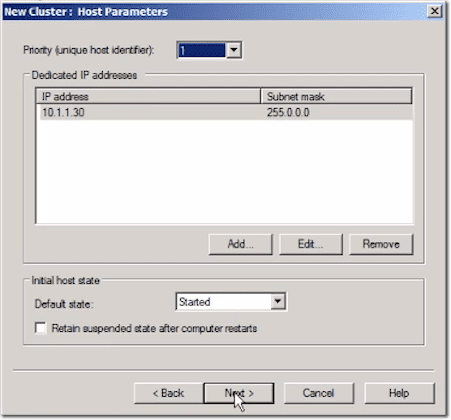
At this point, you’ll be able to see a couple default settings. For this demo, we really just need basic functionality, so we’re just going to keep those settings. One thing to take note of is the priority up at the top.
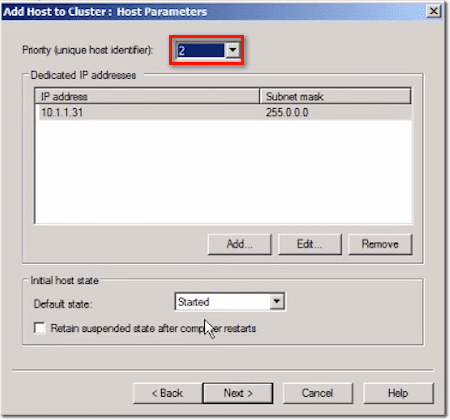
It is set to 1, which means this is the primary system. When you start setting things up on your second server, make sure its priority setting is set to 2.
Click Next.
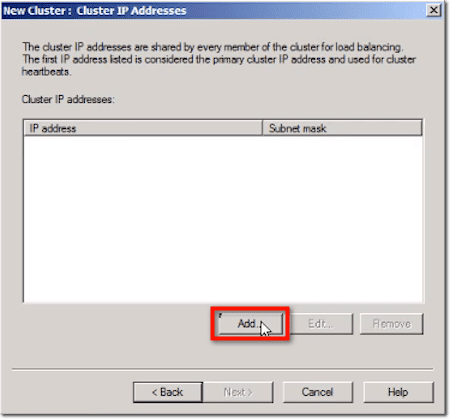
Next, you’ll be asked to enter the IP address of your cluster. This should have been set up initially through DNS, where you indicate a name for the cluster and assign it an IP address. Here, you just click Add.
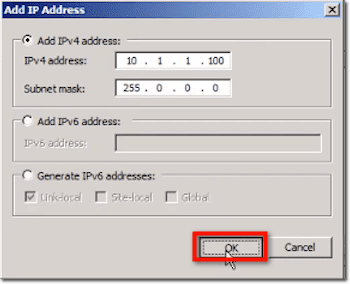
Then you enter the IP address you’ve chosen as well as its corresponding subnet mask, and then click OK.
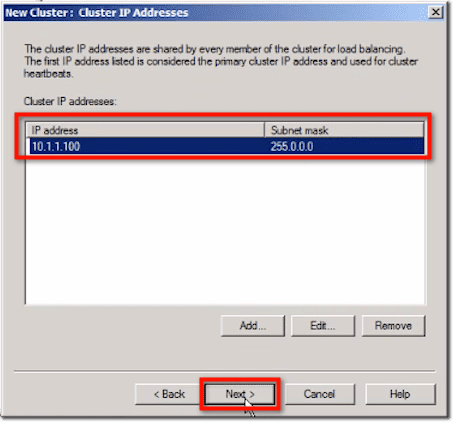
That should add that IP address to your list of cluster IP addresses. Click Next.
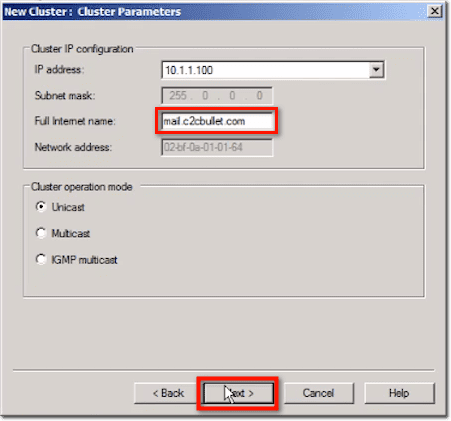
In the succeeding window, some fields will already be populated. Enter the full Internet name, which in our case, is mail.c2cbullet.com.
You can see that there are different cluster operation modes: Unicast, Multicast, and IGMP Multicast. Each of these means something different in terms of the configuration, but we’re not going into the details here. We’re just going to leave the setting at Unicast.
If you really want to learn more about Network Load Balancing, I would encourage you to do further research on these different cluster operation modes. NLB isn’t just used for CAS servers. It’s also used in other servers and services like Internet Information Services and so on.
Click Next.
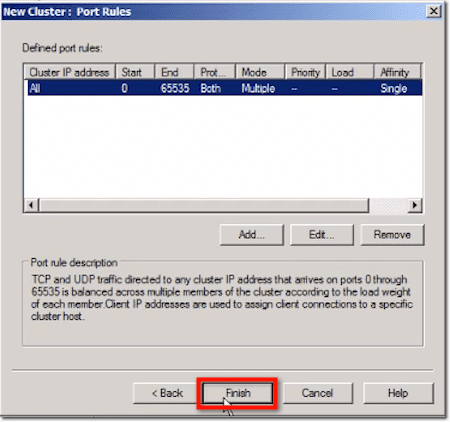
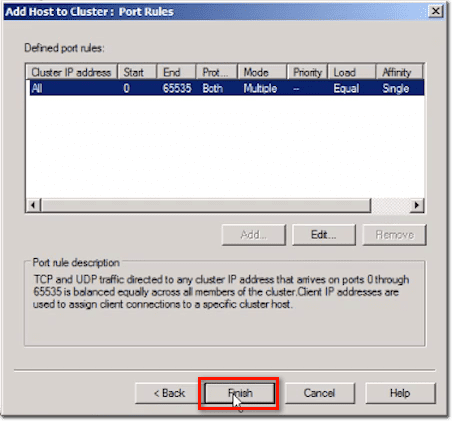
Here you can see defined port rules. It’s typically recommended that you be more specific when setting up rules. Again, we’re going to leave the default because it’s the least restrictive solution at this point for a lab setup. However, in a production environment, you might want to narrow this down to the literal protocols that you’re going to be using, whether it’s HTTP or SSL, and so on.
Click Finish.
You’ll typically need to give it a moment to see if all worked out OK. As usual, the hourglass means things are still being processed.
Sometimes, you might get an error when you set this up and you might have to go back and reconfigure things to make sure everything is configured properly.
Once processing completes, you should see the NLB Network’s status indicating it’s already Enabled.
At this point, you can now add the second CAS-HUB server to the mix. Again, you should have the same setup on that CAS-HUB server. In our case, we have the NLB Network and the Public Network, and have Network Load Balancing installed.
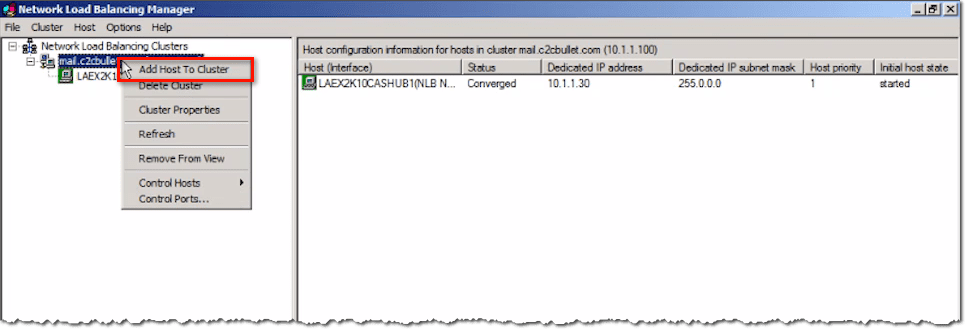
Right-click the full internet name and select Add Host to Cluster.
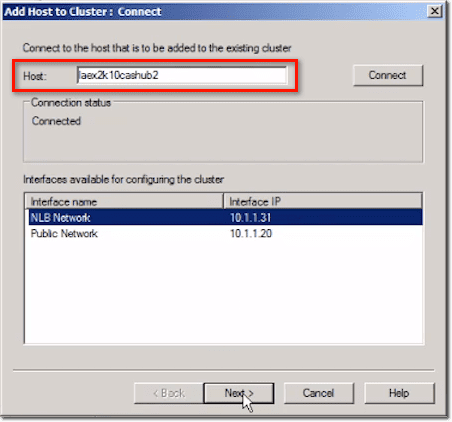
Enter the name of your second host. You should see your available networks again. Click Next.
You’ll then see this host’s priority set to number 2. Click Next.
Click Finish.
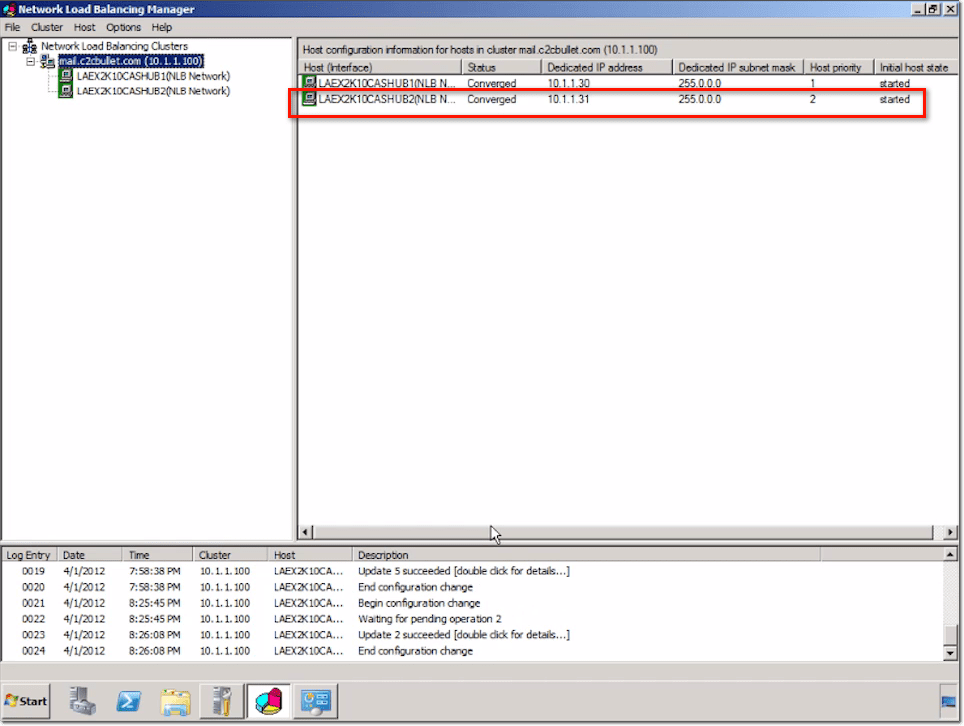
The secondary server should now be added in.
Enable IP Forwarding
Now that you have both systems ready, you’re good to go. The only thing that’s recommended at this point is to enable IP forwarding on the network adapters for both the 1st and 2nd CAS-HUB servers.
To do that, you execute the netsh command in Powershell like this:
netsh interface ipv4 set int “NLB Network” forwarding=enabled
wherein “NLB Network” is just a name we came up with. You can come up with your own.
The next thing to do is to create the CAS array. Bring up the Exchange Management Shell and enter:
New-ClientAccessArray -Name -FQDN -Site
wherein Name is the name of the Client Access server array, FQDN is the fully qualified domain name of the Client Access server array, and and Site is the Active Directory site to which the Client Access server array belongs.
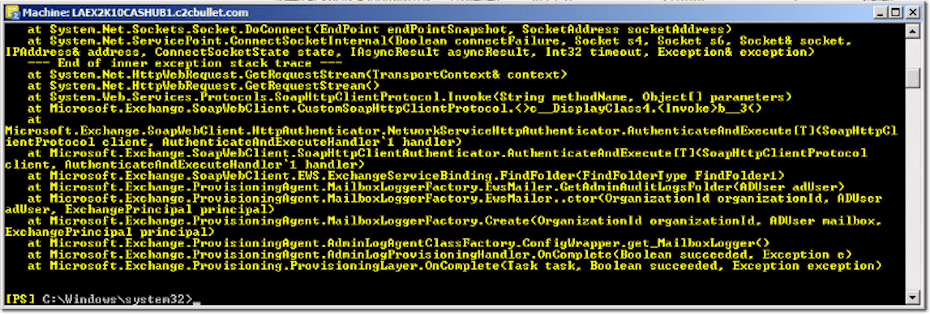
If you forget to specify a required parameter, the Exchange Management Shell will prompt you for it. For example, here’s what happened when we forgot to specify the site.
After you enter the value for the missing parameter, the system will set up the CAS array for the site (in our case, that would be “LA”). Notice that we already have both LAEX2K10CASHUB1 and LAEX2K10CASHUB2 under the Members column.
Don’t worry too much about the yellow warnings/notifications that follow immediately after. As long as everything’s working, that shouldn’t be a problem.
Establish the Need to use CAS Array on the Database
The next part of the process is to establish on the database itself that you need to use that CAS array. That’s because the database, which is part of a DAG (Database Availability Group), was configured prior to the setting up of the CAS array.
Simply type this:
Set-MailboxDatabase “LAEX2K10MB1 Database” -RpcClientAccessServer mail.c2cbullet.com
Just replace ”LAEX2K10MB1 Database” with the name of your database and mail.c2cbullet.com with your FQDN
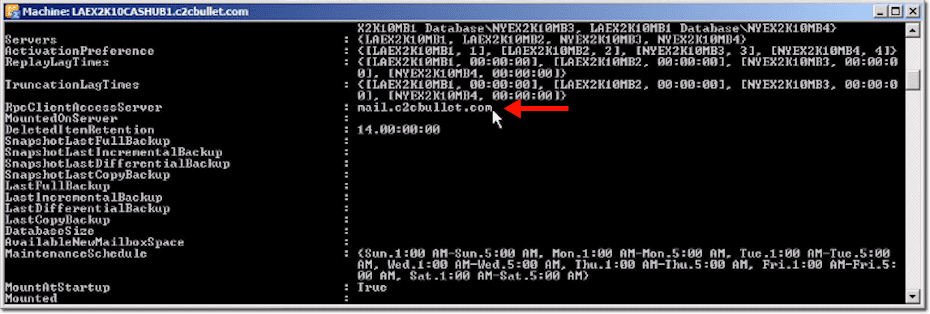
No need to worry about the warning that says no settings of the database have been modified, because if you check the database itself by running the get-mailboxdatabase command like this:
get-mailboxdatabase “laex2k10mb1 database” | f1,
you can see that the RpcClientAccessServer entry has indeed been changed to the one you specified earlier.
So, really, the next step of the process and the way to test that everything is working properly is to take a client and to set up its Outlook with your FQDN. At that point, if it’s configured to use your FQDN for the address (and that’s the cluster itself), then whether one server is up or both servers are up, it wouldn’t really matter.
The NLB server will handle the load-balancing side so that they both are given an equal amount of work. At the same time, if one of those servers does go down, the client won’t be aware of it because he will still be going to the same address.
When the client goes to that address with a request, if one of the servers happens to be down, the network load balancing solution will step in and allow the other CAS-HUB server to satisfy that request. All this will happen behind the scenes, without the client ever noticing anything.
Conclusion
Hopefully, after reading this post, you now understand how to configure two CAS-HUB servers for high availability. That concludes this post. See you again next time.


