


Exchange 2010 Cross-Forest Migration: GAL Sync and Enabling MRS Proxy
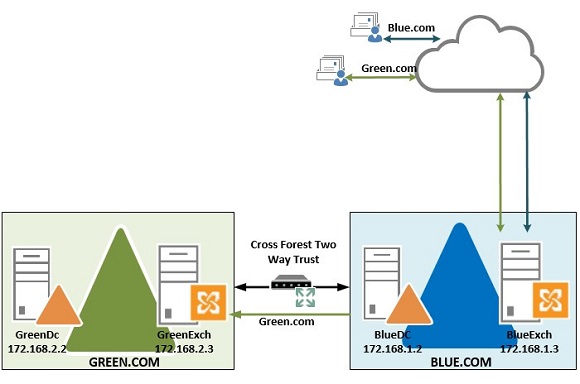
This is the second installment in our article series on how to perform a Microsoft Exchange 2010 cross-forest migration, using a lab environment to migrate users from one domain to another. In the previous post, we configured DNS forwarding and the two-way trust relationship.
In this article, we’ll perform the following five steps:
- Global address list (GAL) sync between blue.com and green.com
- Create and configure the send connector between blue.com and green.com
- Create and configure the availability service between blue.com and green.com
- Configure green.com as an accepted domain in blue.com
- Enable MRS Proxy on the source forest green.com CAS servers

Step 1: Global Address List (GAL) Sync Between Domains
A Microsoft Exchange cross-forest migration doesn’t happen overnight, and we might need to have the environment in co-existence mode for a long time. We need to create and configure GAL sync between the blue.com and green.com domains so that users can find the contact of other forest in their local GAL. The followings steps prepare and configure GAL sync between two forests using the free GAL sync script by Carol Wapshere, a Microsoft Forefront Identity Manager (FIM) MVP.
Create Organization Unit (OU) in the blue.com and green.com forest
- Create new OU in both the forests to create GAL sync contacts for cross-forest users.
- Create the new OU GAL sync under the root domain blue.com, and then create GreenContacts OU under GAL sync OU.

3. Create the new OU with name Galsync under the root domain green.com and then create bluecontacts OU under Galsync OU.
Create and configure Galsync account in blue.com and green.com forest
- Create new service account “GALSync” in both green.com and blue.com.
- Provide Recipient Management Role for the GALSync in both green.com and blue.com. Execute the below command on both the forests to provide Recipient Management Role permission.
ADD-RoleGroupMember "Recipient Management" –Member "Galsync"
- Provide GALSync account, permission to use remote PowerShell in both the forests. Execute the below command on both the forests to provide remote PowerShell permission.
Set-user -identity "GALSYNC" -RemotePowerShellEnabled $True
- Enable “Windows Authentication” on the PowerShell virtual directory in IIS on the blueexch.blue.com and greenexch.green.com servers
Preparing and Executing GAL Sync Script
- Download the free GAL Sync script and copy it to the server BlueExch.blue.com and create a file under the path C:scriptsGalsync.ps1.
- Create password file “Bpassword.txt” to input into the Galsync.ps1 script. Execute the below commands to create blue.com password file (Bpassword.txt) and input the password for the account “bluegalsync”
read-host -assecurestring | convertfrom-securestring | out-file C:scriptsBpassword.txt
- Create password file “Gpassword.txt” to input the Galsync.ps1 script. Execute the below command to create green.com password file(Gpassword.txt) and input the password for the account “greengalsync.”
read-host -assecurestring | convertfrom-securestring | out-file C:scriptsGpassword.txt
4. Edit the file C:scriptsGalsync.ps1 and update the GLOBAL DEFINITIONS parameter as defined in the below screenshot:
")
Updating the global definitions parameter. (Image: Krishna Kumar)
5. Start the Exchange Management Shell on the Exchange 2010 server, then change the path C:scripts and execute the script “.Galsync.ps1” to create GAL contacts in both the forests.
Step 2: Create and Configure Send connectors between domains
Send-connectors are created to send emails directly to the remote forest, instead of routing through the Internet. The following is a step-by-step instruction on how to create and configure send-connector at blue.com and green.com to send emails to each other directly.
- Create the below specified service account in each forest and add an account to the “Exchange Servers universal security” group (builtin Microsoft Exchange Security Group – Exchange Servers). This account is used by the Send connector to authenticate at the receiving server at the other forest.
- Blue domain account: blueBlueconnector
- Green domain account: greengreenconnector
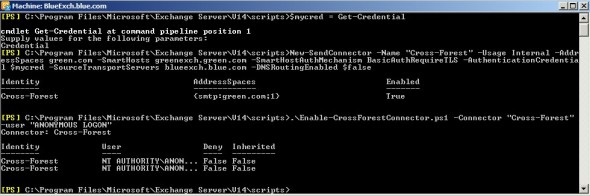
- Execute the below PowerShell command on blue.com Exchange management shell to create send-connector, to send green.com emails directly to the targeted server – greenexch.green.com. On executing the first command, it will prompt for the input of the credentials. Input the username as greengreenconnector and password for the same.
$mycred = Get-Credential
New-SendConnector -Name "Cross-Forest" -Usage Internal -AddressSpaces green.com -SmartHosts greenexch.green.com -SmartHostAuthMechanism BasicAuthRequireTLS -AuthenticationCredential $mycred -SourceTransportServers blueexch.blue.com -DNSRoutingEnabled $false
.Enable-CrossForestConnector.ps1 -Connector "Cross-Forest" -user "ANONYMOUS LOGON"
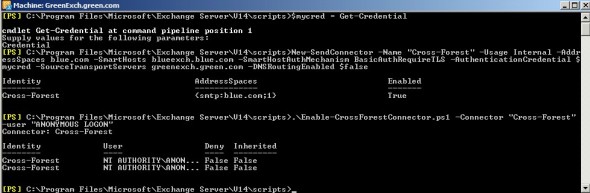
3. Execute the below PowerShell command on green.com Exchange management shell to create send-connector to send blue.com emails directly to the targeted server – blueexch.blue.com. On executing the first command, it will prompt for an input for the credentials. Input the username as blueblueconnector and password for the same.
$mycred = Get-Credential
New-SendConnector -Name "Cross-Forest" -Usage Internal -AddressSpaces blue.com -SmartHosts blueexch.blue.com -SmartHostAuthMechanism BasicAuthRequireTLS -AuthenticationCredential $mycred -SourceTransportServers greenexch.green.com -DNSRoutingEnabled $false .Enable-CrossForestConnector.ps1 -Connector "Cross-Forest" -user "ANONYMOUS LOGON"
Step 3: Create and Configure Availability service between two forests
Configuring Availability service is to allow a free/busy information, accessible across the forests. As we will have exchange environment in co-existence, we need to have a “free/busy”, sharing between forests. Below are the steps to configure free/busy information between the forests.
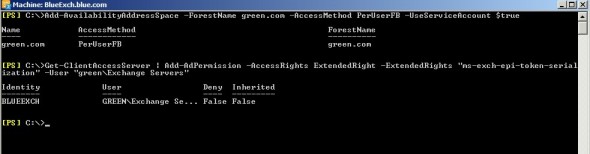
1. Login to blueexch.blue.com and access Exchange management shell. Execute the below two commands to create and configure free/busy sharing with green.com.
Add-AvailabilityAddressSpace -ForestName green.com -AccessMethod PerUserFB -UseServiceAccount $true Get-ClientAccessServer | Add-AdPermission -AccessRights ExtendedRight -ExtendedRights "ms-exch-epi-token-serialization" -User "greenExchange Servers"
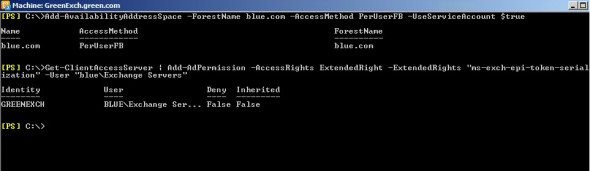
2. Login to greenexch.green.com and access Exchange management shell. Execute the below two commands to create and configure free/busy sharing with blue.com.
Add-AvailabilityAddressSpace -ForestName blue.com -AccessMethod PerUserFB -UseServiceAccount $true Get-ClientAccessServer | Add-AdPermission -AccessRights ExtendedRight -ExtendedRights "ms-exch-epi-token-serialization" -User "blueExchange Servers"
Step 4: Configure green.com as Accepted domain in blue.com
Once all the above configuration is completed, the blue forest should be good to accept emails for green.com and deliver the emails to green domain. This is normally done when the acquiring company decides that it should be a source of authority to send and receive emails from internet for the acquired company.
Steps to configure green.com Accepted domain in blue forest
1. Login to blueexch.blue.com and access the Exchange management shell
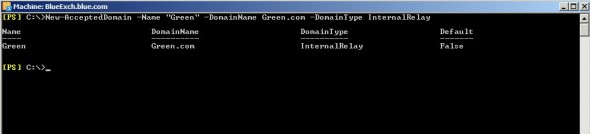
2. Execute the below command to allow blue domain exchange server to accept emails for green.com and also use internal relay connector to relay the emails to green.com domain.
New-AcceptedDomain –Name “Green” –DomainName Green.com –Domaintype InternalRelay
3. Once Accepted domains are configured, we should be good to switch MX record for green.com domain, to point out to the same server (IP address) where blue.com emails are delivered. A mail exchanger record (MX record) is a type of resource record in the Internet DNS, which points to the mail server to accept emails from internet. To edit the MX record, you need to login to the account where your green.com domain is registered.
How to edit an MX record
As an example, here’s how to edit an MX record hosted at GoDaddy.com.
1. Log in to your account at www.godaddy.com.
2. Open the Domains tab and select My Domain Names. You’ll be directed to the Manage Domains page and the click on the domain green.com
3. In the MX (Mail Exchanger) section, select the MX record you want to edit, and then click Edit Record
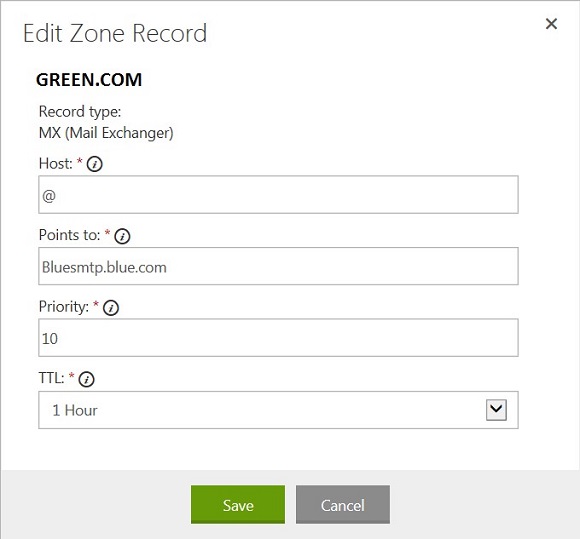
4. Edit any of the following fields:
- Host: Enter the domain name for the MX record. For example, type @ to map the record directly to your domain name.
- Points to: Enter the mail server’s address, name of the blue.com Exchange /SMTP server
- Priority: Select the priority you want to assign to the mail server.
- TTL: Select how long the server should cache the information.
5. Click Save, and then click Save Changes. Below is the reference example screenshot.
Step 5: Enable Mailbox Replication Service (MRS) Proxy on the source forest green.com CAS servers
MRS Proxy needs to be enabled on the source forest to perform cross forest migration. By default, this service is disabled and we need to start it. A simple way to do this is to execute the following command in the Exchange management shell on the CAS server.
Set-WebServicesVirtualDirectory -Identity "EWS (Default Web Site)" -MRSProxyEnabled $true
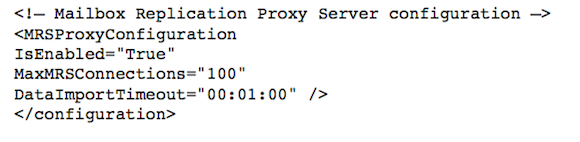
If you are using Exchange 2010 RTM or SP1 then you can enable MRS Proxy by editing the web.config file at the path “C:Program FilesExchange ServerV14Client Accessexchwebews”.
You also need to change the parameter IsEnabled=”false” to IsEnabled=”true” then save the file and restart the Exchange MRS Service. The parameter “IsEnabled” is located in the section that starts with “<!– Mailbox Replication Proxy Server configuration –>”.
Below is the updated part of the web.config file.
MRS can be throttled to maintain the health of the database. MRS throttling is controlled by the configuration file MSExchangeMailboxReplication.exe.config. By default, this configuration file is located on all Client Access servers in the same folder where Exchange is installed: Program FilesMicrosoftExchange ServerV14BinMSExchangeMailboxReplication.exe.config.
That’s it! We’ve now prepared Microsoft Exchange servers in both the forests to work in co-existence mode. In the next part of the article series, we’ll install and configure the ADMT tool, install and configure Password Export Server (PES), and finally perform necessary tweaks in an environment to perform the migration.