


Enabling Windows 10 Device Guard

In today’s Ask the Admin, I will show you how to enable and configure Device Guard in Windows 10 Enterprise and Windows Server 2016.
Device Guard is new in Windows 10 Enterprise. For the first time, it allows system administrators to customize kernel-mode and user-mode, code integrity checks using Configurable Code Integrity (CCI). Using a Device Guard policy, untrusted code can be blocked once the boot loader has started. This can help in preventing malware or other untrusted code from running on your systems. Additionally, if Virtual Secure Mode (VSM) is enabled, Device Guard provides more robust application control than Windows 7 AppLocker by utilizing a chain of trust. This can extend from the device hardware right through to the Windows kernel.
For more information on how Device Guard differs from AppLocker, the native application control solution in Windows 7, see Windows 10 Device Guard Versus AppLocker and What Is Windows 10 Device Guard? on Petri IT Knowledgebase.
Create a Device Guard Policy
In this article, I am going to run you through a basic proof-of-concept so that you can see how Device Guard works. In a production environment, you would need to do more work to ensure that policies do not prevent Windows booting or line-of-business apps from functioning correctly.
There is no GUI for Device Guard, so you will need to be comfortable using PowerShell cmdlets. The cmdlets work by scanning a clean, malware-free reference system. It will then, generate a set of rules that allow all scanned files to run by using a list of allowed publishers. Unsigned files will be blocked. Files signed by publishers that are not included in Device Guard policy will also be blocked. This will occur regardless of whether Windows trusts them.
There are ways to deal with unsigned files but that is for another article. The instructions below will assume that all the files scanned by Device Guard are signed and trusted by Windows. To test whether Device Guard is working, we will download a file that is not trusted in our Device Guard policy.
Scan a Reference Device
The reference Windows 10 or Windows Server 2016 device should be malware-free. They should also be configured in the same way as devices that you would apply the policy. There are three steps to deploying a policy:
- Scan a reference system to create an XML policy file. It should contain a list of rules to allow signers.
- Convert the XML file into a .bin file.
- Configure Device Guard using a Group Policy Object (GPO) or local policy.
VSM is not required but it does enable Device Guard to provide more robust protection.
Let’s start by creating a Device Guard policy using a clean install of Windows 10 Enterprise.
- Open PowerShell with local admin privileges.
- Change the working directory to c:\temp.
- Run New-CIPolicy to create an XML file for the local device.
- You can view the contents of the file using Get-Content.
New-CIPolicy -FilePath '.\policywin.xml' -Level Publisher -UserPEs -ScanPath 'c:\windows\system32'
Get-Content '.\policywin.xml'
I restricted New-CIPolicy to the scanning of the system32 folder. This should capture most files that Windows needs to boot and run. We will scan the Program Files folder separately, which will generate a second XML file, policyprogs.xml. It can be merged with policywin.xml. The -UserPEs parameter tells New-CIPolicy to include user-mode programs in the scan.
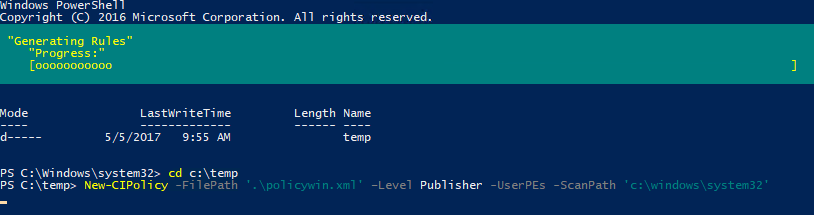 Scan a Reference System Using the New-CIPolicy Cmdlet (Image Credit: Russell Smith)
Run New-CIPolicy again. This time, create a set of publisher rules for user-mode files.
New-CIPolicy -FilePath '.\policyprogs.xml' -Level Publisher -UserPEs -ScanPath
'c:\program files' -NoScript
Merge XML and policyprogs.xml using Merge-CIPolicy.
Merge-CIPolicy -PolicyPaths '.\policywin.xml', '.\policyprogs.xml' -OutputFilePath
'.\policyfinal.xml'
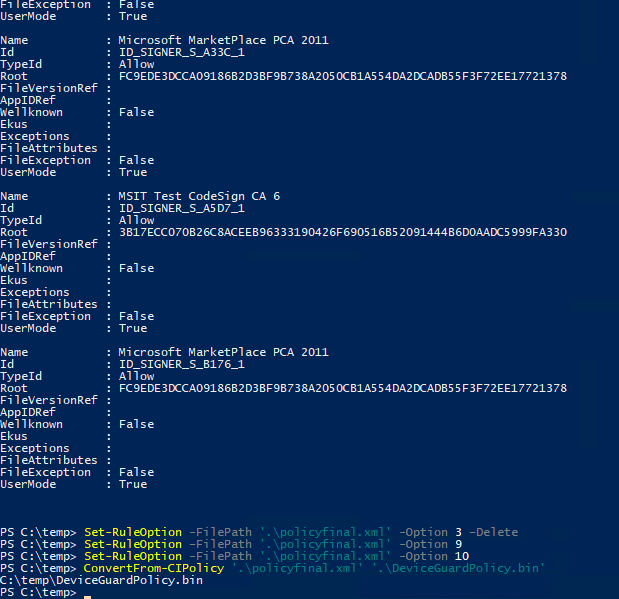
New-CIPolicy always creates policies in audit mode. We will need to enforce policies by deleting the audit-mode rule from the XML file.
Set-RuleOption -FilePath '.\policyfinal.xml' -Option 3 -Delete
Additionally, before deploying the Device Guard policy to production, set rule-option 9 from Advanced Boot Options Menu and rule-option 10 from Boot Audit on Failure. Administrators can access a pre-boot command prompt for managing Windows if the policy blocks a kernel-mode driver. These options can be deleted later.
Set-RuleOption -FilePath '.\policyfinal.xml' -Option 9
Set-RuleOption -FilePath '.\policyfinal.xml' -Option 10
Convert XML into a Device Guard policy using ConvertFrom-CIPolicy.
ConvertFrom-CIPolicy '.\policyfinal.xml' '.\DeviceGuardPolicy.bin'
Enable Device Guard in Policy
To enable Device Guard, we need to add the DeviceGuardPolicy.bin file to a policy setting. In this example, I will use local policy to enable Device Guard on a single device. In a production environment, you can use Group Policy to enable Device Guard in your environment. For more details on creating GPOs, see Create and Link a Group Policy Object in Active Directory on Petri.
- Type mmc in the search box on the taskbar, right click mmc in the results, and select Run as administrator from the menu.
- In the console window, press CTRL+M to add a snap-in.
- Under Available snap-ins on the left of the Add or Remove Snap-Ins dialogue, double-click Group Policy Object Editor in the list.
- Click Finish in the Select Group Policy Object dialogue to select the local computer.
- Click OK in the Add or Remove Snap-Ins.
- Under Local Computer Policy in the console window, expand Computer Configuration > Administrative Templates > System > Device Guard.
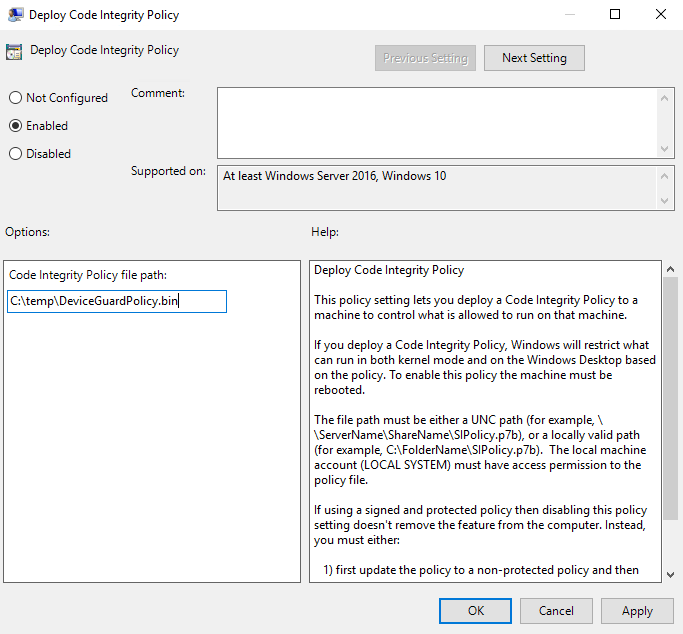
- Double-click Deploy Code Integrity Policy on the right and set the policy to Enabled.
- Add the path to the bin file you created in the previous steps. The file must be accessible from a local or network location on each device that receives the policy setting.
- Reboot the device.
Test Device Guard
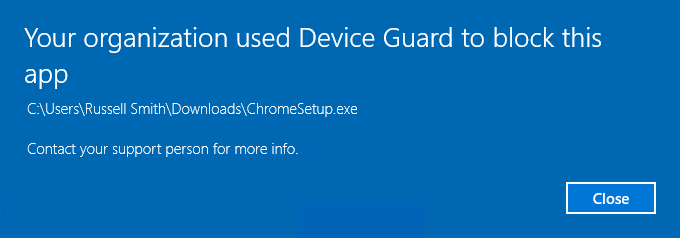
Let’s check if Device Guard is working. Download Google Chrome. Run the installer and you should see that Device Guard has blocked it. Because Google was not included in our Device Guard policy as a trusted publisher, any files signed by Google will be blocked.
In this article, I showed you how to get started with Device Guard in Windows 10 Enterprise.