How to configure Alcatel SpeedTouch Pro with Static Port Mapping?
In the previous tip I’ve explained how to convert your Alcatel SpeedTouch Home ADSL modem to the PRO version. After you’ve done that you might want to begin some serious network configuration.
To be able to access your LAN from outside you’ll have to configure NAT (Network Address Translation) on your modem. I won’t go into explaining what NAT is and what it’s good for. That will come later. I’ll assume you know what you want, and this tip will only tell you how to do it, not why.
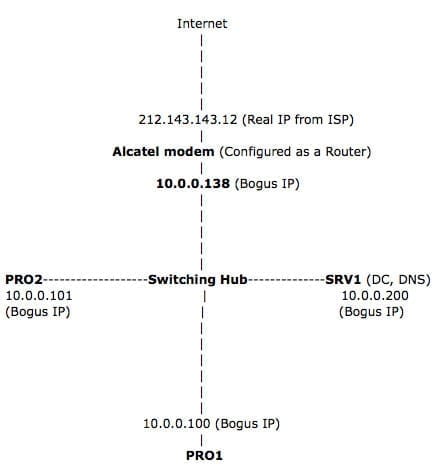
Let’s say you have the following LAN configuration:
| Computer | OS | Software | IPs and Ports |
| PRO1 | Windows XP Pro | Remote Desktop | 10.0.0.100:3389 (TCP) |
| SRV1 | Windows 2000 SRV | Exchange 2000 | 10.0.0.200:25 (TCP) |
| 10.0.0.200:110 (TCP) | |||
| 10.0.0.200:80 (TCP) | |||
| Terminal Services (TSWEB) | 10.0.0.200:80 (TCP) | ||
| IIS | 10.0.0.200:80 (TCP) | ||
| 10.0.0.200:21 (TCP) |
Let’s say you need to make all of the above services and applications available from the Internet. Reasons for doing so might be:
- Receive SMTP mail destined for your domain (if you have one and if you have an MX record for it)
- Connect to your Exchange Server via OWA
- Send to and receive mail from your Exchange Server via Outlook Express
- Have a small web page for your customers
- Have a small FTP site for your use
- Control your Server and XP computers from Terminal Services and RDP clients
There may be other reasons and other applications you’d want to use but we’ll stick to those for the purpose of this article.
To make sure these applications can accept incoming connections you’ll have to map a port for them on your ADSL modem.
Lamer Note: The above settings are only examples of what your network should look like. You’re settings may be different. Use your brains, friends and Google to find out what ports YOUR applications need, and use the following logic to apply the settings.
Step one – Connect to the modem
At PRO1 (or SRV1) open a Telnet session to the modem:
- Telnet to your modem by using this command:
telnet 10.0.0.138
Log in as any user and the modem will show a string like ‘SpeedTouch (00-00-00-00-00-00)’ before asking the password. That’s the MAC address of the modem.
Enter the password that you obtained through the script found here: Upgrade from Home to Pro (the one I told you to write down… you did write it down, didn’t you?).
Go into the NAT command by typing
nat
the help command will bring out a list of known commands. Try list to see how your modem is configured.
Step two – Configure NAT settings
As we’re already in the NAT command prompt we can now enter our configuration parameters and save them.
Begin your configuration with the create command:
=>nat
[nat]=>create
protocol = tcp
inside_addr = 10.0.0.100
[inside_port] = 3389
outside_addr = 0
[outside_port] = 3389
[nat]=>save
[nat]=>
This set of commands will tell the modem that if an incoming connection is being attempted from the Internet to the true IP address (the one we got from the ISP) at TCP port 3389 – it should map it to the bogus IP address of 10.0.0.100 at TCP port 3389 – that’s where your RDP connection awaits the call.
Basically, you could type the command in one string:
:nat create protocol=tcp inside_addr=10.0.0.100:3389 outside_addr=0.0.0.0:3389
and get the same result.
Go on with the rest of the information in the table. Save your settings by using the save command. View the settings by using the list command.
:nat create protocol=tcp inside_addr=10.0.0.200:110 outside_addr=0.0.0.0:110
:nat create protocol=tcp inside_addr=10.0.0.200:25 outside_addr=0.0.0.0:25
:nat create protocol=tcp inside_addr=10.0.0.200:80 outside_addr=0.0.0.0:80
:nat create protocol=tcp inside_addr=10.0.0.200:21 outside_addr=0.0.0.0:21
That’s it. Make sure your settings are correct. If not, you can delete them by using the delete command:
:nat delete protocol=tcp inside_addr=10.0.0.100:3389 outside_addr=0.0.0.0:3389
and so on.
Or if you want, do the delete command as a step-by-step sequence just like we did at the beginning.
Don’t forget to type save to save all your settings!
Good luck.
For a list of all known port numbers please see the Well Known Port Numbers page.


