


Controlling Communications Inside Office 365 Tenants with Information Barriers (Part 1)
Another Office 365 Compliance Feature
Those working with Exchange are probably familiar with the concept of an ethical firewall, a barrier erected in software to stop defined sets of users communicating with each other. In the past, bespoke customizations like transport sinks were written for this purpose. Usually the firewalls were deployed by organizations operating in highly regulated industries. For instance, a bank might stop traders and brokers communicating. Since the advent of transport rules in Exchange 2007, the job is usually done by creating transport rules to stop groups communicating.
Ethical firewalls continue in Exchange Online, but now we have other methods of communications, notably Teams. Announced in preview in April and now generally available, Information Barriers deliver the answer for Office 365 by preventing sets of users communicating through all Office 365 workloads.
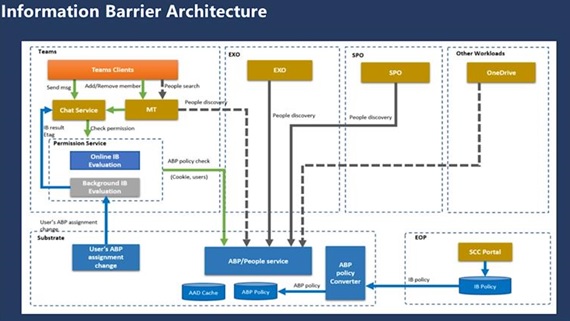
Figure 1 shows the Office 365 Information Barrier architecture (as presented at Ignite 2018) to control access across Exchange Online, SharePoint Online, Teams, and OneDrive for Business.
This article explores the concepts behind Information Barriers and the steps needed to prepare for their introduction into an Office 365 tenant. The next article looks at the implementation of Information Barriers in Teams.
Starting with Teams and Exchange
Teams and Exchange Online are the first workload to support Information Barriers. For Exchange Online, Information Barriers replace Address Book Policies (ABPs), which restrict user access to the directory and have been in use since Exchange 2010. Information Barriers don’t do anything more for Exchange, so they are currently a straight functional swap for ABPs.
Office 365 accounts who come under the control of Information Barrier policies need an Office 365 E5 license or the Advanced Compliance add-on.
Information Barriers and Exchange Address Book Policies
Information Barriers replace Exchange Address Book Policies (ABPs). In fact, you can’t create any information Barrier policies until all ABPs have been removed from the organization. When active, the Information Barrier policies serve the same purpose as ABPs by preventing users seeing other people in the directory whom they are not allowed to communicate with.
Poor Documentation
If your organization uses ABPs today, the need to replace them is an important aspect of planning for Information Barriers. It would have been good if Microsoft had done more to highlight this fact in its documentation instead of inserting a note in the prerequisites:
“No address book policies. Before you define and apply information barrier policies, make sure no Exchange address book policies are in place. If you do have such policies, make sure to remove your address book policies first.”
This prerequisite is easy if your organization doesn’t make much use of ABPs. Unfortunately, Microsoft’s advice hides a lot of pain for an organization that has invested in ABPs. These organizations tend to be large and complex, which is why they use ABPs in the first place.
Removing an Address Book Policy
Removing an ABP from an active mailbox is easy. First find the mailboxes stamped with the relevant ABP:
Get-Mailbox -IncludeInactiveMailbox | ? {$_.AddressBookPolicy -eq "Engineering ABP"}
Now, run Set-Mailbox to remove the assignment. Note that this only works for active mailboxes.
Set-Mailbox -Identity Kim.Akers -AddressBookPolicy $Null
Things become more complicated when inactive mailboxes are in the picture. If any of these mailboxes were assigned ABPs when active, you must restore them to remove the ABP assignment. For example, let’s say that you need to find inactive mailboxes that have been assigned the “Engineering ABP.” This command will do the trick:
Get-Mailbox -InactiveMailboxOnly | ?{$_.AddressBookPolicy -eq $Null} | Format-Table Name, PrimarySmtpAddress, ExchangeGuidRestore inactive mailbox
You now need to restore each of these mailboxes by running the New-Mailbox cmdlet (unless the mailboxes were deleted within the last 30 days, in which case you can run the Undo-SoftDeletedMailbox cmdlet). In my case, the relevant inactive mailboxes were reasonably old, so I recovered them by running a command like:
New-Mailbox -InactiveMailbox a74ce6db-80cc-427b-97e3-ff027cde8e54 -MicrosoftOnlineServicesID [email protected] -name "Natasha Jones"
Recovering an inactive mailbox creates a new mailbox and the ABP assignment is blank, so once you have recovered all the inactive mailboxes and cleared the ABP assignments from active mailboxes, you can remove ABPs by running the Remove-AddressBookPolicy cmdlet. For example:
Remove-AddressBookPolicy -Identity “Engineering ABP”
Organization or Directory Segments
The sets of users that come under the control of Information Barriers are referred to as organization segments. Information Barrier policies define which segments can communicate with each other or those blocked from communication. The first step in implementing Information Barriers is to define organization segments for the users whose communication should be controlled. You don’t have to create segments for the entire organization, but if you don’t, the risk exists that some users will be able to communicate where they should be barred.
Segments are defined by properties of Azure Active Directory accounts. Microsoft suggests that you use the same property as the basis for all segments. In other words, if you decide to divide the organization by department, use the department property for all segments. It’s also best if the segments don’t overlap (multiple segments cover the same set of accounts).
To explain the concept, Microsoft documents how the fabled Contoso organization creates suitable segments and uses those segments in Information Barrier policies.
Checking Azure Active Directory
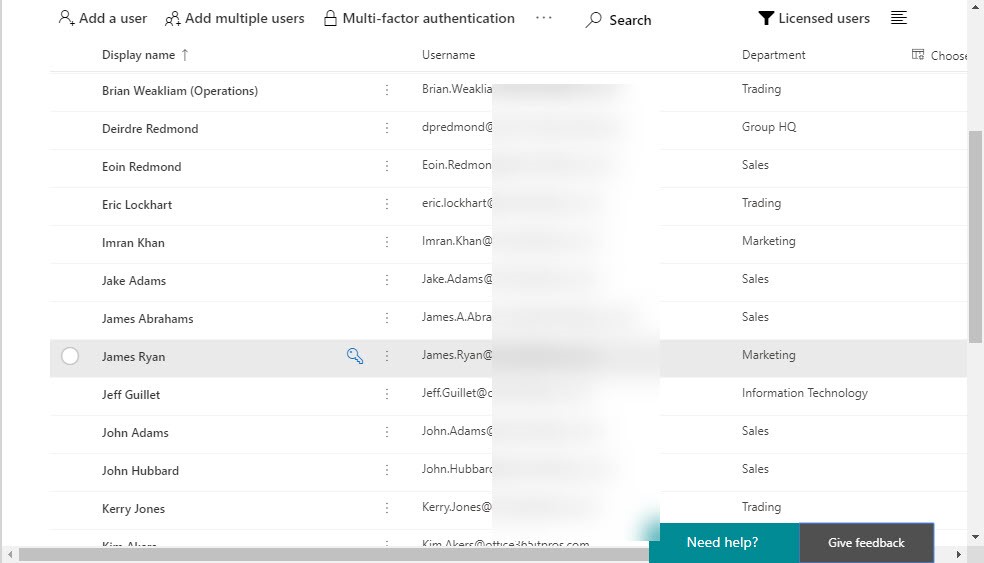
It’s safe to say that not every instance of Azure Active Directory is perfectly populated. It’s important to check that the properties of Azure Active Directory accounts used to define segments are populated with the right values. For this example, we’re going to segment by department, so each account needs a valid department value. We can use the Office 365 Admin Center (Figure 2) to examine the properties of user account (unfortunately the Admin Center doesn’t support sorting by department).
Filling in the Gaps
Looking through a GUI for missing or invalid values can become tiresome. As is often the case, PowerShell comes in handy to identify any directory problems that must be fixed before proceeding to implement Information Barrier policies. Here’s how to find accounts that don’t have a department filled in:
Get-AzureADUser -all $True -Filter "UserType eq 'Member'" | ?{$_.Department -eq $Null} | Format-Table UserPrincipalName, Displayname, Department -AutoSize
The data returned by Azure Active Directory includes the accounts used for shared mailboxes and room mailboxes. An alternative is to use the Get-Recipient cmdlet and filter the search to return just accounts with user mailboxes:
Get-Recipient -RecipientTypeDetails UserMailbox -ResultSize Unlimited | Format-Table Name, WindowsLiveId, Department -AutoSize
In either case, you can export the result to a CSV file and use that as the basis for finding accounts that need to be updated with accurate department details. Here’s what I used:
Get-AzureADUser -all $True -Filter "UserType eq 'Member'" | Select Department, DisplayName, UserPrincipalName, PhysicalDeliveryOfficeName | Sort Department | Export-CSV -NoTypeInformation c:\temp\UsersDepartments.csv
An ISV tool like Hyperfish will help you get your directory straightened out if you don’t want to do the work with PowerShell.
Check and Check Again
After applying all the updates, make sure to do a final pass to check that all the department information is correct. There are normally typos to be fixed. The typos might be acceptable to a human, but they mean that the filters used by Information Barriers won’t work as expected. In short, it is critical that the directory properties you use to segment the organization are as accurate as you can make them.
Creating Organization Segments
Information Barrier policies work by either allowing or blocking segments communicating with each other. To create a policy, we must first define the segments. Each segment has a filter to tell Azure Active Directory what accounts come within its scope. Think of this like the filter used by a dynamic group.
Our example scenario establishes an ethical firewall for Teams to stop staff in the Trading and Sales departments communicating with each other. To do this, we need two segments: one defines the accounts in the Trading Department, the other defines the accounts in the Sales Department. Currently, you can only create and maintain Information Barrier policies with PowerShell. The cmdlets to work with Information Barriers are available by connecting a PowerShell session to the Security and Compliance Center endpoint.
New-OrganizationSegment -Name "Trading Department" -UserGroupFilter "Department -eq 'Trading'"
New-OrganizationSegment -Name "Sales Department" -UserGroupFilter "Department -eq 'Sales'"
These segments use simple queries. You can construct more complex queries (anything that can be executed against Azure Active Directory) and use those to define segments. Guest accounts are included in organization segments and supported by Information Barriers.
To test the effectiveness of the query used in an organization segment, we can apply the query when running the Get-AzureADUser cmdlet. For example:
Get-AzureADUser -Filter "Department eq 'Sales'" | Format-Table Displayname, UserPrincipalName

DisplayName          UserPrincipalName
-----------          -----------------
Andy Ruth (Director) [email protected]
James Abrahams       [email protected]
Flayosc Worker       flayosc_yandex.com#EXT#@office365itpros.onmicrosoft.com
Alternatively, you can check for an individual user with the Get-InformationBarrierRecipientStatus cmdlet, but only after Information Barrier policies are deployed.
Get-InformationBarrierRecipientStatus -Identity Andy.Ruth -Identity2 JAbrahams
Creating Information Barrier Policies
Once we’re happy that the organization segments identify the right people, we can proceed to link them in two Information Barrier policies. One will stop people in trading communicating with sales; the other blocks the reverse traffic.
New-InformationBarrierPolicy -Name "Trading Block Sales" -AssignedSegment "Trading Department" -SegmentsBlocked "Sales Department" -State Inactive
New-InformationBarrierPolicy -Name "Sales Block Trading" -AssignedSegment "Sales Department" -SegmentsBlocked "Trading Department" -State Inactive
The Information Barrier policies are created in an inactive state. This is recommended because it allows administrators to set everything up (and do some testing) before activating policies across the organization.
To activate a policy, run the Set-InformationBarrierPolicy cmdlet to change the state to Active.
Set-InformationBarrierPolicy -Identity "Trading Block Sales" -State Active
Allowing Communication by Policy
Information Barriers also support the concept of an allow list to allow segments to only communicate with one or more other segments. For example, this command permits communications between accounts in the Group HQ segment with five other segments.
New-InformationBarrierPolicy -Name "Group HQ Communications" -AssignedSegment "Group HQ" -SegmentsAllowed "Sales Department", “Marketing”, “Research”, “Trading Department”, “Engineering”
Just like Address Book Policies, if Office 365 workloads can’t find a policy to block or allow communication between two accounts, it assumes that communication is allowed.
Now to Teams
We have our organization segments and Information Barrier policies defined and ready to go. Exchange will begin to use the policies immediately as a direct replacement for ABPs. It takes a little more work to make the policies effective for Teams. That awaits us in the next article.