


Consolidating File Servers with PowerShell and Robocopy
- Blog
- PowerShell
- Post
File Servers – We all have them in one form or another. These servers tend to grow exponentially more critical than what we imagined when deploying them. They were also quite cumbersome to migrate until Microsoft released its Storage Migration Service. But there is one important scenario that it does not cover – consolidating multiple file servers into one.
In this tutorial we will walk through how you can avoid unsupported versions of Windows and securing the availability to your file servers by consolidating them.
Why should I consolidate my file servers?
Many businesses have multiple (and sometimes dozens) of file servers created for different reasons throughout the years. But consolidating them into one or a few servers instead makes more sense now since networking and storage are both cheaper and faster than ever before. This decreases the time spent on managing them. You may also have a few file servers that is nearly empty since many companies utilize services like OneDrive and SharePoint for user data.
Also, by migrating them to a clustered file server you can secure availability and utilize functions like Cluster-Aware Updating to automate patching without our users even noticing it.
Now let’s get started!
Prerequisites
In this article you will learn how to consolidate file servers. But keep in mind that your environment is unique and proceed with caution. What shares and folders you want to migrate is up to you!
With that said there are a few prerequisites:
- Two or more file servers to consolidate (source servers). This has been tested on Windows Server 2008 and upwards but might work for older versions.
- One or more file servers with Windows Server 2019 to consolidate to (destination server) – preferably a cluster
- One Windows 10 PC with Powershell 5.1 and Microsoft Excel installed
- Administrator rights on both source and destination servers
Keep in mind that the specs of the new file server must be able to handle the load of the servers it replaces – combined!
Gathering information
The most important part of a successful consolidation is to have the right information at hand. You can gather these manually – while not preferred cause it is prone to typos and other errors it works.
But this is on how to consolidate with PowerShell – And since it’s hard to get your experience and knowledge into a script we will use a semi-automatic method instead. Starting out by installing ImportExcel collecting information about the shares on our source servers with PowerShell.
Installing ImportExcel
ImportExcel is a PowerShell module that can both import and export excel data. It is a perfect tool to have when gathering information that needs some manual processing. Launch PowerShell as an administrator on your PC and type the following to install the PowerShell module:
Collect information about the file shares
Launch Powershell as an administrator on your PC that has admin permissions on the source servers and type:
# Replace fs01.contoso.com with the name of one of your source servers
$ComputerName = "fs01.contoso.com"
# Fetch shares through WMI on the remote computer
$Shares = Get-WmiObject -Class Win32_Share -ComputerName $ComputerName
# Filter default shares with a case-sensetive regex ('^(ADMIN|IPC|PRINT|[A-Z])\\$')
$Shares | ? {$_.Name -cnotmatch '^(ADMIN|IPC|PRINT|[A-Z])\$'} | Select Name,Path,Description
You will be presented with an output of all the shares that are configured on the source server.
Now, doing this for every source server is not viable in many cases, so let’s create something better that fetches shares from all source servers and outputs it to Excel with the ImportExcel module:
# List of source servers
$SourceServers = @(
'fs01.contoso.com',
'fs02.contoso.com',
'fs03.contoso.com'
)
# Foreach of the source servers
$ToExcel = foreach($ComputerName in $SourceServers){
# Fetch shares with WMI
$Shares = Get-WmiObject -Class Win32_Share -ComputerName $ComputerName
# Filter out unwanted shares
$Filtered = $Shares | ? {$_.Name -cnotmatch '^(ADMIN|IPC|PRINT|[A-Z])\\$'}
# Output it with UNC (Combined $Computername+Name),Path,Description and for future use "Category", "MigrateSubFolders"
$Filtered | Select PSComputerName,Path,@{Name="UNC";Expression={"\\$ComputerName\\$($_.Name)"}},Description,"Category","MigrateSubFolders"
}
# Output to excel
$ToExcel | Export-Excel -Path C:\temp\Shares.xlsx -AutoSize -TableName shares -ClearSheet
Open up the excel you just created in C:\temp\Shares.xlsx. It will present you with an output that may look something like this:
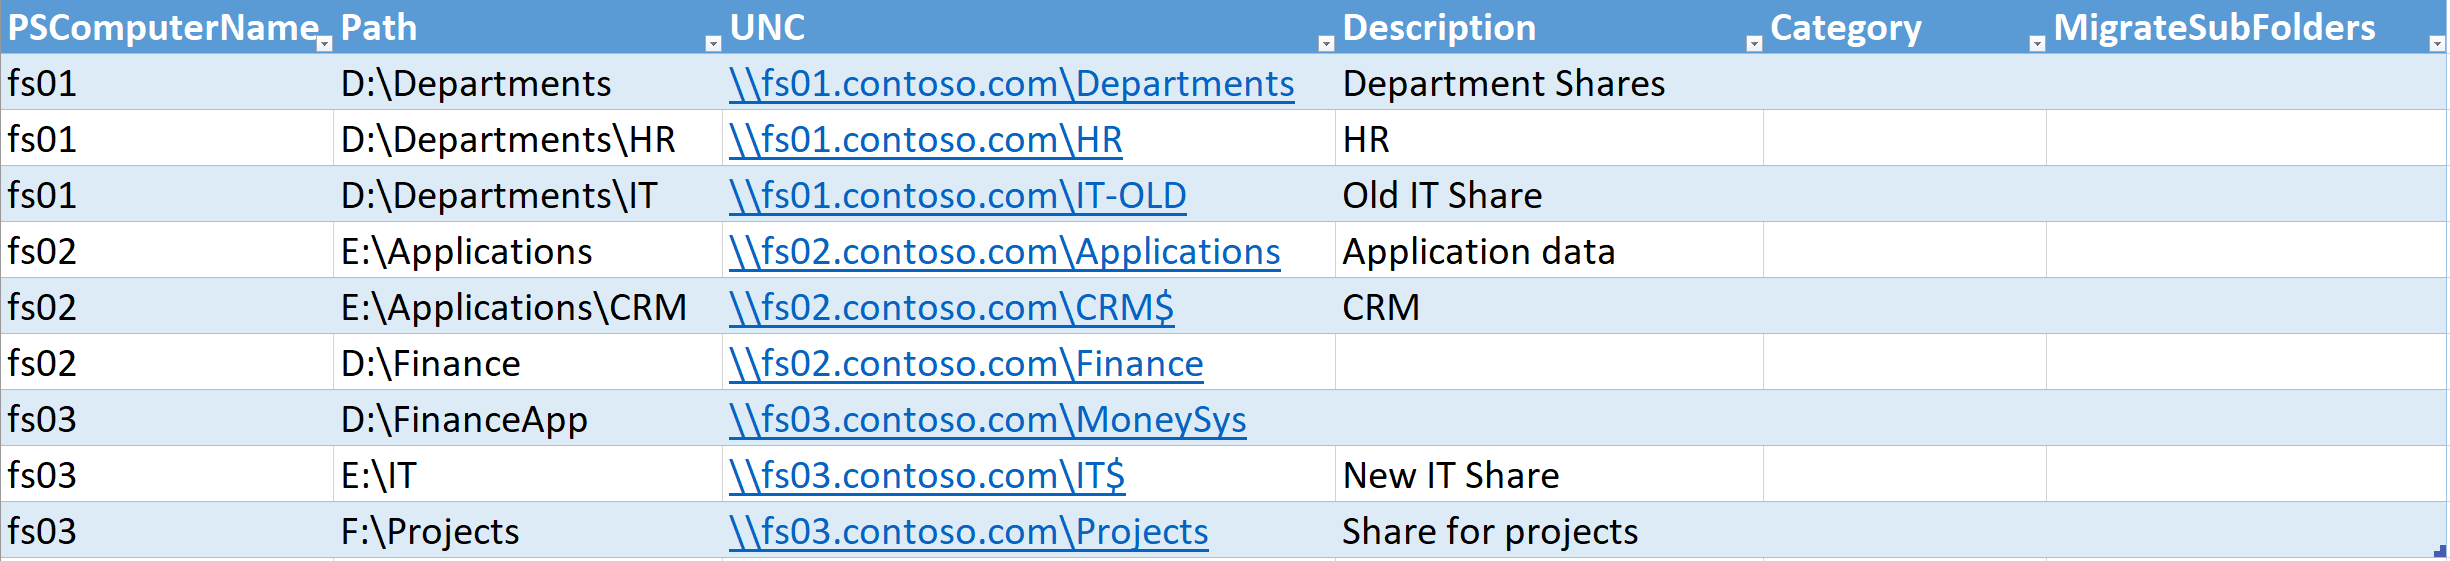
Read carefully and you might notice a few different things with the example above:
- The \\fs01….\Departments appears to be a Share with one folder for each department
- The HR and IT share on fs01 is shared from the Departments share folder
- fs02 has the CRM directly shared even though it resides in E:\Applications that is shared as \\fs02…\Applications
- \\fs02…\Finance appears to be a department share
And so on – a migration based on this data would not be pretty at all. It also seems like we would migrate the old IT share that is not in use.
This highlights how important it is to do research and a bit of manual touch up before we do anything further.
You need to create a new share on the destination server for every category you set with the same name.
Cleaning up the data
Let us do a bit of manual cleanup and classifying the data by entering a category in the Category column. Start out by removing the “shares that is in a share”:
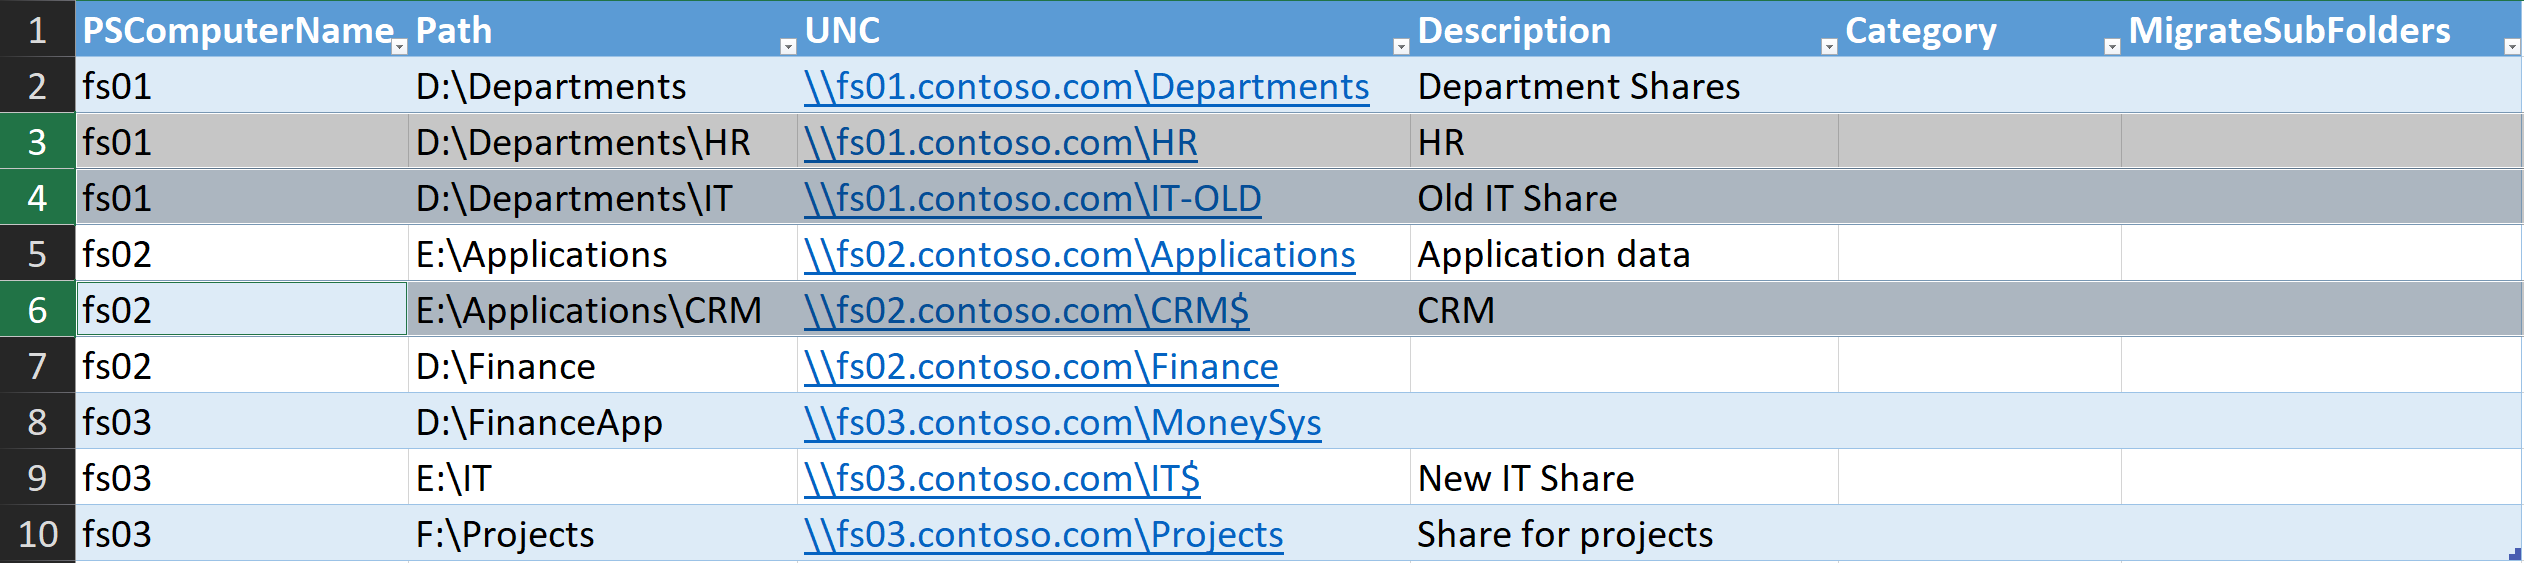
After that you apply a category of your choice in the “Category” column:

The “Category” column will decide what share it will be copied to on the destination server. i.e. \\fs10.contoso.com\AppData\
Finally, you mark the shares that you want to migrate the subfolders of instead of a 1:1 of the share itself. You do this by entering “Yes” in the MigrateSubFolders column:

Migrating subfolders instead of the whole folder itself is helpful when migrating together several different shares with the same category of data. Since you might have shares for different departments spread out on several servers due to size and other limitations.
Now that you have some up-to-date information we will save and close Shares.xlsx and generate one last spreadsheet that we can use for our PowerShell+RoboCopy function later on.
Generating the migration spreadsheet
A good migration spreadsheet is the core of a well-performed consolidation. This will be the basis when organizing and communicating with different parts of the organization about the consolidation. It is also here that you will find and remediate duplicates, old shares, and so on.
The script that creates the *Migration.xlsx-*file will have to do the following things:
- Read the cleaned-up Shares.xlsx
- Read subfolders of shares with MigrateSubFolders
- Create a destination path consisting of the destination server, category and share name
- Output at least source path and destination path to an Excel sheet.
You can start out by reading the Shares.xlsx that we created earlier with PowerShell as an Admin:
You will now loop through them one by one and either create output based on the data of the excel or perform Get-ChildItem if the MigrateSubFolders property is set to "Yes":
# Name of the new server
$DestinationServer = "fs10.contoso.com"
# Step through all rows
$MigrationList = Foreach($Row in $ExcelData){
# Get all sub directories if MigrateSubFolders = Yes
# Create an array of objects with source and Share Name
if($Row.MigrateSubFolders -eq 'Yes'){
$SubFolders = Get-ChildItem -Path $Row.UNC -Directory
$ShareNames = $SubFolders | Foreach {
[PSCustomObject]@{
Source = $_.FullName
ShareName = $_.Name
}
}
}
# If it's a 1:1 - Just create $ShareNames with 1 object
else{
$ShareNames = [PSCustomObject]@{
Source = $Row.UNC
ShareName = $($Row.UNC -split "\\")[-1]
}
}
# Output Source, Destination and a few extra properties that we want in our excel sheet as columns
$ShareNames | Foreach {
$Destination = @("\\$DestinationServer",$Row.Category,$_.ShareName) -join "\"
[PSCustomObject]@{
Source = $_.Source
Destination = $Destination
Migrate = "Yes"
Comment = ""
}
}
}
$MigrationList
Running the code above will generate an output that looks like to this:
Source Destination Migrate Comment
------ ----------- ------- -------
\\fs01\Departments\\Facilities \\fs10.contoso.com\Departments\Facilities Yes
\\fs01\Departments\\IT \\fs10.contoso.com\Departments\IT Yes
...
...
\\fs03\FinanceApp \\fs10.contoso.com\AppData\FinanceApp Yes
Note how we use the Category column from the previous spreadsheet to determine the destination path. Next up, let us export this to excel so that we can perform the last – but most crucial cleanup:
$MigrationList | Export-Excel -Path C:\some\folder\Migration.xlsx -AutoSize -TableName MigrationList
This will output the contents of $MigrationList into C:\some\folder\Migration.xlsx.
Now upon opening the Migration.xlsx file with Excel and taking a further look you discover that we have a lot of duplicates:
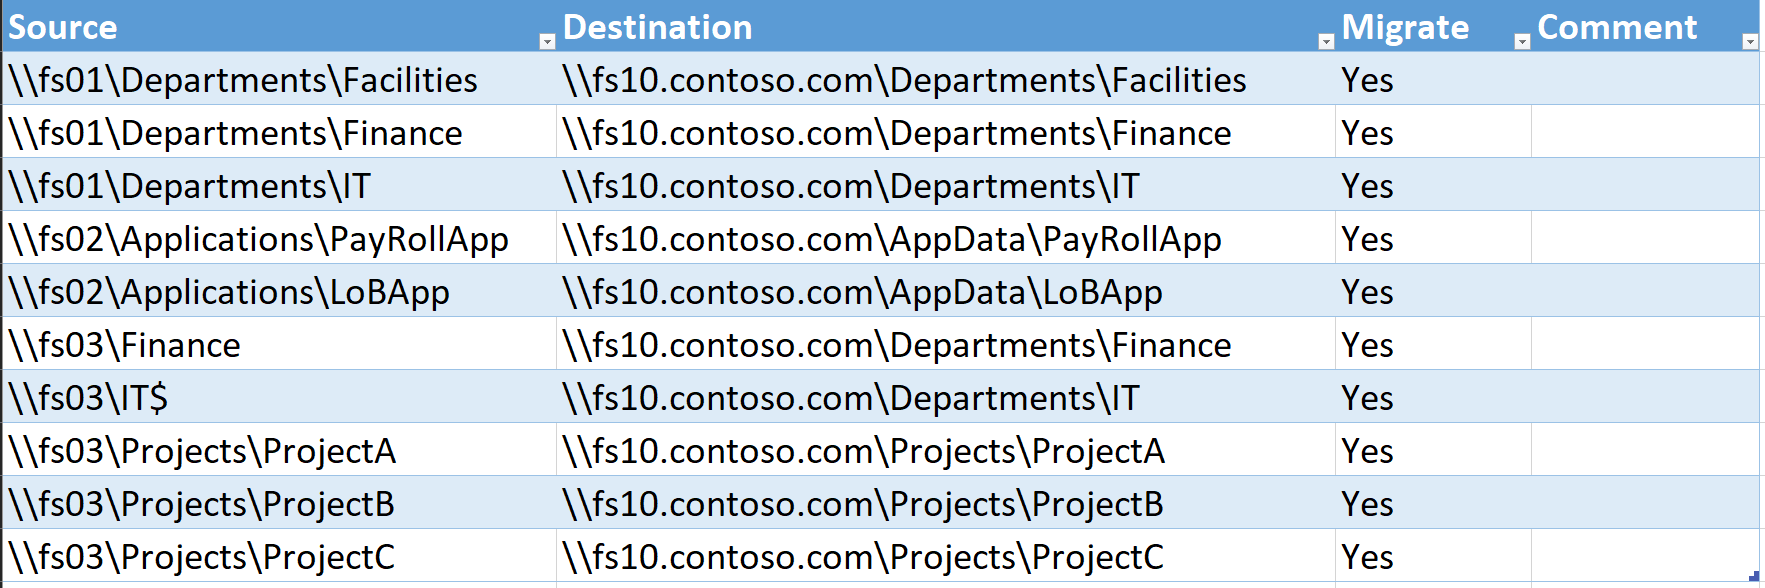
This is not unusual – This could be because of two folders having the same name by coincidence or that the old data have not yet been removed. You can however make this a bit easier and mark them as duplicates before exporting them to excel. Close the excel file and enter this into the PowerShell window that you previously used:
$MigrationList = $MigrationList | Group-Object Destination | Foreach {
if($_.Count -gt 1){
$_.Group | Foreach {
$_.Migrate = "No"
$_.Comment = "Has duplicates!"
$_
}
}
else {
$_.Group
}
} | Sort Destination
$MigrationList | Export-Excel -Path C:\some\folder\Migration.xlsx -AutoSize -TableName MigrationList
This uses the PowerShell cmdlet Group-Object to group together objects by the “Destination” property and thus detecting duplicates. We then set Migrate to no and comments that this row has duplicates. It is an easy and quick way of detecting duplicates and makes your life a lot easier when dealing with tens or even thousands of folders.
You now have a spreadsheet that is easier to sort through that looks something like this:

It is highly recommended that you go through all of the shares since it’s not uncommon to find unused shares, duplicates, and similar as seen in the example below. This can reduce the amount of data that needs to be transferred by terabytes!
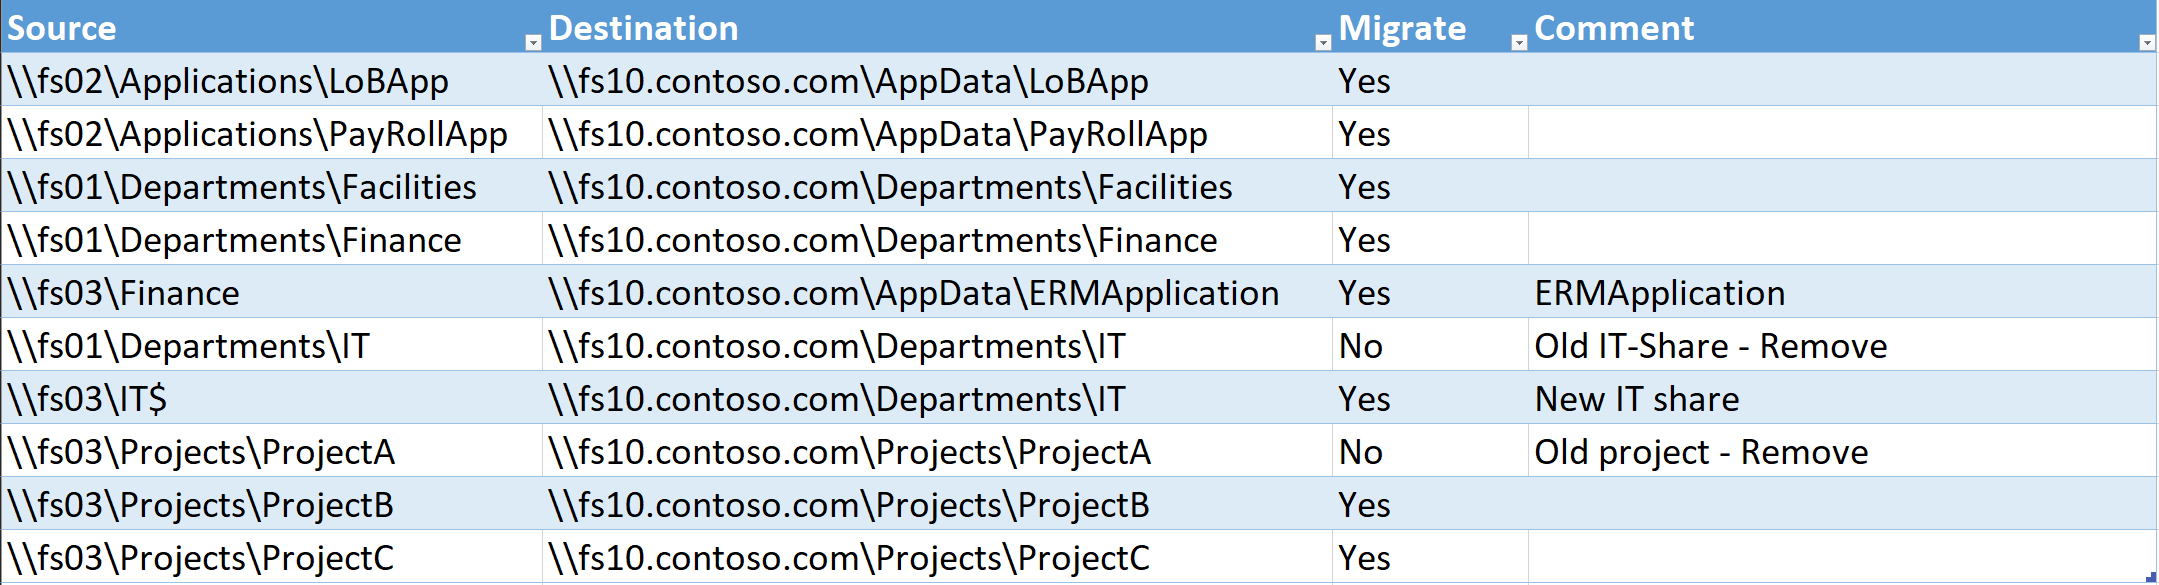
You now got an excellent foundation to base this data migration and file server consolidation on. Save and close the Excel so that you can export this to a CSV and start transferring the data
Exporting to CSV
Now that you have all the information that you need to start the data transfer you need to export the spreadsheet to a CSV file. This is because you want to be able to read it on the destination server without having to install Excel.
You can do this on the computer that you created the Migration.xslx spreadsheet on by entering the following command into PowerShell:
This will read the
Migration.xlsx
spreadsheet with theImport-Excelcmdlet and export it to Migration.csv by usingExport-CSV. Transfer the CSV to the destination server - In this example, we transferred it to
C:\Temp\Migration.csv
on the migration server. You now have all the information needed for our PowerShell function to transfer the data. Now let us RDP to the destination server to find out how to transfer the file shares!
Robocopy
To transfer the data your PowerShell script is going to use 2 major components:
- RoboCopy
- The migration.csv file
Have a look at RoboCopy - the most important command that you're going to utilize first.
The RoboCopy command
The command below is similar to what you are going to use if you transfer your file shares according to this article.
The command above will:
- Copy the source directory \\fs01.contoso.com\Some\Share to \\fs10.contoso.com\Some\Share
/mirwill mirror the source directory to the destination directory – all files in the destination that does not match or exist in the source directory will be removed/replaced./secWill copy all file permissions./ZBStarts file transfers in restartable mode – if not successful it will transfer them in backup mode (slower)/MT:64Will instruct robocopy to transfer the files with 64 concurrent threads/Ecopies subdirectories including empty ones/R:1Will retry file transfer once if it fails/W:1Will wait for 1 second between retries/unilog:"<path">will output a log in unicode format to <path>
These parameters might need to be adjusted depending on the hardware of your destination server. Now let us get started on the PowerShell function that will start robocopy for us!
Creating a script
The simplest approach to transfer all shares would be to useForeach-Objecton the CSV file that you transferred to the server earlier and for each loop launch RoboCopy. This is basically the method we are going to use but with a bit more finesse so that you can transfer multiple shares at once without slowing the transfer speeds down. The function that you're are going to use in this article is calledStart-FileShareMigrationJob- It's included below and you are going to get the main parts explained in detail.
The function parameters
Start out by looking at the parameters:
As you can see the-Sourceand-Destinationparameters have the parameter optionValueFromPipeLineByPropertyNameset. That means that you can pipe an object to it that has the
Source
and
Destination
properties. You can even pipe an array of objects (as in the whole migration.csv) that contains those properties and it will loop through them as long as theBegin{},Process{}andEnd{}blocks are present. you also have a few parameters that you might recognize from when looking at the RoboCopy parameters earlier. In fact - all parameters here will be used as arguments to start robocopy.
The Begin block
Now have a look at the Begin{} block:
This will fetch the start time of the job, create a Session Id and set the out path for our logs to
C:\Temp\logs\<sessionId>
- We use sessionId so that we can separate different runs since you can use this function to fetch the "delta" since it will only copy files that have changed.

It also contains a small internal Write-Log function to make it easier to write logs.
The process block
The main part of the function is the process block that is shown below:
Process {
Write-Log "Starting robocopy session for $Source -> $Destination"
if($PSCmdlet.ShouldProcess("$Source -> $Destination","STARTING JOB $JobId;Source=$Source;Destination=$DESTINATION;")){
$ShareName = $Destination -split "\\" | Select -Last 1
$LogPath = "$BaseLogDir\$ShareName-$JobId.txt"
$Arguments = "`"$Source`"","`"$Destination`"","/MIR","/ZB","/SEC","/MT:$NumberOfThreads","/E","/R:$Retries","/W:$WaitTime","/unilog:`"$LogPath`""
$Job = [PSCustomObject]@{
JobId = $JobId
SessionId = $SessionId
Source = $Source
Destination = $Destination
Process = Start-Process C:\windows\system32\Robocopy.exe -ArgumentList $Arguments -PassThru -WindowStyle Hidden
}
$Jobs+= $Job
$Job
$JobId++
While(($Jobs | ? {!$_.Process.HasExited} | Measure).count -ge $NumberOfJobs){
if($n -eq 1){
Write-Verbose "Waiting for jobs"
}
if($n -ge 10){
$n = 0
}
$n++
Start-Sleep 1
}
}
}
The process block acts like a Foreach-loop when an array of objects is piped in if the function has parameters that have the ValueFromPipeLine or ValueFromPipeLineByPropertyName option set. You can read more about creating pipeline-supporting functions here.
For each loop it builds an array of arguments with source and destination paths, and also the other RoboCopy commands that we described earlier. It then executes it with the arguments and stores the process information in an array.
You can then see how many of the RoboCopy processes that are currently running by looking at $Jobs.Process.HasExited.
If the number of running Robocopy processes is greater or equal to the -NumberOfJobs parameter (By default 5) it will sleep for one second and check again. This will ensure that you do not have too many robocopy transfers running at once. And now for the last part of the script – the End block.
The End block
The End block in this function is just used for waiting for the RoboCopy processes to finish
It will loop as long as the amount of running robocopy processes that have not exited is greater than 0.
The complete function
Below you will find the complete function that you will use to start robocopy
Function Start-FileShareMigrationJob {
[cmdletbinding(SupportsShouldProcess)]
param(
# Source path to copy
[parameter(Mandatory,ValueFromPipelineByPropertyName)]
[string]$Source,
# Destination path to copy to
[parameter(Mandatory,ValueFromPipelineByPropertyName)]
[string]$Destination,
# Number of concurrent jobs
[int]$NumberOfJobs = 5,
# Number of threads allowed for every job
[int]$NumberOfThreads = 64,
# Number of retries
[int]$Retries = 1,
# Time to wait between retries
[int]$WaitTime = 1,
# Maximum number of robocopy jobs at the same time
[int]$MaxConcurrentTransfers = 5
)
Begin {
# For logging purposes
$StartTime = Get-Date -Format "yyyy-MM-dd HH:mm:ss"
# To keep track of multiple transfer sessions
$SessionId = (get-date -Format "yyyyMMdd_HHmmss")
$JobId = 1
Write-Verbose "SessionId is $SessionId"
# Directory to log to
$BaseLogDir = "C:\temp\logs\$SessionId"
mkdir -Force $BaseLogDir | Out-Null
$ScriptLogPath = "$BaseLogDir\\Script.txt"
# Function for writing logs
Function Write-Log($Message,$JobId) {
$Date = Get-Date -format o
$Out = "$Date,MAIN,$SessionId,$Message"
Write-Verbose $Out
Add-Content -Path $ScriptLogPath -Value $Out
}
$Jobs = @()
}
Process {
Write-Log "Starting robocopy session for $Source -> $Destination"
# Utilizing ShouldProcess that makes it possible to test the command with the -WhatIf parameter
if($PSCmdlet.ShouldProcess("$Source -> $Destination","STARTING JOB $JobId;Source=$Source;Destination=$DESTINATION;")){
# Extract the share name
$ShareName = $Destination -split "\\" | Select -Last 1
$LogPath = "$BaseLogDir\$ShareName-$JobId.txt"
# Create a list of arguments used to start robocopy
$Arguments = "`"$Source`"","`"$Destination`"","/MIR","/ZB","/SEC","/MT:$NumberOfThreads","/E","/R:$Retries","/W:$WaitTime","/unilog:`"$LogPath`""
# Create a PSObject containing information about the robocopy transfer and the RoboCopy process object
$Job = [PSCustomObject]@{
JobId = $JobId
SessionId = $SessionId
Source = $Source
Destination = $Destination
Process = Start-Process C:\windows\system32\Robocopy.exe -ArgumentList $Arguments -PassThru -WindowStyle Hidden
}
# Add the object above to the $Jobs var and print it out
$Jobs+= $Job
$Job
$JobId++
# If number of running robocopy.exe processes is greater or equal to $NumberOfJobs - Wait
While(($Jobs | ? {!$_.Process.HasExited} | Measure).count -ge $NumberOfJobs){
if($n -eq 1){
Write-Verbose "Waiting for jobs"
}
if($n -ge 10){
$n = 0
}
$n++
Start-Sleep 1
}
}
}
End {
# Wait for all jobs to finish and print "waiting for jobs" every 20 sec
$n = 1
While(($Jobs | ? {!$_.Process.HasExited} | Measure).count -gt 0){
if($n -eq 1){
Write-Verbose "Waiting for jobs"
}
$n++
if($n -ge 20){
$n = 1
}
Start-sleep 1
}
$EndTime = Get-Date -Format "yyyy-MM-dd HH:mm:ss"
Write-Log "Start:$StartTime End:$EndTime"
}
}
Now that you have the function use it and your Migration.csv to start a file transfer.
Transferring the files
On the destination server – launch PowerShell as an administrator and paste the function above into it and import the CSV into a variable by entering:
Let's check out the $MigrationList variable:

All that is left now is to start the file transfer by piping it to Start-FileShareMigrationJob:

You can see here that PowerShell outputs different jobs.

The robocopy logs can be found in the
C:\temp\logs\yyyyMMdd_HHmmss
folder.
Selecting what to transfer
For some scenarios you might want to just perform a transfer for a certain server. This is easily achieved by using Where-Object:
You can also split it up into multiple CSVs and so on depending on what fits your use case.
The cut-over
Now after waiting for a (usually) long time the migration finishes it is recommended that you perform these transfers regularly until it is time for the cutover. These usually take only a few minutes.

The cut-over can be performed in a few different ways. But the best method if you do not have DFS in place is to set the source servers in read-only share permissions and perform one last sync using the method described in this article.

Then shut the source servers down and change everything that points towards the old source servers to the new destination servers. This is error-prone and will result in a lot of downtime if the settings are not centrally managed.

If you use DFS for everything then the approach is a lot simpler.
- Begin by setting the DFS TTL to a few minutes instead of 30-60 minutes.
- At the same time add a disabled link to the share paths.
- When those setting has propagated – set the source server shares in read-only.
- Run
$MigrationList | Start-FileShareMigrationone last time. - If you see any file lock errors in the logs that reside in C:\temp\logs\yyyyMMdd_HHmmss – Restart the source server and run the step above one more time.
- Enable the DFS links pointing to the destination server and disable the old one.
- Shut down the old source servers.
When you see that your users and applications are up and running towards the new server - set the DFS TTL back to normal.
Note that it is the share’s permission and not the NTFS permissions! Changing the NTFS permissions for all shares will mess up the last synchronization and will result in a lot of downtime.
Conclusion
You have now learned how to consolidate multiple file servers. While it demands a lot more work the base concept of performing a consolidation of multiple servers vs a 1:1 migration is the same. The success of the consolidation resides in the work that is put into the investigation beforehand and at the cut-over rather than in the file transfer itself. So the advice is to be careful and meticulous when sorting through and organizing the file shares beforehand. And also since you are using excel it is easy to share with colleagues!
Related Article: