Create and Configure a File Share using Azure Files
Transferring files between virtual machines in Azure, or between an on premise server and a virtual machine (VM) in the cloud, has been a bit of a hassle up until now. But that’s all about to end with Azure Files, a new service from Microsoft that’s now in preview. In this article, I’ll show you how to create and connect to a file share in the cloud with Azure Files.
What is Azure Files?
Azure Files lets administrators create standard Server Message Block (SMB) file shares, which is the type of file shares that would be created if you set up a shared folder on Windows Server in the cloud without provisioning a file server running in a virtual machine.
This allows organizations to port applications that rely on connecting to an SMB file share more easily to the cloud, and transfer files between VMs or on-site devices. Azure Files currently works on SMB 2.1, but there are plans to upgrade it to SMB 3.0 in the future. The Azure Files feature is billed according to file sizes, as opposed to bytes written in the case of Azure Blobs.
How to Create a File Share
Because Azure Files is currently in preview, you’ll need to sign up and activate Azure Files to access this feature. You can add the feature to a current Azure subscription. Once the feature has been activated, you will receive a confirmation email from Microsoft. This could take a few days as the preview is being phased out gradually.
Create a New Storage Account
Once activated, Azure Files is only enabled for new storage accounts, so even if you have an already existing storage account associated with your subscription, you will need to create a new one as follows:
- Sign in to the Azure Preview Portal.
- In the bottom left corner of the portal, click NEW.
- In the panel that slides in from the left, click Storage.
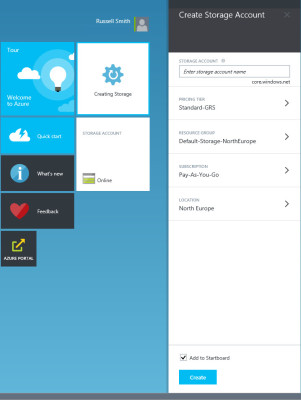
- In the Create Storage Account panel, type a name for the new account in the STORAGE ACCOUNT box. If the name is available, a green smiley will appear in the right of the box.
Create a new storage account in Azure (Image: Russell Smith)
Make sure that the LOCATION field on the Create Storage Account panel is set to the same location as where the VMs are located from which you would like to access file shares.
- If you need to change the location of the storage account, click LOCATION on the Create Storage Account panel, select the new location and click Select.
- To complete the creation of the new storage account, click Create on the Create Storage Account panel.
After a few minutes, the new storage account will appear in a tile on the portal start page. While we are in the portal, let’s get the management key for the new storage account.
- Click the tile for the new storage account on the portal start screen.
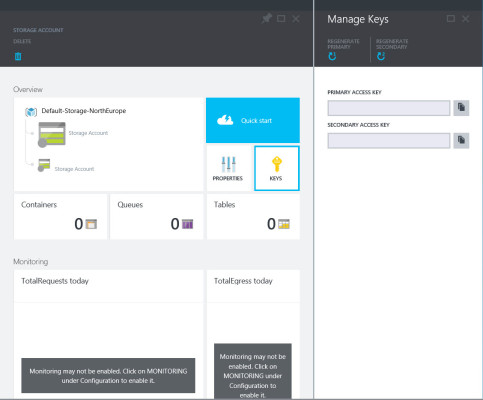
- Two new panels will pop up to the right. Click the KEYS tile in the STORAGE ACCOUNT panel.
- In the Manage Keys panel, click the clipboard icon to the right of the PRIMARY ACCESS KEY.
Getting the management key for a storage account in Azure. (Image: Russell Smith)
Make a note of this key by pasting it into a convenient place. You’ll need it later.
PowerShell and Windows Azure Storage Tools
Now we have a new storage account with the Azure Files feature enabled, we can create a file share. But before proceeding, make sure that you have the PowerShell tools for Azure configured on your management workstation. For more information on setting up PowerShell tools for Azure, see “Setup Windows Azure PowerShell Management” on the Petri IT Knowledgebase. Also, make sure to install the Windows Azure Storage Tools as part of this process using the Web Platform Installer.
In addition to the Windows Azure Storage Tools and PowerShell tools for Azure, you will need to install the Azure Files tools separately, as they are not currently included in either of the above packages while the feature is in preview. The following steps describe how to install the Azure Files tools:
- Download the Azure Files tools.
- Right click the downloaded zip file and select Properties from the menu.
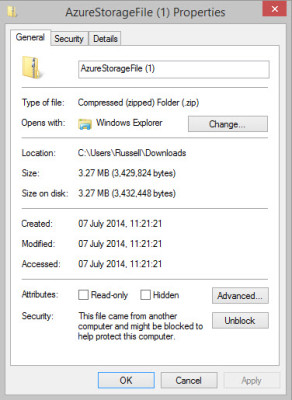
- Click Unblock in the Security section at the bottom of the Properties dialog and then click OK.
- Right click the downloaded zip file again and click Extract All from the menu.
- In the Extract Compressed (Zipped) Folders dialog, click Extract and a new window will open showing the extracted files. If the default located for the extracted files is not convenient, you can click Browse to change the location or move them at a later time.
Unblock security before unzipping the Azure Storage Files download. (Image: Russell Smith)
Create a New File Share
Let’s start PowerShell and create a new file share. Before following the instructions below, you need to set up the PowerShell tools for Azure, making sure they are connected to your subscription.
- Press the WINDOWS key to switch to the Start screen, type powershell and make sure that Windows PowerShell is selected in the search results. Press CTRL+SHIFT+ENTER to start PowerShell, entering an administrator username and password, or giving consent if prompted.
- Before we can import the Azure Files module, we need to change the working directory in the PowerShell command prompt to the folder where we unzipped the download in the previous steps, so that PowerShell can find the necessary files. The easiest way to do this is using the change directory (cd) command by typing cd “c:AzureStorageFiles” and pressing ENTER. In the preceding command line, you should replace “c:AzureStorageFiles” with the path to the extracted files on your PC.
- Now we have the right working directory set in PowerShell, type import-module .AzureStorageFile.psd1 and press ENTER to import the Azure Files module.
- To set the storage account, type $ctx=New-AzureStorageContext <StorageAcc> <Key> and press ENTER, replacing <StorageAcc> with the name of the storage account we created earlier in this article, and <Key> with the long management key that we copied out of the management portal.
- To create a share, type New-AzureStorageShare myfiles2 -Context $ctx and press ENTER, replacing myfiles2 with the name for your new share.
In a few seconds, you should see a message in the PowerShell console showing the URL of the storage account, and the name and last modified date of the new file share.
PowerShell console displaying storage account URL. (Image Russell Smith)
Connect to a File Share from a VM in the Cloud
You can now connect to the file share from any VM located in the same region as the storage account. To connect to the file share, use any method that you would normally use to connect to an SMB file share in Windows. In this example, I’ll show you how to connect using the net use command.
- Start a virtual machine that’s located in the same region as the storage account we created in this article, and connect to the VM using Remote Desktop.
- Log on to the VM.
- In the virtual machine, switch to the Start screen, type cmd, make sure that Command Prompt is displayed in the search results and press ENTER.
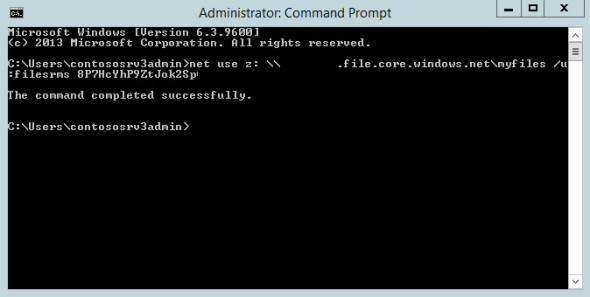
- In the command prompt window, type net use z: \filesrms.file.core.windows.netmyfiles2 /u:<StorageAcc> <Key> and press ENTER.
Map a drive with net use. (Image: Russell Smith)
You need to replace <StorageAcc> with the name of the storage account we created earlier, <Key> with the long management key that we copied out of the management portal, and \filesrms.file.core.windows.netmyfiles2 with the URL to your file share, which can be derived by adding the name of the share to the URL for your storage account, which was displayed in PowerShell after the file share was created.
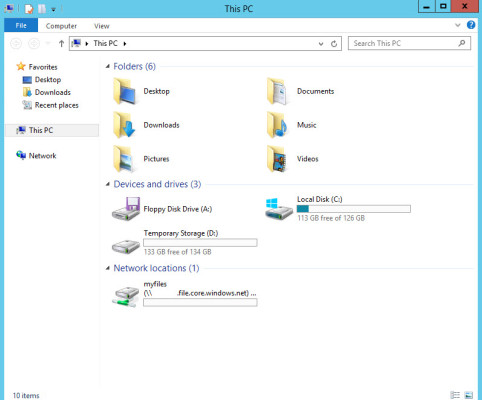
- Press WINDOWS + E to open File Explorer and you should now see a new drive with the letter name Z mapped to your file share.
The mapped drive in File Explorer. (Image: Russell Smith)
Transfer Files from a Physical On-Site Device
The easiest way to upload files to Azure is to use the AZCopy tool, which is part of the Windows Azure Storage Tools, and can be downloaded using Microsoft’s Web Platform Installer.
- Type cd “C:Program Files (x86)Microsoft SDKsWindows AzureAzCopy” and press ENTER in the command prompt to change the working directory.
- Type AzCopy “C:LocalFolder” https://mystorageacc.file.core.windows.net/myfiles2/ /DestKey:<Key> /s and press ENTER, changing “C:LocalFolder” for the path of the folder you want to upload to your Azure Files share, https://mystorageacc.file.core.windows.net/myfiles2/ with the URL for your storage account and file share name, and <Key> with the management key for the storage account.
You should now see a progress message in the command prompt window showing you details of the requested upload.


