


Blocking Guests from Classified Office 365 Groups (and Teams)
Keeping Secrets
As I have discussed previously, some Office 365 Groups and Teams hold confidential information that you might not want to share with guest users. Using Azure Information Protection to stop guest users accessing the content of sensitive files certainly works, but it goes against the model of Office 365 Groups where all members enjoy the same access rights to all resources.
With that in mind, perhaps it’s best to stop guest users getting into sensitive groups in the first place. You can do this by blocking the ability of owners to add guests to their groups and teams at a group level. Administrators can always add guests if needed.
Groups Policy Settings
The Azure Active Directory policy for Groups defines settings for how Office 365 Groups behave in a tenant. One of those settings is AllowToAddGuests, which is True if the tenant allows guests to be members of groups, and False if you want to block guests. This policy covers all groups, unless individual groups have their own settings.
One approach to protecting sensitive groups is to assign them a special classification that we can later use as the basis for blocking guest access. A classification is a label defined in the ClassificationList setting of the Groups policy.
You can’t manage the settings in the Groups policy through a GUI. Everything is done through PowerShell.
Strictly Advisory
Group owners apply classifications as a visual sign to inform users about the sensitivity of the information contained in a group. A classification is strictly advisory. It gives users a visible clue as to the sensitivity of the information discussed in the group, but does not affect how the group works, nor does a classification protect group content or place any restriction on how that content is used. Adding or updating a new classification or removing a classification from the list does not affect classifications placed on existing groups.
Clients and Classifications
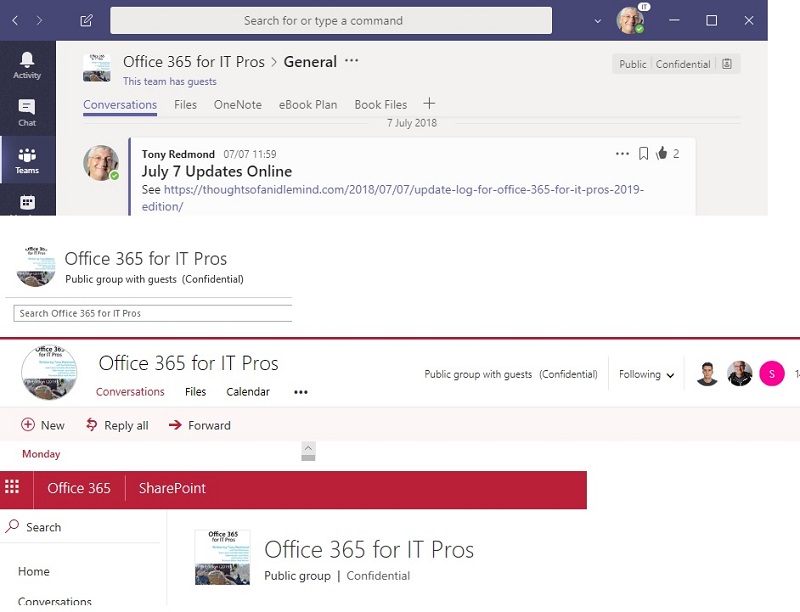
Figure 1 shows how different clients display a group’s classification, Teams shows the classification in the team name header, while Outlook and OWA show it in the conversation and files views, and SharePoint displays the classification for the group document library.
Classifications and Licenses
The Groups policy can dictate a default classification, which is assigned to new groups if the owner does not pick another classification. While defining a list of classifications in the Groups policy does not require an Azure Active Directory Premium license, defining a default classification does. This doesn’t really make sense to me, but such is the mystery surrounding Microsoft licensing decisions.
Making Sure that Groups are Classified
Default classifications are not applied when a group is created with PowerShell. It’s also possible that many groups created in 2017 before Office 365 supported group classifications remain unclassified. If so, it’s easy to apply a default classification by running the command:
Get-UnifiedGroup | ? {$_.Classification -eq $Null} | Set-UnifiedGroup -Classification "Internal Only"
This command fails if the specified classification is not in the Groups policy.
Blocking Guest Access for Selected Groups
With classifications defined and assigned to groups, we can now proceed to block access for our sensitive groups. Let’s assume that you use the “Secret” classification to mark groups (or teams) that hold sensitive information. After classifying the secret groups, we can use PowerShell to scan for and block guest access for those groups.
In this example, the first step is to create a set of groups classified as “Secret.” The code then loops through each group to discover whether group-specific policy settings are in place. If so, the code updates the settings to block guest access. Groups that don’t have a policy setting are controlled by the tenant policy, so the first step is to create policy settings for the group. We can then update the setting to block guest access.
$GroupTemplate = (Get-AzureADDirectorySettingTemplate | ? {$_.DisplayName -eq "Group.Unified.Guest"})
$Groups = (Get-UnifiedGroup -ResultSize Unlimited | Where {$_.Classification -eq "Secret"})

ForEach ($Group in $Groups) {
    $GroupSettings = Get-AzureADObjectSetting -TargetType Groups -TargetObjectId
              $Group.ExternalDirectoryObjectId
    if($GroupSettings) {
       # Policy settings already exist for the group - so update them
       $GroupSettings["AllowToAddGuests"] = $False
       Set-AzureADObjectSetting -Id $GroupSettings.Id -DirectorySetting $GroupSettings
                 -TargetObjectId $Group.ExternalDirectoryObjectId -TargetType Groups
       Write-Host "External Guest accounts prohibited for" $Group.DisplayName
    }
    Else
    {
       # Settings do not exist for the group - so create a new settings object and update
       $Settings = $GroupTemplate.CreateDirectorySetting()
       $Settings["AllowToAddGuests"] = $False
       New-AzureADObjectSetting -DirectorySetting $Settings -TargetObjectId
               $Group.ExternalDirectoryObjectId -TargetType Groups
       Write-Host "External Guest accounts blocked for"$Group.DisplayName
    }
}
The update occurs in Azure Active Directory. Synchronization to the workload directories must happen before clients learn about the new status for a group and the block is effective.
To check that the block is in place, we can create a list of the groups blocked from having guest members. To do this, run the Get-UnifiedGroup cmdlet to check the AllowAddGuests property, which is $False if the group is blocked.
For example, this command reports the display names and classification for all blocked groups. Remember that the block works for all clients that populate group membership, including Teams.
Get-UnifiedGroup | ? {$_.AllowAddGuests -eq $False } | Format-Table DisplayName, Classification
Sometimes Secrets Need to be Kept
It would be nice to live in a world where secrets are unnecessary, but that’s cloud cuckoo land. You now have two techniques to keep secrets when guests are involved with Office 365 Groups or Teams. Either block them completely from your most secret groups or protect individual files within document libraries. It’s up to you.
Follow Tony on Twitter @12Knocksinna.
Want to know more about how to manage Office 365? Find what you need to know in “Office 365 for IT Pros”, the most comprehensive eBook covering all aspects of Office 365. Available in PDF and EPUB formats (suitable for iBooks) or for Amazon Kindle.