


Windows 7 is the next generation of operating system due from Microsoft and it is now set for a planned release in the final quarter of 2009 which would be just a bit shy of the three years since the release of Windows Vista.
This segment of the article series is an overview of BitLocker Drive Encryption and BitLocker To Go.
[NOTES FROM THE FIELD] – Microsoft has now released their Release Candidate for Windows 7; I wrote a brief article Windows 7 Release Candidate (Build 7100) – Early Details on this already and at this time there is a tentative release date for Windows 7 this fall supposedly near the end of October time frame.
In my Walkthrough for BitLocker on Windows 7 article I did a walkthrough of the steps for enabling BitLocker on your Windows 7 system.
In my BitLocker To Go Walkthrough Windows 7 article I did a walkthrough of the steps of getting a removable USB drive (thumb drive) enabled with BitLocker Drive Encryption.
In this article I will do a walkthrough of the steps to leverage the BitLocker To Go secured device on legacy operating systems.
BitLocker To Go Review
Just as a quick review (and if you want to review this information in a little more depth, the articles listed above contain the information broken out in some more detail) here is a high summary review of BitLocker Drive Encryption and BitLocker To Go.
- BitLocker Drive Encryption protects portable systems such as laptops from loss of data and information when the laptops themselves are lost or stolen.
- BitLocker To Go is natively available in Windows 7 Enterprise Edition and Windows 7 Ultimate Edition at this time.
- BitLocker To Go can be used in part on USB drives and other flash card type memory.
- BitLocker To Go can be leveraged with the BitLocker To Go Reader to provide read-only access to the data from computers running Windows Server 2008, Windows Vista, Windows XP with SP3, or Windows XP with SP2.
BitLocker To Go Legacy System Walkthrough
In order to use a BitLocker To Go secured device such as a USB drive on a legacy system such Windows XP Service Pack 3 (which is what we’re using for this walk through) you’d start out the process by inserting the device in the USB slot.
Once this is done the autoplay window should render as shown below.
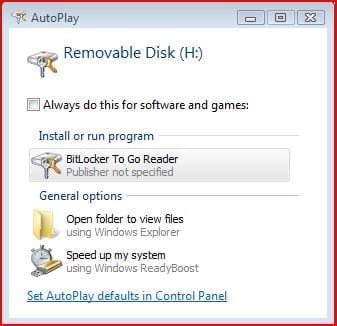
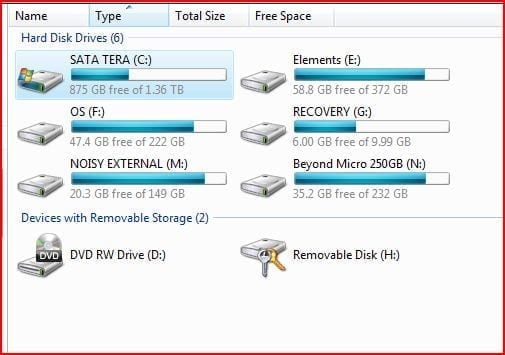
[NOTES FROM THE FIELD] – If autoplay is not enabled on your system this window will not appear and you’d need to access the drive from Windows Explorer, shown below as “Removable Disk (H:)”
In order to kick off the reader you would need to run BitLockerToGo.exe

Assuming that autorun is enabled you’ll see the option to launch the BitLocker To Go reader. Once you do that the BitLockerToGo.exe application is launched and prompts you for a password to unlock your access to the device.
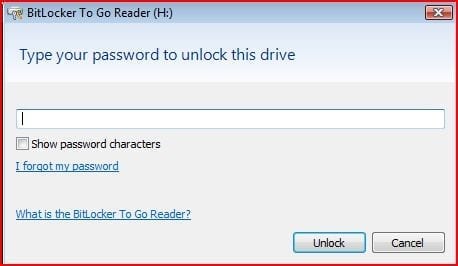
When you enter your password the reader is launched which provides you with read-only access to the data. As you can see, the reader application window looks similar to an Explorer view where files and folders can be seen.
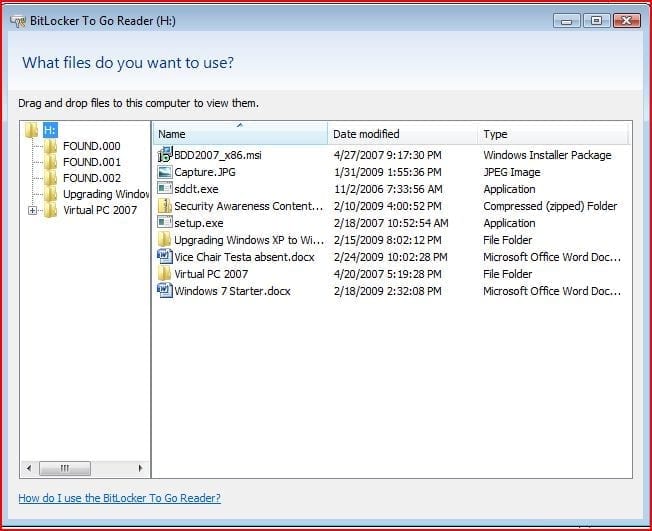
This is not the actual view in Windows Explorer but rather the application; the actual Windows Explorer view is show below.
As you can see, all that is accessible from the real Windows Explorer view is the autorun.inf file that auto launches the BitLockerToGo.exe application and the application itself; all the other data represented there is secured and cannot be accessed from this view even when the BitLockerToGo.exe application is running. The only view that will allow read only access to the data is the BitLockerToGo reader application window.
If you should need to edit anything on the secured drive you’d need to copy it from that device to a local drive of whatever system you are working from. Once you are done with your edits you will not be able to copy the edited information back to the BitLocker secured device as the entire device is set to read only access for the legacy system.
If the changes must be saved you’d need to copy them off the legacy system (a different USB key that is not BitLocker secured, network transfer, attachment to an email, etc) and then get them back to a Windows 7 system where the BitLocker secured device can be opened for read / write access and the edited data re-saved.
[NOTES FROM THE FIELD] – The advantage of this is that the reader does allow you the ability to copy off files to the local system if you need to make edits to them.
The downside of that is this activity allows for the greater possibility for human error of misplacing / losing track of the data by leaving it on the system where the edits were made, keeping it on the unsecured USB device that was used to transfer the data back to the Windows 7 system, having a copy of the information as a SENT item somewhere it may not belong when it was emailed to the author / data owner and so on.
If you shut down the BitLockerToGo reader application by closing out the view you will need to launch it again to access the data and that requires that you to re-enter the password for the device.
Another way to secure the data again is removing the device from the system; the activity of re-securing the device is automated for the user when that removal action is taken.
Those are all the steps and the outline of the limitations for accessing your BitLocker To Go secured device on a legacy system.
That’s a wrap for my BitLocker To Go Walkthrough on Legacy Systems article – I hope you found it a good investment of your time.
I am always looking forward to any feedback you have on this or any of the articles I have written so feel free to drop in some comments or contact me directly.
Additionally, I would welcome any suggestions topics of interest that you would like to see and based on demand and column space I’ll do what I can to deliver them to you.
Best of luck in your studies.