


11 Ways to Take a Screenshot on Windows Devices

Do you often look for the easiest way to take a screenshot on your PC? Screenshots can be extremely helpful if you want to share what you are seeing on your screen with others, or to keep something for reference later.
Here are ten easy-to-use ways to take a screenshot on your Windows devices.
Windows screenshot shortcuts using the keyboard
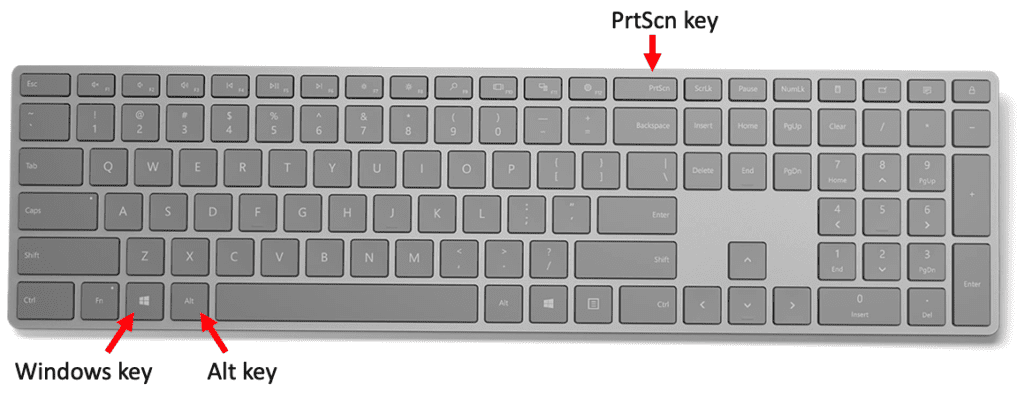
There are three main Windows screenshot shortcuts. For all of them, you’ll need to be familiar with the Print Screen key, the Windows key, and the Alt key on your keyboard.
TIP: Check out this article on Petri for more information on using keyboard shortcuts.
For those unfamiliar, the PrtScn key is usually in the upper right corner of your keyboard. The Windows key is in the lower-left corner, while the Alt key is right next to the Windows key.
Here are three different ways to take screenshots using your keyboard.
1. Print Screen
You can press the Print Screen (the PrtScn key) to capture a full-screen screenshot, including the taskbar on your screen. It will send the image automatically to the Windows clipboard. On laptops, you may have to hold the Function (Fn) key while pressing the PrtScn to capture a screenshot.
Once your screenshot is on the clipboard, you can open it with Microsoft Paint or any other image editing software to edit and save it. If you need a quick screenshot, Print Screen is a really straightforward option.
2. Win + Print Screen
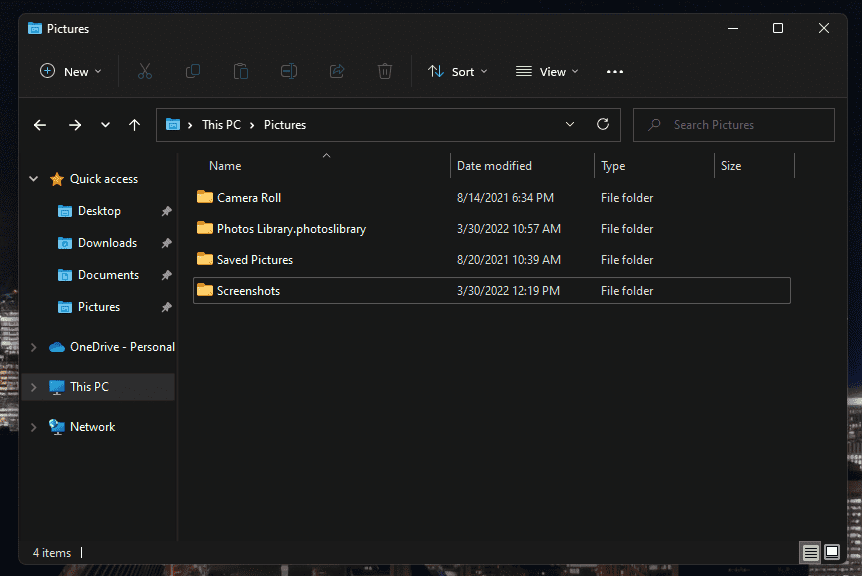
The Win + PrtScn option also captures your entire screen, the only difference is that it saves the screenshot as an image file. You can access the saved file in the subfolder ‘Screenshots’ in the Pictures folder of your PC.
3. Alt + Print Screen
The Alt + PrtScn keyboard shortcut is used for capturing a screenshot of your active window. Therefore, you should highlight the preferred window, by clicking anywhere in it, before taking the screenshot.
Just like screenshots captured by the PrtScn shortcut, using Alt + PrtScn will send the screenshot directly to the clipboard instead of saving the image as a file.
How to take a screenshot on Windows using the GUI
If you don’t want to use keyboard shortcuts, don’t worry! There are still plenty of ways to take screenshots on Windows using the GUI.
4. The new Snipping tool
Microsoft’s new Snipping Tool, previously known as Snip & Sketch, is a utility that lets you easily take screenshots of an entire screen or selected areas of an open window.
You can find the new Snipping Tool either in the list of installed apps on the Start menu or open it by pressing Win + Shift + S on your keyboard. You can also pin this tool to your taskbar for quick access.
When you click + New in the Snipping Tool, you can choose the area of the screen that you want to snip. Or if you opened the tool using the keyboard shortcut, you can go ahead and select an area straightaway.
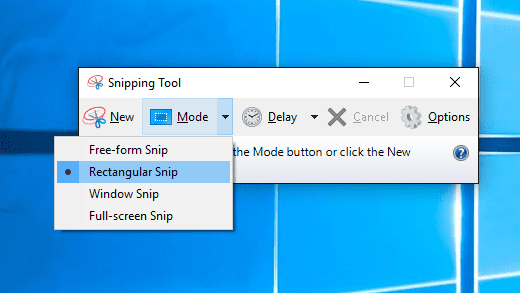
You can choose different types of snips including rectangular, freeform, window, or the full screen snip to capture the image the way you want.
The Snipping Tool also allows you to customize the captured screenshot using touch writing, the pen, highlighter, eraser, and other tools available in the top center of your screen. After customizing the screenshot, you can save it as a file.

5. The legacy Snipping Tool
The legacy Snipping Tool is a free utility for capturing screenshots on Windows 10, 8, 7, and Windows Vista. Like the modern Snipping Tool mentioned above, it can capture different types of screenshots.
To open the Snipping Tool on Windows 10 and Windows 7, go to the Start menu, type Snipping Tool in the search area, and select the tool from the list. You can also open it in Windows 10 by pressing Win + Shift + S.
On Windows 8, you can swipe in from the right corner of the screen to access the search box, type Snipping Tool, and select it from the results.
Once the Snipping Tool is open, you can choose Mode to select the type of snip. Select from free-form snip, rectangular, window, and full-screen snip. The Snipping Tool also allows you to capture a specific moment from a video or animation by setting up a one to five-second delay.
After capturing the screenshot, you can edit or annotate it by using the pen, highlighter, or eraser. Once you’re done with editing, you can save the screenshot by selecting the Save As option from the File menu, then you can choose the file format and add the file name and location. Finally, save the screenshot by clicking the Save button.
6. Xbox Game Bar
The Xbox Game Bar is an inbox app on Windows 10 and Windows 11 which allows you to take a screenshot while playing a game or using other apps. You can access the Game bar by pressing the Windows key + G.
The Game Bar will appear as an overlay, and you can press the Camera Icon from the Widget Menu to capture the screenshot or use the Win + Alt + PrtScn keyboard shortcut. Once you’re done, you can find this screenshot as a PNG file in the Capture section of the Widget Menu.

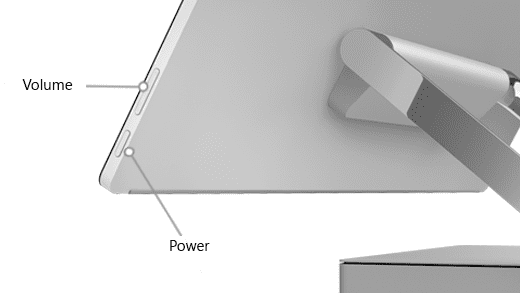
Most of Microsoft’s Surface devices allow users to take screenshots without using the keyboard. You can take screenshots on Surface devices by pressing and holding the Power button together with the Volume Up button, a key combination that many smartphones and tablets also use for taking screenshots.
While pressing these keys, the screen will first dim for a couple of seconds, then you can release the buttons to capture a screenshot. The image will be automatically saved to the Screenshots folder in the Pictures folder.
Third-party Windows applications for taking screenshots
If the methods above are not enough, some third-party apps also provide a range of features to improve the effectiveness of your screenshots. Here are some of the most interesting third-party tools.
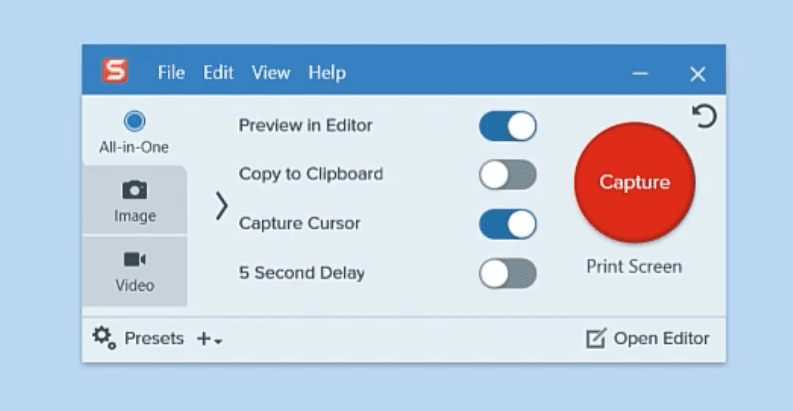
8. TechSmith SnagIt
TechSmith SnagIt is a paid app providing advanced editing options and effects when taking screenshots. After opening the app, you can use the red color Capture button to see the different options for taking a screenshot.
Three options are available: All-in-one, Image, and Video. You’ll need to choose the Image option, select the capture mode that you want to capture from the Region section, and click the Capture button to take a screenshot.
9. Greenshot
Greenshot is a free screenshot capturing tool for Windows and macOS. The app lets you quickly capture a screenshot, and it also lets you take a screenshot of an entire web page by scrolling down.
You don’t need to open Greenshot manually as the app will start running in the background by default right after installing. Different capture modes are available:
- Capture region (PrtScn Key): Click and hold down the left button on your mouse to define the area that you want to capture, then release the mouse button.
- Capture window (Alt + Print Screen): This lets you take a screenshot of an app window.
- Capture full-screen (Ctrl + PrtScn): This option allows you to capture the entire screen.
- Capture web page (Ctrl + Shift + PrtScn): You can use this when you need to capture an entire web page.

Greenshot also enables you to edit screenshots by using its image editor, and you can save the file when you’re done by choosing Screenshot Destination.
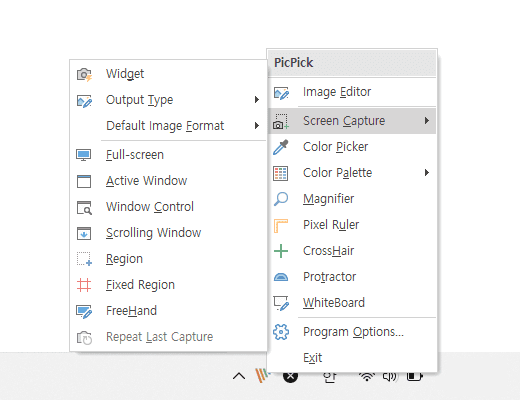
10. PicPick
Being one of the best freemium screen capture tools developed by NGWIN, PicPick encompasses a range of features including seven different capture modes, a pixel ruler to measure the size of the screenshot, image editing tools, and more.
To capture the screen with PicPick, right-click the PicPick icon and select the Screen Capture option. At this moment, you can choose your output type or capture mode from a list that includes full-screen, active window, scrolling window, region, freehand, and more.
After taking the screenshot, you can edit the image with the PicPick Editor and save, share, or upload the image anywhere you want.
ShareX is a free screenshot app widely used by gamers as it supports video captures and various workflows, along with a huge number of filters and effects to edit your screenshots.
To capture a screenshot on ShareX, open the app and select Capture, then you can choose the capture mode. The app also lets you set up a delay or choose how many scrolls of a window you want to capture. Once you’re done taking a screenshot, you can save, share, or upload it to a remote sharing service.

That’s it for these ten different ways to take a screenshot on a Windows PC, including an additional button combination if you’re using a Surface device. Taking screenshots is a great way to keep track of different things, and we hope the different options covered in this guide will help you to improve your workflow.
Related Article: